
Hello Fabric Mart friends!
So nice to say hey again! Just want to take this opportunity to wish my awesome, sweet and amazing firstborn a Happy 5th Birthday this week. It's hard to believe he's already FIVE!
Like many folks I've been spending a lot of time at home this Summer, which has translated into lots of sewing. I've often had a thoughts about sewing for the upcoming season to get maximum wear out of garments, but often seem to be playing catch up for the current season. But not this time: here are my first transitional pieces for Autumn, entirely inspired by the wonderful sweater knits I kept spying at Fabric Mart.


First up is the cardigan: Helen's Closet Blackwood Cardigan

This is the third Blackwood I've made, but the first of the shorter iteration (view B). It makes me want to sew up a 3/4 sleeve cropped version!

The fabric is a delightfully mottled abstract blot poly/lycra sweater knit. Unfortunately, it's sold out at the site now but you can find many alternatives here. I was really pleased with how this washed up and can see this piece as a staple in my wardrobe for seasons to come.

I made a size 12 which is consistent with my measurements on the size chart and I'm pleased with the relaxed fitting results. The only alteration I made was to shorten the sleeves 3". They are purposely long in this pattern and designed to scrunch around the wrist, but I like a little less play in my cardigan sleeves.

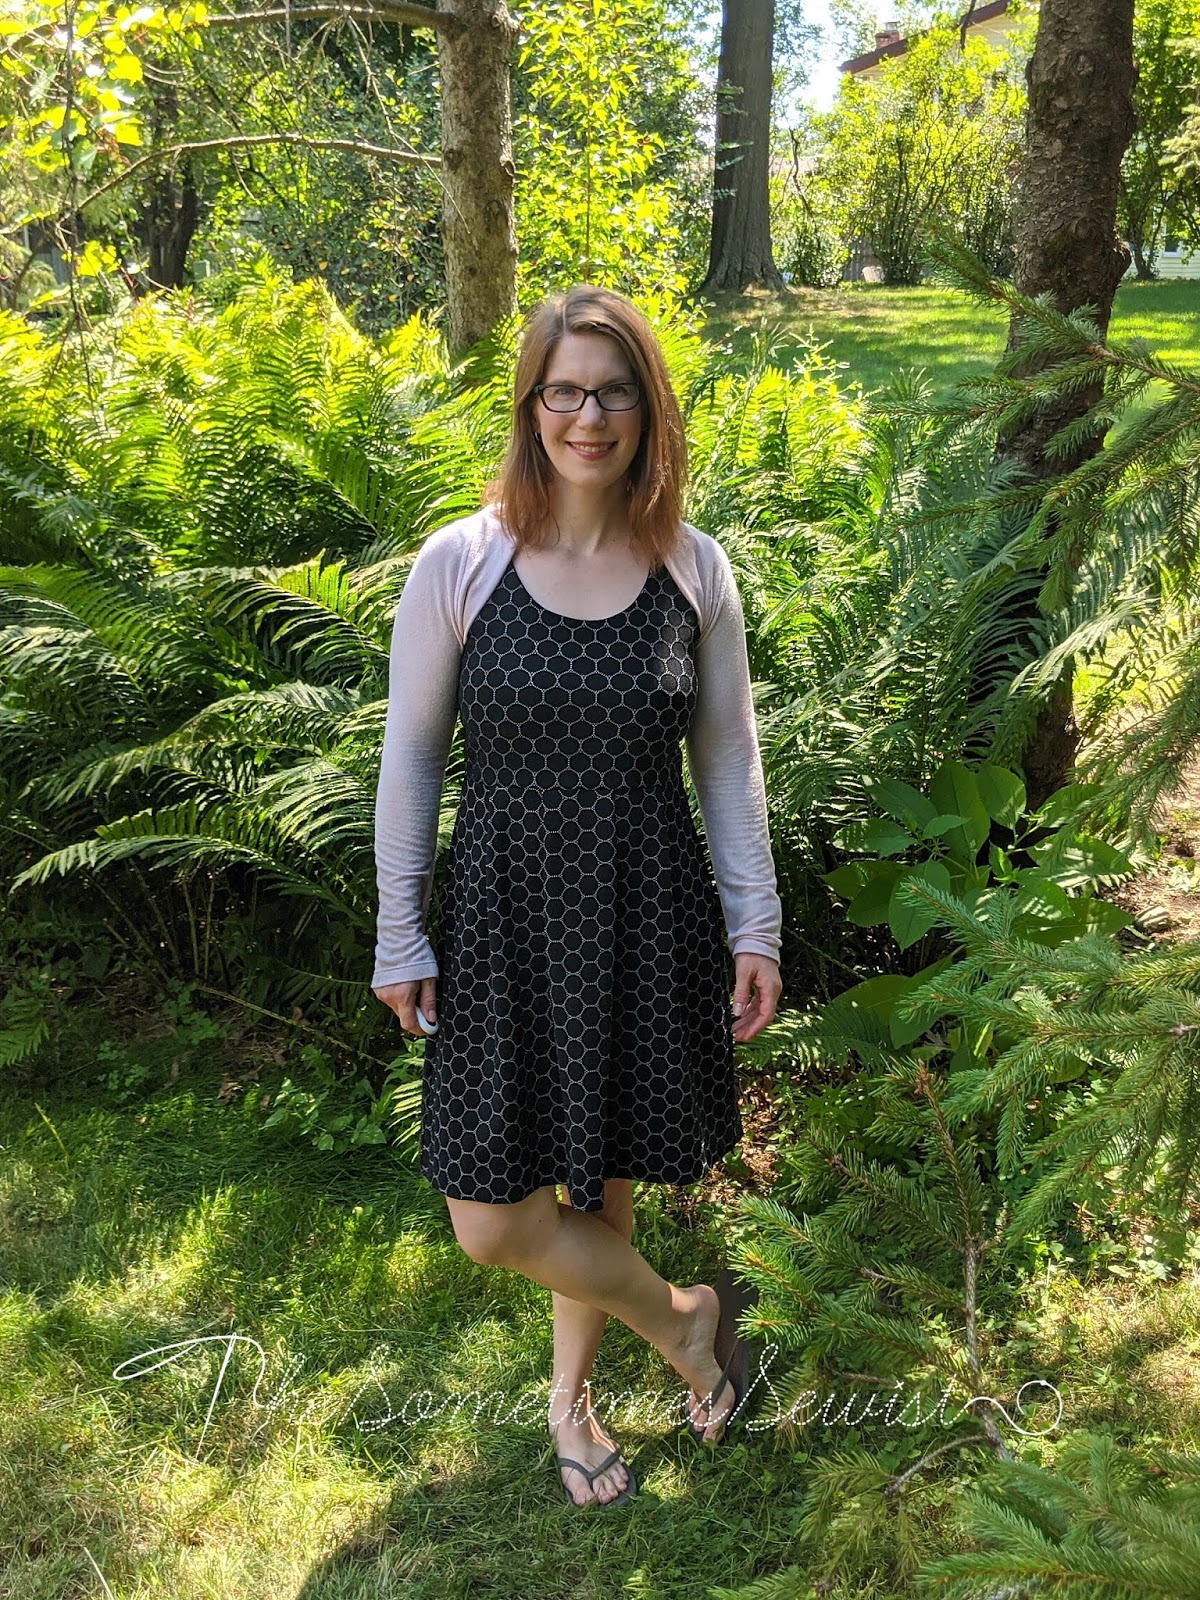
Secondly is the shrug: Jalie 3246

It's not a secret, I love all things Jalie. I've made two of the maxi tank dresses from this pattern this Summer and knew I wanted to try the shrug next. I was not disappointed: this shrug was a SUPER FAST SEW. I'm talking half an hour here. There will be more!

My usual Jalie bodice size is a V, so that's what I used for this garment. It feels a tad large and baggy across the back, which is certainly a function of stretch of this sweater knit as well as sizing, so I will make sure in future iterations to either use a less stretchy knit or a size U.

I used a wonderful brushed rayon/poly/Lycra sweater knit, which is unfortunately sold out. Again, you can find similar options here. I tend to prewash my fabrics one step harder than I plan to launder them in the end and this produced a bit of pilling in this fabric. It's not too bad now, but I worry how it will fare as time and laundering goes on.

As it is, I love the ballet-esque look this marriage of fabric and pattern produce.
Last but not least, the dress: McCall's 7561

This is my second time making this dress, which is a sleeveless view B. The first go I made a straight medium, which fit alright but was a bit loose in the shoulder area. So for this one I used the small for the shoulder and armscye and a medium everywhere else. I'm pretty pleased with the results, but might do more of a small/medium blend in the shoulder, etc. next time. I also lengthened the skirt about 1 1/2".

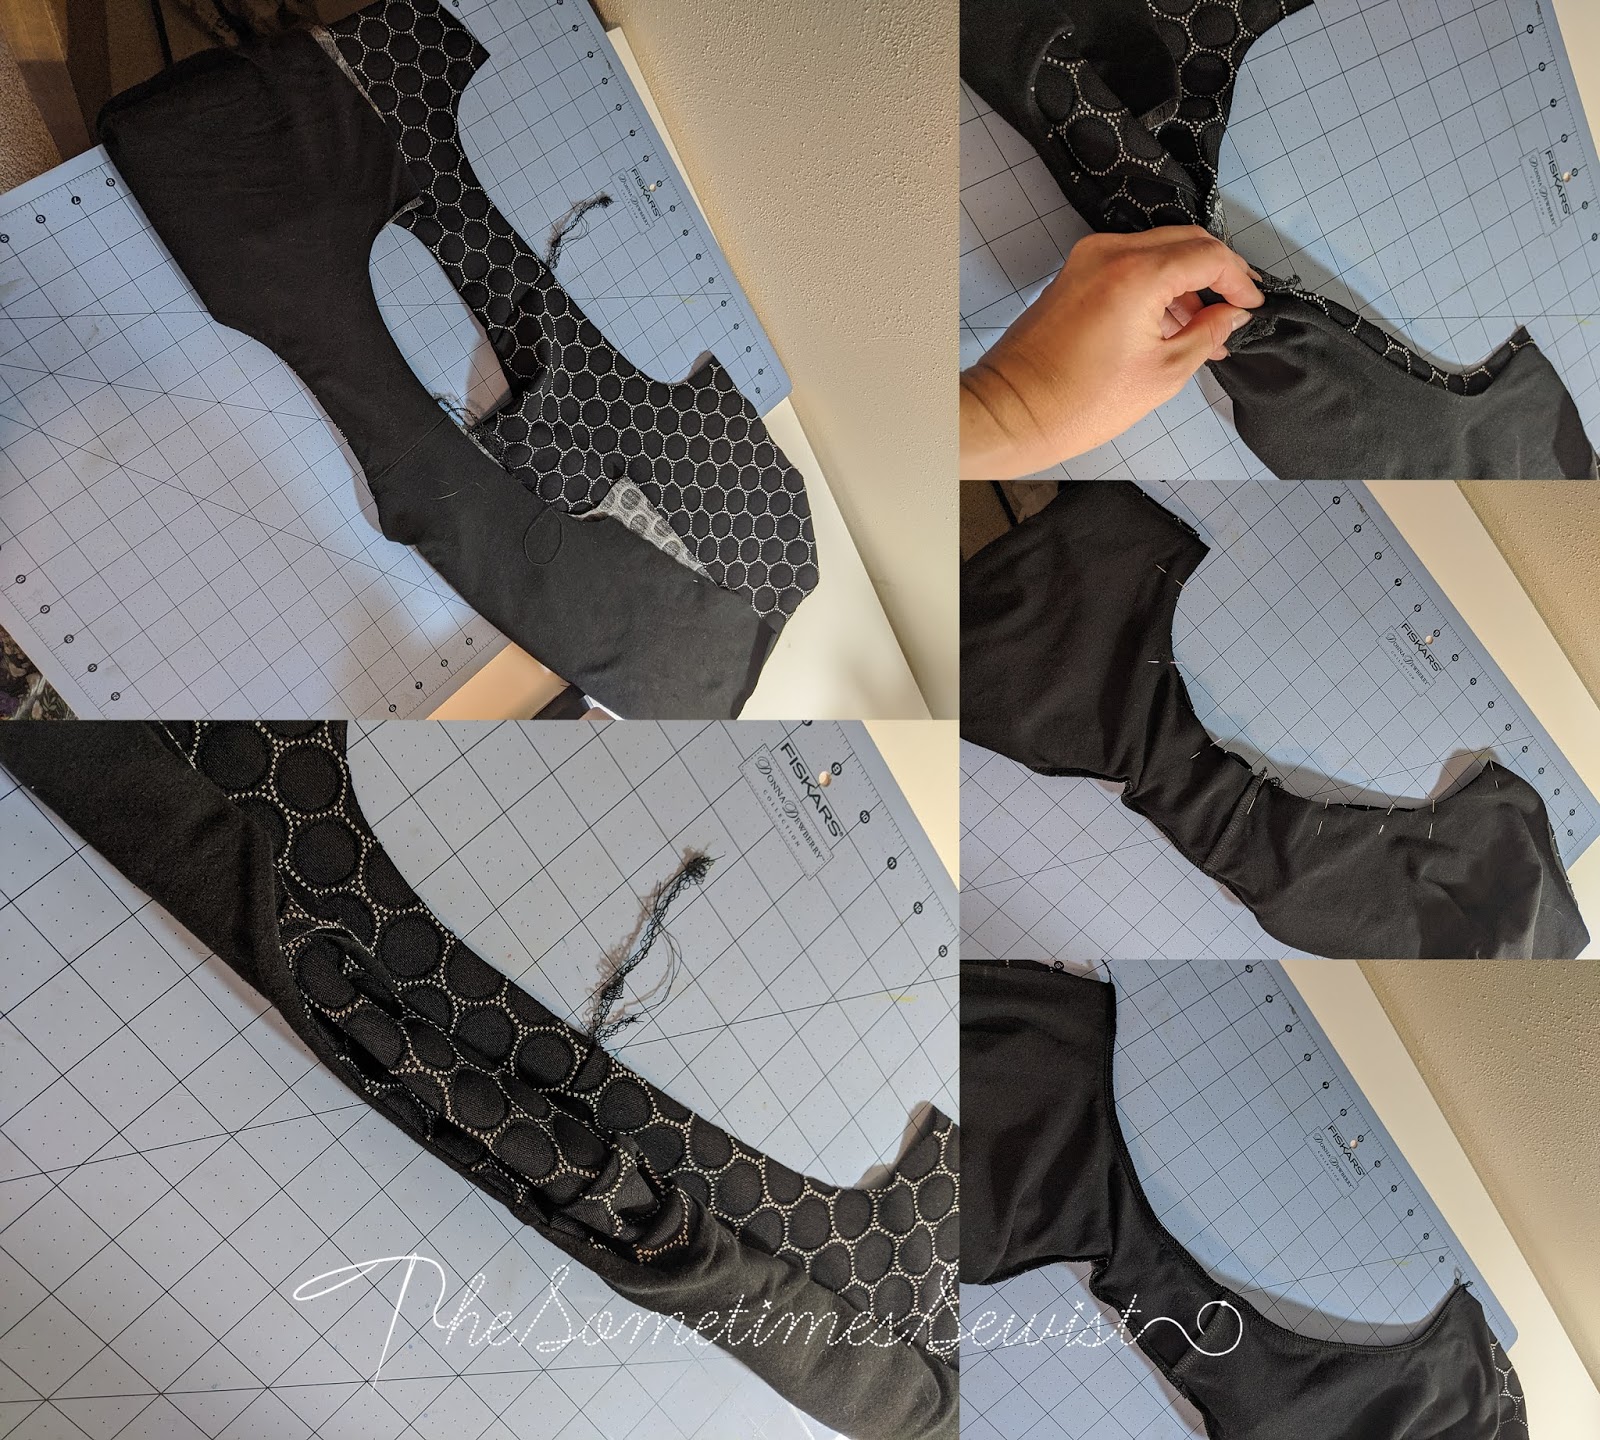
This pattern calls for turning and stitching the neck and arm edges, which I hate as a seam finish. It doesn't work well at all if your knit doesn't stretch both ways and it often gets sloppy and stretched out looking over time. So, I decided to line with a cotton lycra jersey from my stash and use the "burrito" method instead!

How to Burrito your sleeveless bodice:

NECKLINE
1. Sew shoulders together
2. Place garment and lining right sides together and stitch neckline
3. Turn right side out and press

ARMSCYE
4. Roll one edge of sleeve up to the other edge
5. Bring garment and lining armscye right sides together, casing the roll in between
6. Sew armsyce, taking care not to catch roll in your seam
7. Turn right side out
8. Repeat 4-7 for the other armscye

SIDE SEAM
9. Lay side seams of front and back out flat
10. Match front and back side seams together, taking care not to twist and matching garment side to garment side and lining to lining
11. Stitch along the entirety of this seam from garment to lining
12. Repeat 9 to 11 for other side of bodice
The fabric is this jacquard eyelet-look double knit (it also comes in this awesome teal!). This pattern calls for a jersey, but I knew with how wonderfully stretchy this was, it would work out. Being polyester, it's not the coolest selection for a Summer dress (thus the Autumn transition thought), but I really love how it turned out.

As designed, this pattern is a dirndl (gathered) skirt, but to work with the stiff drape of this double knit I converted those gathers to pleats. I decided to make it simple and place the pleats at the center front and the pattern notches. To figure out the pleat uptake, I measured the bottom of my bodice (15") and the top of the skirt (25"), then divided the difference (10") by 4 to get a 2 1/2" uptake per pleat. The photo shows the red where the center and notches are and the purple as the dart uptake amount. I simply brought the purple to the red and voila! Though, this photo is not entirely accurate as I did end up spacing the center dart a bit further apart in the end (moved everything out 1" from the center front to make a larger and more flattering center pleat).

I'm pretty happy with how these pieces turned out and looking forward to wearing them more once the weather starts to turn! I took these photos during 90 degree weather here in Wisco and it was quite a sweaty feat.

So nice to say hey again! Just want to take this opportunity to wish my awesome, sweet and amazing firstborn a Happy 5th Birthday this week. It's hard to believe he's already FIVE!
Like many folks I've been spending a lot of time at home this Summer, which has translated into lots of sewing. I've often had a thoughts about sewing for the upcoming season to get maximum wear out of garments, but often seem to be playing catch up for the current season. But not this time: here are my first transitional pieces for Autumn, entirely inspired by the wonderful sweater knits I kept spying at Fabric Mart.


First up is the cardigan: Helen's Closet Blackwood Cardigan

This is the third Blackwood I've made, but the first of the shorter iteration (view B). It makes me want to sew up a 3/4 sleeve cropped version!

The fabric is a delightfully mottled abstract blot poly/lycra sweater knit. Unfortunately, it's sold out at the site now but you can find many alternatives here. I was really pleased with how this washed up and can see this piece as a staple in my wardrobe for seasons to come.

I made a size 12 which is consistent with my measurements on the size chart and I'm pleased with the relaxed fitting results. The only alteration I made was to shorten the sleeves 3". They are purposely long in this pattern and designed to scrunch around the wrist, but I like a little less play in my cardigan sleeves.

Secondly is the shrug: Jalie 3246

It's not a secret, I love all things Jalie. I've made two of the maxi tank dresses from this pattern this Summer and knew I wanted to try the shrug next. I was not disappointed: this shrug was a SUPER FAST SEW. I'm talking half an hour here. There will be more!

My usual Jalie bodice size is a V, so that's what I used for this garment. It feels a tad large and baggy across the back, which is certainly a function of stretch of this sweater knit as well as sizing, so I will make sure in future iterations to either use a less stretchy knit or a size U.

I used a wonderful brushed rayon/poly/Lycra sweater knit, which is unfortunately sold out. Again, you can find similar options here. I tend to prewash my fabrics one step harder than I plan to launder them in the end and this produced a bit of pilling in this fabric. It's not too bad now, but I worry how it will fare as time and laundering goes on.

As it is, I love the ballet-esque look this marriage of fabric and pattern produce.
Last but not least, the dress: McCall's 7561

This is my second time making this dress, which is a sleeveless view B. The first go I made a straight medium, which fit alright but was a bit loose in the shoulder area. So for this one I used the small for the shoulder and armscye and a medium everywhere else. I'm pretty pleased with the results, but might do more of a small/medium blend in the shoulder, etc. next time. I also lengthened the skirt about 1 1/2".

This pattern calls for turning and stitching the neck and arm edges, which I hate as a seam finish. It doesn't work well at all if your knit doesn't stretch both ways and it often gets sloppy and stretched out looking over time. So, I decided to line with a cotton lycra jersey from my stash and use the "burrito" method instead!

How to Burrito your sleeveless bodice:

NECKLINE
1. Sew shoulders together
2. Place garment and lining right sides together and stitch neckline
3. Turn right side out and press
ARMSCYE
4. Roll one edge of sleeve up to the other edge
5. Bring garment and lining armscye right sides together, casing the roll in between
6. Sew armsyce, taking care not to catch roll in your seam
7. Turn right side out
8. Repeat 4-7 for the other armscye

SIDE SEAM
9. Lay side seams of front and back out flat
10. Match front and back side seams together, taking care not to twist and matching garment side to garment side and lining to lining
11. Stitch along the entirety of this seam from garment to lining
12. Repeat 9 to 11 for other side of bodice
The fabric is this jacquard eyelet-look double knit (it also comes in this awesome teal!). This pattern calls for a jersey, but I knew with how wonderfully stretchy this was, it would work out. Being polyester, it's not the coolest selection for a Summer dress (thus the Autumn transition thought), but I really love how it turned out.

As designed, this pattern is a dirndl (gathered) skirt, but to work with the stiff drape of this double knit I converted those gathers to pleats. I decided to make it simple and place the pleats at the center front and the pattern notches. To figure out the pleat uptake, I measured the bottom of my bodice (15") and the top of the skirt (25"), then divided the difference (10") by 4 to get a 2 1/2" uptake per pleat. The photo shows the red where the center and notches are and the purple as the dart uptake amount. I simply brought the purple to the red and voila! Though, this photo is not entirely accurate as I did end up spacing the center dart a bit further apart in the end (moved everything out 1" from the center front to make a larger and more flattering center pleat).

I'm pretty happy with how these pieces turned out and looking forward to wearing them more once the weather starts to turn! I took these photos during 90 degree weather here in Wisco and it was quite a sweaty feat.

Until next time...
Jess
your dress looks great! the pleats give a sophisticated tone to mccall's 7561. i actually like the drapiness on your shrug--kind of a stole-thrown-on vibe instead of "everyday sweater".and the abstract print on your cardigan makes it so versatile for layering! congratulations on a lovely 3-piece capsule.--anne
ReplyDeleteThat dress is perfection! I love the finishing and fit. And in that black/white, it'll be super versatile.
ReplyDeleteThose are super cute knit separates. Lining the bodice is a great idea, and thank you for the detailed instructions.
ReplyDeleteThanks for your detailed explanation! I've been meaning to make M7561 so it's very timely!
ReplyDeleteLove the shrug! I've been stalking the sweater knits too. The dress is such a great versatile piece too!
ReplyDelete