
Made by a Fabricista: The Madison Cardigan by Style Sew Me Patterns

 Happy Saturday All,

Even though the weather in Florida is still in the 80s, I am gearing up for cooler days in November and December.  I have a love affair with cardigans as my work building is extremely cold and a lightweight cardigan is perfect for the cooler days or nights here in sunny South Florida.

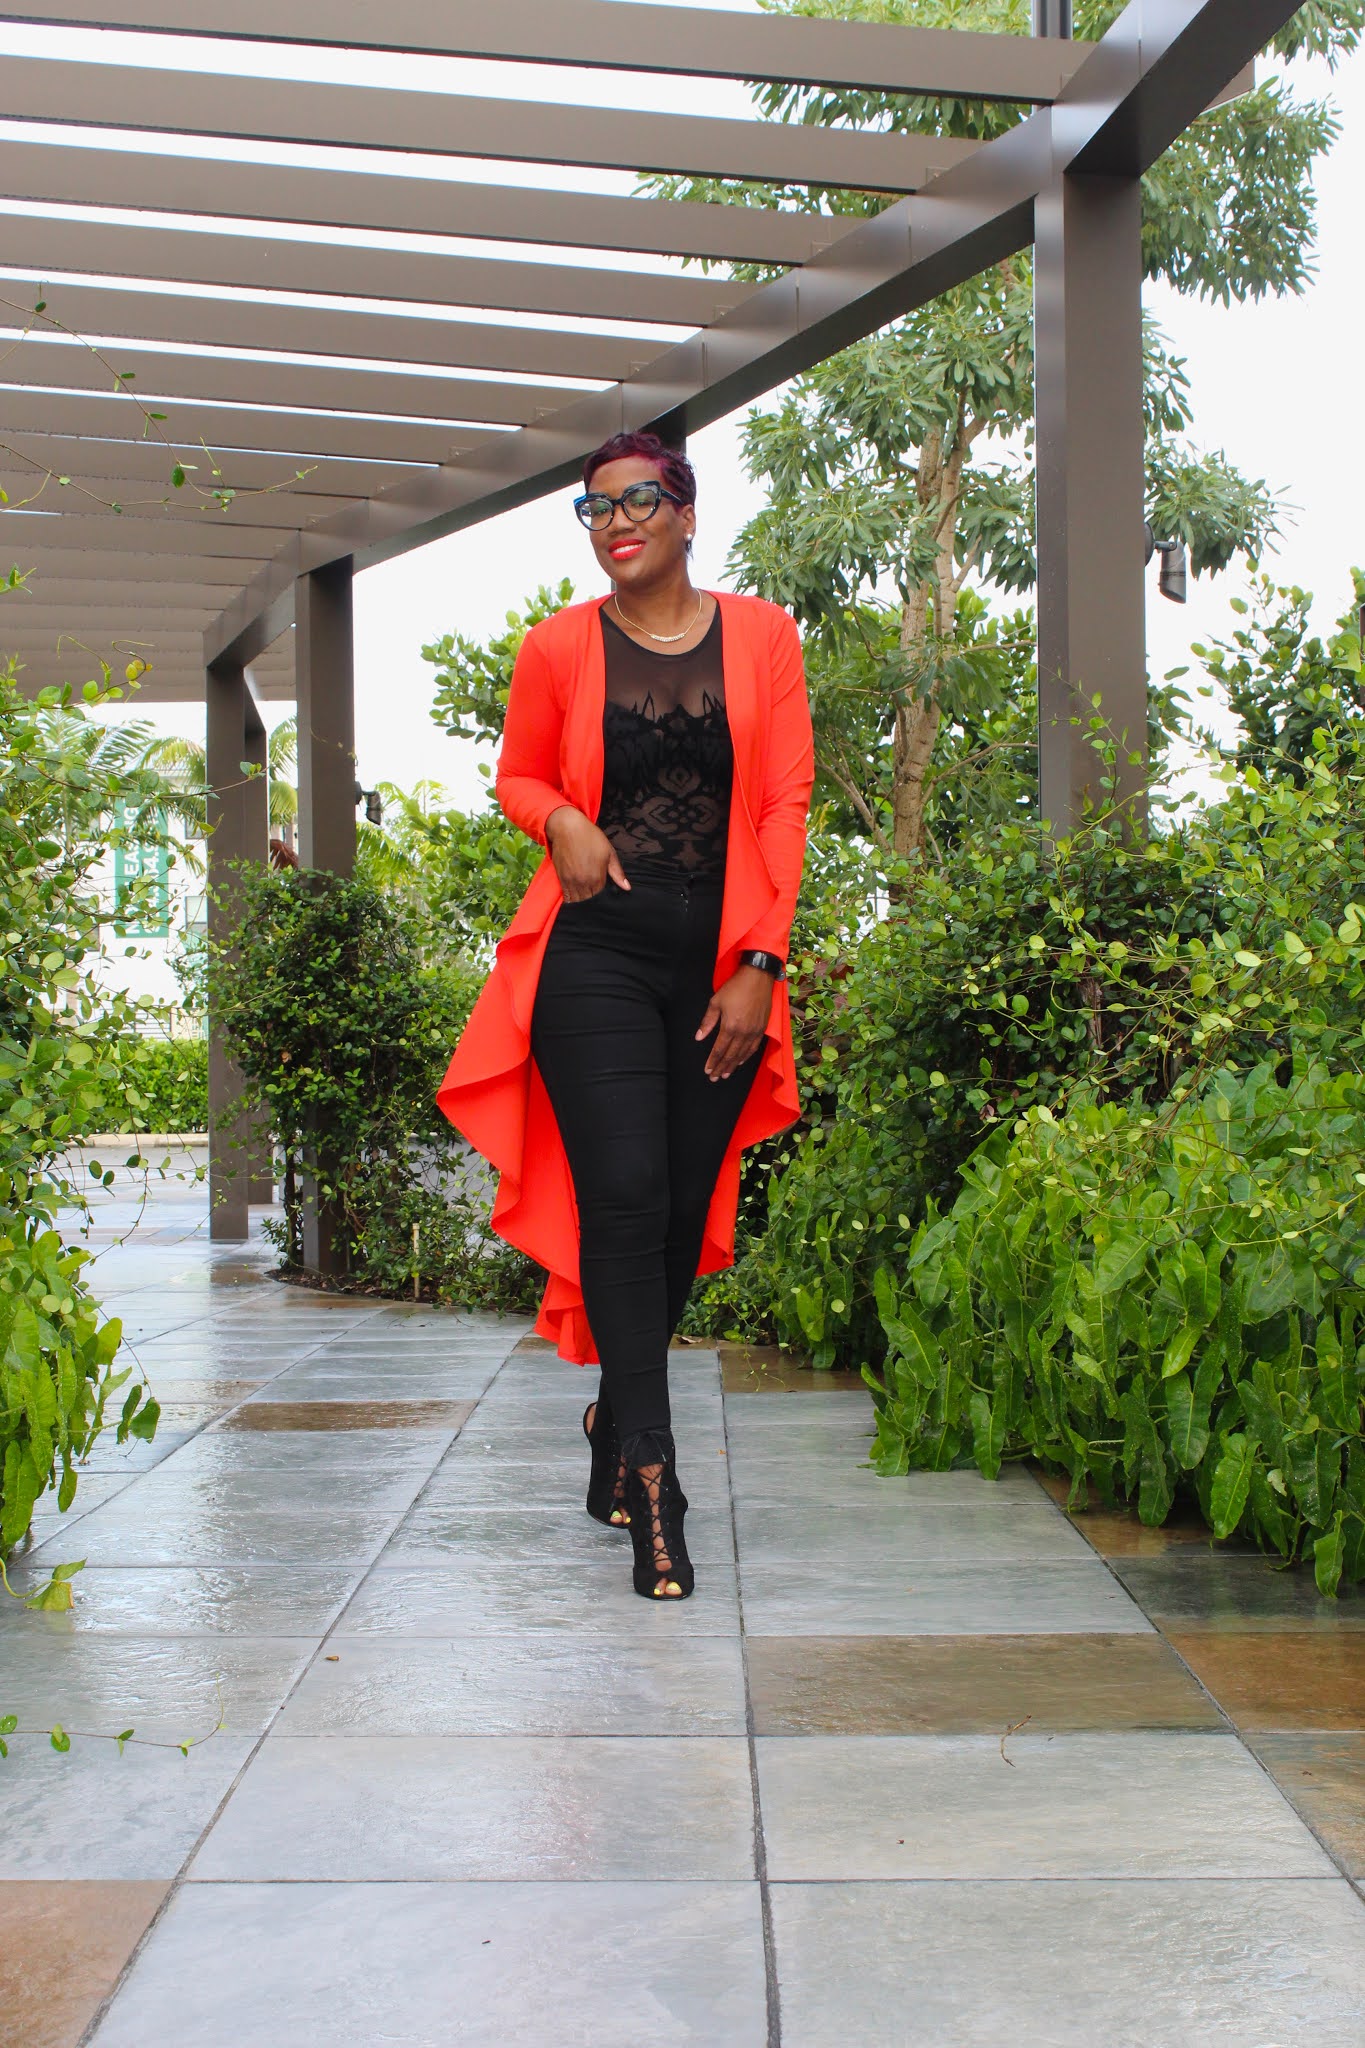
Two years ago when I did a review of 3 cardigan patterns here, I fell in love with the Madison Cardigan by Style Sew Me Patterns which is now available at Fabric Mart.  This easy to sew waterfall drape is stylish and can be dressed up or down.

If you have been following my sewing journey, you know my favorite knit fabric is Ponte knit.  I absolutely love the feel, drape, recovery, and sturdiness of the fabric. Around this time of year, Fabric Mart typically carries a wide selection of colors perfect for Fall and Spring. When I came across this orange color, I knew I had to grab a few yards for a cardigan. Unfortunately, this is color is almost sold out but Fabric Mart has a variety of colors here.

For this month's make, I selected 2 Ponte fabric with the intention to color block but because the red hue was almost as vibrant as the orange, I decided not to color block but use the orange Ponte knit for the cardigan. 

 I do have plans to make the Style Sew Me top from the Lisa loungewear set with the red fabric which is currently on my cutting table. 


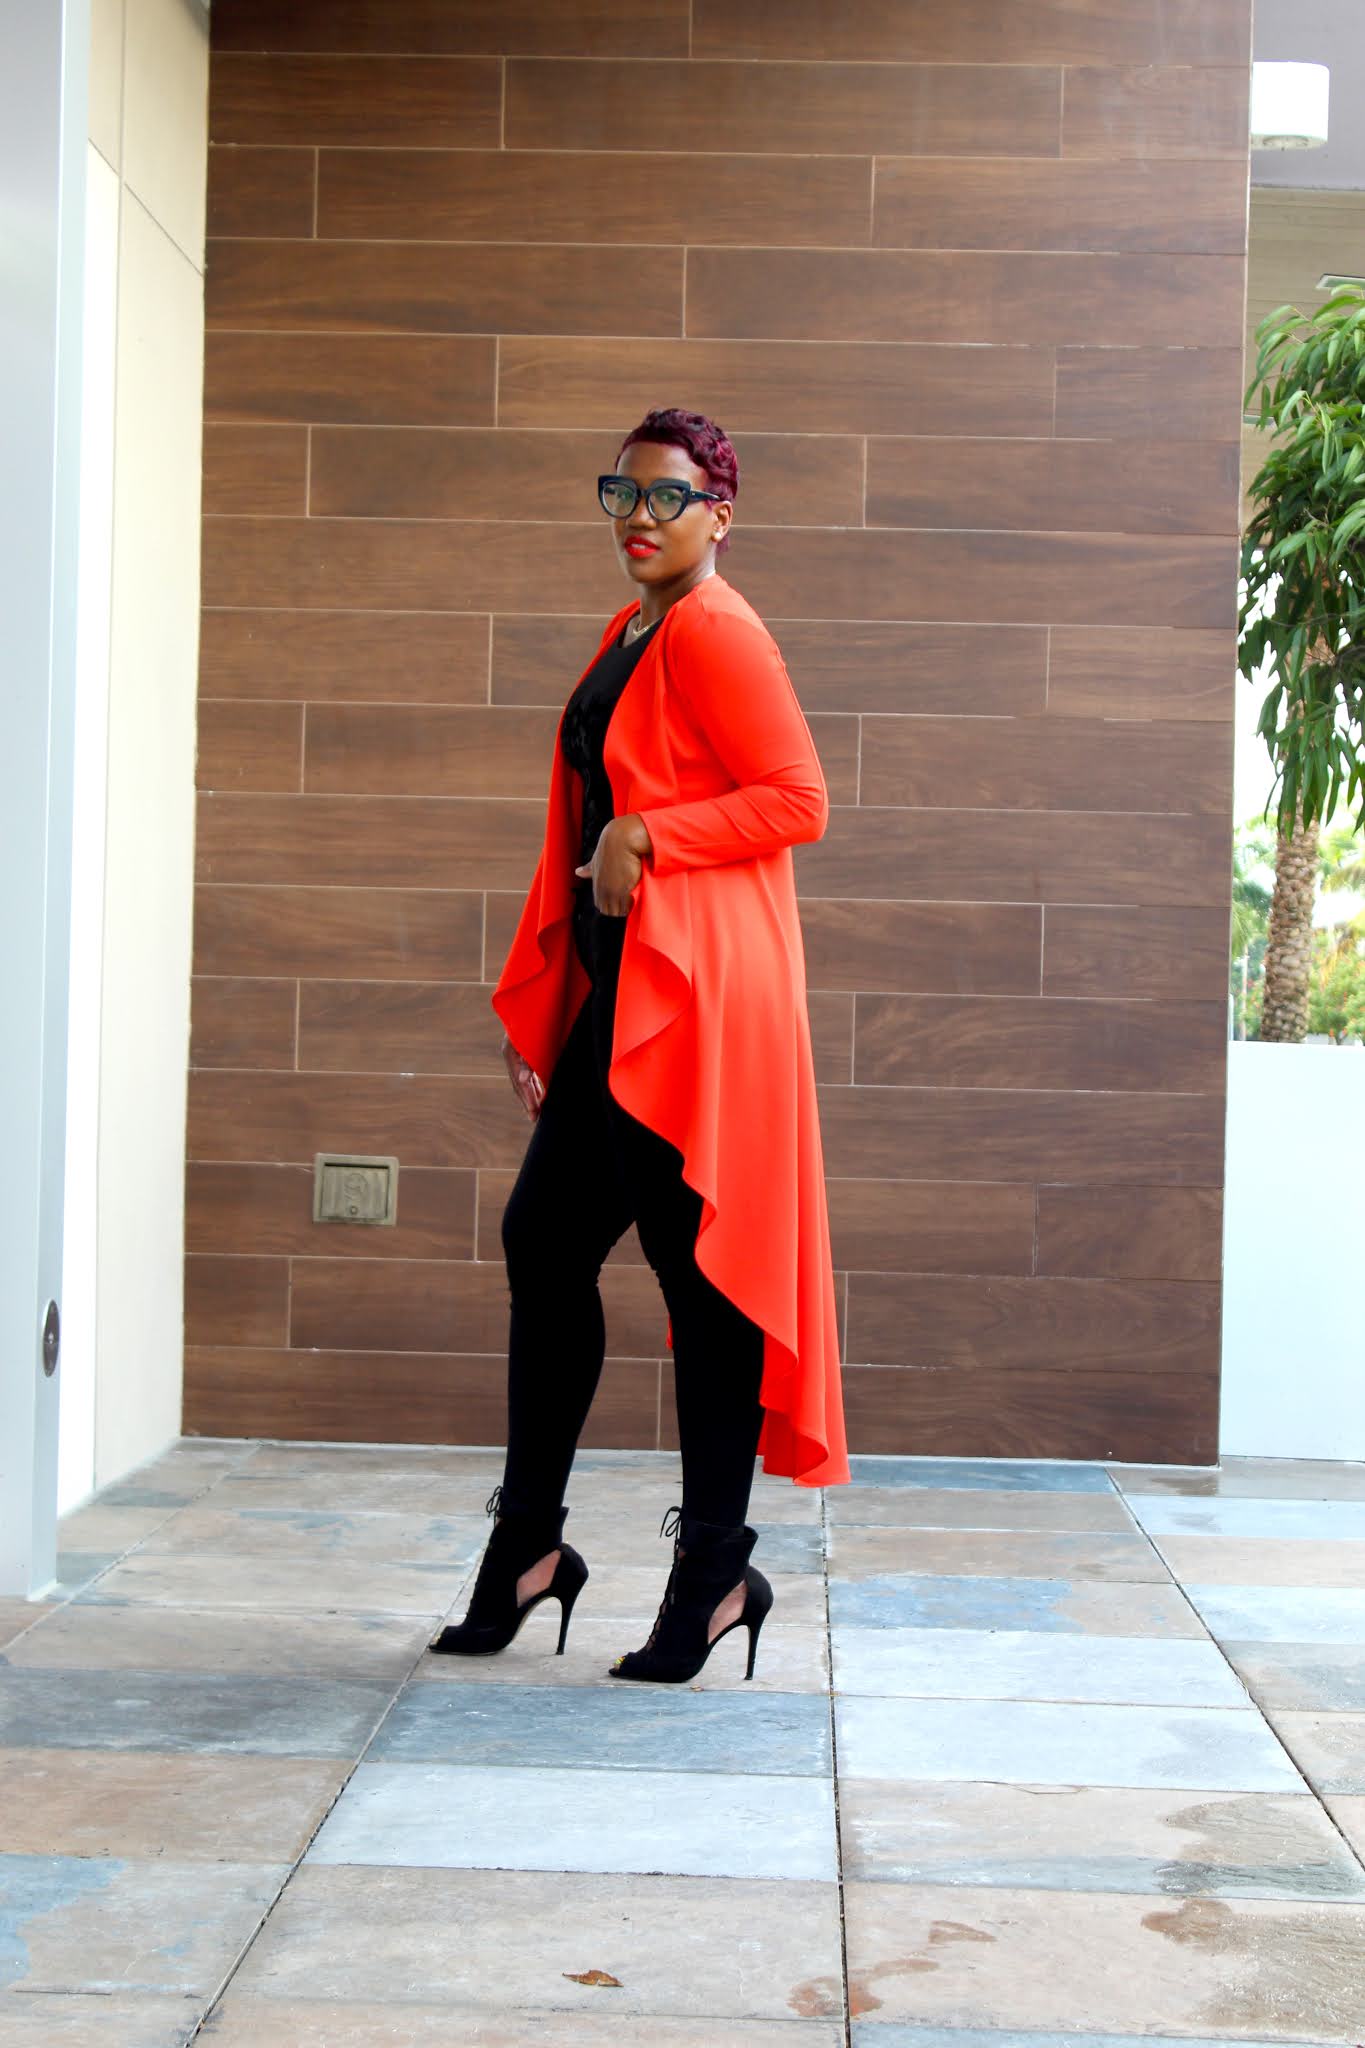
 Did you know that you can sew 90% of your knit garment with a serger?  Well, for the past 2 years, my cardigans are made using the serger except for the hem and where the seams meet.  I am excited to announce that I am a NEW brand ambassador for Husqvarna Viking and I couldn't wait to create my first Fabric Mart make using my new Amber Air S 400 air threading serger.  

I will be unboxing my new Designer Sapphire 85 sewing and embroidery machine this weekend and can't want to jazz up my makes. I am excited about this new journey especially learning more about embroidery and features of the Designer Sapphire 85.

Thank you for following my sewing journey!  This month is extremely special as I celebrate 3 years of blogging with Fabric Mart and 5 years of sharing my sewing journey through my personal blog.  I am ready to step up and step out of my comfort zone and plan to continue to share this journey with you.  Don't forget to stop by my Instagram page to see what I will be working on over the next few weeks.  Now that I have adjusted back to in-person teaching, I am hoping to get a few fall pieces made before Thanksgiving.

One Love,

Marica - https://www.maricamitchell.com  


Comments

  1. Awesome make and beautiful styling! You will make a great ambassador! Congrats!!

    ReplyDelete
  2. That color is beautiful on you...love the drape of this cardigan.

    ReplyDelete
  3. I agree with Rosanne, you will be awesome as an ambassador. Does that mean some YouTube videos in your future?

    Love the brightness of the cardigan and the way it drapes. Thanks for sharing your talents.

    ReplyDelete
  4. Congrats on being Embassador for Husqvarna vicking. 👏👏. I'm one of your biggest fan.. Love your work.

    ReplyDelete
  5. That orange is doing everything for your skin tone. Love love love it

    ReplyDelete

Post a Comment

Thanks for leaving a comment! All comments are reviewed before posting to help us eliminate spam. Your comment will be posted within 24 hours.

Popular Posts You Might Like

Week 4: Jeansmaking- What They Made

This is it, the final round! And we certainly did not go easy on our three remaining contestants this time. This round they had to make their own pair of well fitting jeans. I think they all did an absolutely outstanding job! Take a look what these ladies accomplished & be sure to vote for your favorite! (Link at bottom of post.) And, don't forget to show us your me-made jeans on Facebook or Instagram. Details at the bottom of this post. Danesha from  Classyfied Life So first I must say that this entire challenge has been just that...a challenge! Two weeks ago there was hurricane Irma and I was blessed enough to not lose power and then I went out into the aftermath to capture some photos of my submission. Then two weeks ago I had a big trip planned so I had to do EVERYTHING  in two days . Then the BIGGEST challenge of all...THIS week! I got the challenge and I was super excited to have an extra few days and then before I could even get started I ended up in the eme

Made By A Fabricista: A great tee shirt pattern – or three!

Hi fellow sewists! It’s Andrea  @happy.things.here and I’m here today to talk tee shirts!  I love a good tee pattern…or two…or four. Despite having more than enough of them in my pattern collection, I’m always up for trying a new one. And I also have my favorites and tried and trues (TNTs). I love the versatility of a good tee pattern – dress it up with fancy fabrics to make a work wardrobe piece, use a high quality solid to add some basics, or anything in between. Today I’m sharing three patterns I’ve used multiple times and with many different kinds of fabrics - all a little different and all great beginner patterns too. First up is the newest addition to my pattern collection – the Upland tee and crop top by Rivet Patterns. They are a newer designer who I recently discovered when this tee pattern caught my eye. I love that it has multiple bodice options including a classic design tee and also a crop version with different separate and uniquely shaped bodice pieces. I first made the

Made By A Fabricista: Dreamy Florals | A DIY Dress Inspired by Son de Flor's Spring Collection

Hi everyone!  When I saw this floral print linen/cotton blend make it’s way onto the to-be-described table I knew I had to make a dress from it.  I’d been staring dreamily at all the dresses from the brand Son de Flor who had just put out their spring collection and thought, maybe I can throw together something inspired by them!  I grabbed three yards of that floral shirting and a yard of SWC5682w to line the bodice with.  I used Simplicity’s S8946 for its simple bodice block.  This pattern has a gathered rectangle for the skirt, but I’m a sucker for a circle skirt so that’s where I decided to start.  I folded the fabric twice and cut out the longest circle the fabric would allow.  Then got to work on the bodice, sewing up the darts and attaching everything. Now, I don’t love installing zippers.  I ha d a lot of trouble getting them to sit right, and no matter how much mental gymnastics I do when first pinning one side is always put in the wrong way.  So while I did have to unpick and