
This month I was sewing for TWO! No! I’m not pregnant! Most of the time I guess I’m a selfish sewer. So after my husband asking for the millionth time for me to make something for him I did! Of course I got extra fabric just in case and at the last second I could make something for me too (I really did sew my shirt together at the last second). He had been asking for a button down shirt so I obliged. Let’s get into the details, shall we?


I found the perfect fabric for shirt making. It was the Yale Blue 100% Cotton Chambray. It was the the perfect weight and the right color for Tim. I already had brown buttons in my stash so I used those on both of our shirts. I was going for a more causal button down shirt feel and I think the brown buttons added to that. Tim’s shirt was made using the Thread Theory Fairfield Button Up pattern. Thread Theory was a new pattern company for me and I was really pleased with the drafting and the instructions. One thing I really liked about this pattern was that it was drafted for using Flat Felled Seams. So the seam allowances were offset and the instructions walked you through sewing them up with that seam finish. I also really like the elbow sleeve tab for keeping your rolled up sleeve up. I have to say it was nice sewing for someone else and not having to do fittings for myself. It took pressure off of having to do a FBA for myself. I did totally mess up the sleeves by thinking they were too long for him, I have no idea why I thought that. So I had to recut the sleeves and redo the sleeve placket. This is why I always order extra fabric!


For myself I stuck with my personal favorite pattern company, Closet Core Patterns and I used the Kalle Shirtdress pattern. I like the cropped length, this is the second one I have made. And I also don’t have to do a FBA on this shirt since it's so roomy, maybe that is why I got it sewn up so fast! This pattern features a high/low hem like that I really find unique. Don’t forget you can add little details to a shirt with a stand collar and yoke by using contrasting fabric! To make both shirts I used the “burrito method” to get a clean finish on the inside of the yoke area. When I first learned this method I was like, “what the heck?” But once you do it and visualize the process it is pretty easy. I will walk you through the steps now on how I did it with the Kalle shirt I made.


The “Burrito Method”
First you will cut and prep all your pattern pieces, specifically the two yokes, shirt back and shirt fronts. Make sure to sewing to place any pleats on your shirt back and stay stitch all your necklines. When you undo your burrito you will be pulling in through the neck area. You will need to cut two yoke pieces, for visuals I decided to cut my “yoke” and my “yoke facing” in different colors so you could see them easier (the yellow is Linen From Fabric Mart too!) To start place the yoke (the one the world will see) right sides together on the back of the shirt and baste across the top.

Now that the yoke is basted in place, turn your shirt back so its wrong side up.

Then place your “yoke facing” RIGHT side down on the shirt back. So the shirt back is WRONG side up and the “yoke facing” is RIGHT side down, stitch around the top through all three layers.


Once that is all sewn together you should press your seams up into the yoke area. You can top stitch across the top if you choose to. Next you will lay your shirt back RIGHT side up with the “yoke” pointing up and the “yoke facing” hanging downward.

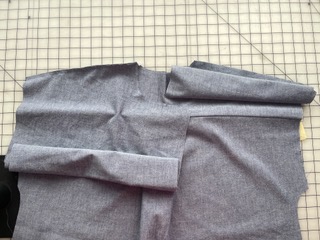
Lay shirt front pieces RIGHT sides together and pin at shoulder seams. Baste shoulders into place.

Now let’s make our burrito. Roll the two front piece up to the shoulders and then roll the back up to the shoulders as well.
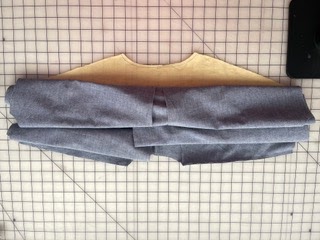
Take the “yoke facing” and wrap it around the rolled pieces, make sure the front and back pieces are out of the way and pin the facing to the shoulders. Stitch through all three layers.


Now pull the fronts and back through the neck opening. You should have all clean seams on the inside!


Give yourself a pat on the back, you did it! Then you can press all the seams for a nice finish. Both of these patterns are a great option for trying the burrito method and they both include instructions for this method in the pattern
Im super happy with how these projects came out! And I guess sewing for my husband isn’t so bad. Hey I made jeans for myself on my last project, maybe jeans are in the works for him too! I hope you give these patterns a try and use the burrito method. And as always Fabric Mart is where it’s at for all your fabric needs!!
HANNAH | @modistrasews
Now that is just to simple to work, but thanks to your pictures and instructions I can see how it would. Got to love a "burrito". Thanks for showing us how it is done. Both you and your husbands shirts look terrific. Let us know how the jeans go for him because guy jeans of course fit different than gal jeans.
ReplyDeleteWonderful work, Hannah! You are one of my favorite Fabricistas and create such polished and classic looks.
ReplyDeleteSo good!
ReplyDelete