

I love plaids- maybe I've made that declaration in this space once before- but I LOVE them. I can't say that I love plaid matching but when I saw this wonderful Mimi G plaid coat last year I knew that her estimation of McCalls 7259 was spot on. There is minimal plaid matching and it seems the two are a match made in heaven.

When I looked through all the coating fabrics on Fabric Mart several plaids jumped out at me. There is still some of this colorway available here. They also have some great buffalo plaids that would pair beautifully as well. The coating I chose is 100% wool and handled gorgeously. It has a great spongy feel and is wonderful to wear. I am perpetually chilly in the winter and often wear a coat like this at work off and on through out the day.
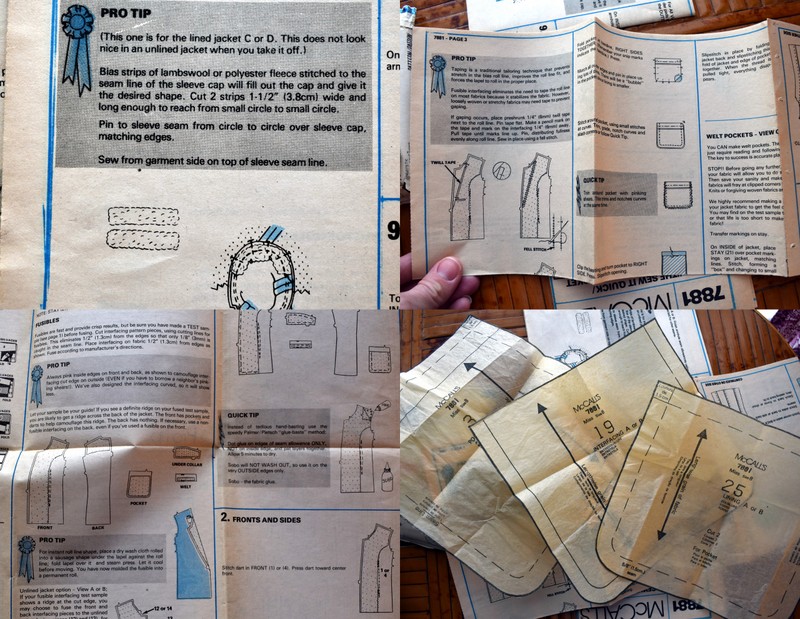
When planning my coat I was really hoping for some great front pockets, and not just patch pockets topstitched down, but pockets that leaned a little toward couture. I wanted them to be big enough for my smartphone, a tissue, keys or a pair of gloves. I rifled through all my patterns in search of a suitable pocket and couldn't find one, until I remembered an old pattern of my Mom's that I'd set to the side to read for coat sewing tips. It's McCalls 7881, a vintage Palmer/Pletsch, and I knew that it was bound to have some great sewing tips in the instructions- just a note, if you ever come across vintage patterns (and especially vintage Palmer/Pletsch) buy them, so often they have the most wonderfully detailed instructions.
What I didn't know until closer inspection was that this pattern also had the exact pockets I was searching for! They have three pattern pieces, wow! The outer fabric pattern piece, the lining, and the interfacing. Exactly what I was looking for, a pocket that would be eased around the edges so as to roll under and hide the lining. And when I stick my hand in the pocket I feel that smooth lining and not wool.

I was so thrilled that I did not have to draft these pockets but just lift them from the pattern and get to work. The only way where I parted with the original plan for these pockets was that I used a 3/8 inch seam allowance just to make sure they were large enough.
You can see from the picture above that the included instructions are AMAZING. There are interfacing guides, sleeve cap instructions, how to establish a roll line, all of the great tailoring tips you need when making a coat. Now if you're wondering how you can get your hands on these instructions you should buy the book "Jackets For Real People" by Palmer/Pletsch. I have the book and compared the two and every bit of the pattern instructions are in the book.

I am loving the option of two sets of pockets. I've worn this coat many times since making it and find myself reaching in those pockets for everything that's been dropped in there. I probably should have doubly reinforced those front pockets!

For those of you who are wondering, I interfaced the entire jacket, I just like the durability and weight the interfacing gives. I also used a sleeve cap out of fleece to keep it from collapsing, and a back stay. I am sure there are more couture ways to do all of this that involve horse hair canvas and the like but these are the methods that are readily available to me and still give me great results.

You can see that I added a tag. These tags were given to me by my Mother in law some years back. She has since passed and its nice to add this tag and think of her and her encouragement around my sewing.
The lining is some kind of poly satin I received in a mystery bundle from Fabric Mart some time back. It worked great, however it did not like steam from the iron so I had to be careful when ironing.

Maybe you're considering sewing your first coat. I say GO FOR IT, there are so many things that might hold you back but the best way to learn is just to give it a whirl. A pattern like this is a great start, aside from the plaid matching it was a really straight forward piece and any beginner could tackle it. If you're fearful about investing in a nice wool fabric and then ruining it, buy it on sale, Fabric Mart is always running a great sale and you're bound to luck up on a great coating.

I have been so pleased with my coat and have even found myself thinking of making a bunch of red, black and white outfits to go with it- ha, ha- then I might never take it off until spring!
Thanks for reading and happy sewing!
Elizabeth
This is an awesome piece, Elizabeth! I think it would look great with jeans and boots, too.
ReplyDeleteThank you Masha for your kind words!! Truthfully I've been wearing it with everything regardless of color clashing! Ha ha, so there you go!
DeleteBeautiful coat! Love the fabric, the cut the fit and your description of your process. I immediately ordered a copy of the Palmer/Pletsch book :) Thank you for that referral. I'm making a coat this year (maybe 2 if I really get the bug) for sure. I think it must be enormously satisfying to slip into your nice warm and cozy me-made coat :)
ReplyDeleteThank you Kathleen! That book is so helpful, you won't regret having it as a reference because there is just so much practical and useful information inside. I say jump into coat making, it is immensely satisfying!
DeleteGreat job! I love vintage patterns. And thank you for the Palmer/Pletch book reference. I'll keep my eye out for it.
ReplyDeleteThank you Christine! Its a great book for your sewing reference collection.
DeleteLovely coat. Great plaid matching!
ReplyDeleteThank you Linda! I love a pattern with minimal pieces that make plaid matching some what easy!
DeleteThis is a great coat!
ReplyDeleteThank you Faye!!
DeleteBeautiful coat! And lovely pictures of you wearing it. It looks warm and cozy. It looks like it was “made for you” if you know what I mean. Job well done. I also find the vintage patterns have better and more detailed instructions.
ReplyDeleteThank you for your kind words! The great thing about making your own garments is that they can have that "made for you" look that distinguishes them- and I love that! It is surprising just how much great information can be found in vintage patterns, they are little treasure troves.
DeleteBeautiful coat, Elizabeth! I agree with you about the importance of pockets and of great vintage pattern instructions. Palmer/Pletsch has the best. Enjoy wearing it this winter!
ReplyDeleteThank you Ann! Pockets (and lots of them) are a must! The more I make my clothes the more I insist on adding them! I've loved wearing this coat (any time the temps drop out it comes) and will enjoy it for many years!
ReplyDeleteIt looks so great on you. Skilled sewing and a wonderful mama who didn’t throw out patterns! 😉
ReplyDeleteCongratulations on a job well done.
Mama
I am lucky indeed to have such a Mom!! Thanks for the constant love and encouragement!
DeleteHi Elizabeth, I have a favor to ask of you, sewer to sewer. I have this pattern, 7881, but I am missing page 1 and page 2 of the instructions. Could you send me pictures of those 2 pages? Caroline
ReplyDelete