
Happy Saturday and Happy Easter All!


When I selected this crepe suiting fabric a few months ago, the first thing that came to mind was a jacket. Unfortunately, this color is sold out but here is another beautiful vibrant color for Spring/Summer or the classic neutral here. I chickened out dreading the task ahead to jump into making a tailored jacket. Moreover, knowing me, I would rock it once or twice during spring or summer and then let it sit for months in my closet.
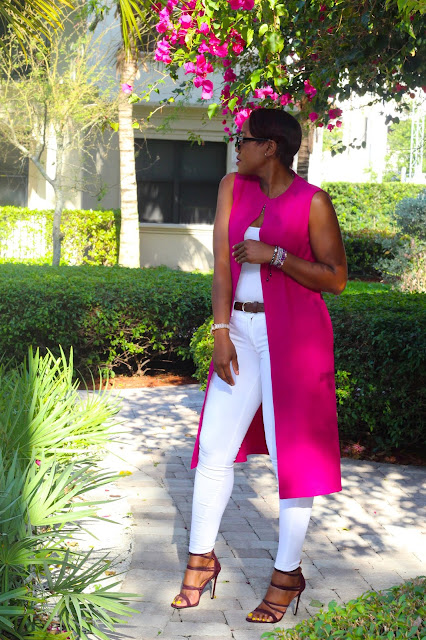 I scrapped that project and then settled on tailored pants, selected the pattern and was ready to cut. I struggled back and forth as I have created so many palazzo pants over the past year and did not want to add another. Right at the last minute, I decided to create a VEST with pockets that I always wanted to add to my classic pieces that I can rock and style all year long.


The pattern I selected to create this classic vest is Simplicity 8265 (VIEW E), which is a great wardrobe builder.

 To create the vest, the instructions are straightforward and no adjustments were needed for the size I cut (Size 12). The only changes I made was eliminating the side slit.

I absolutely fell in love with the design lines of the coat or vest, especially the front darts. The is a great beginner project and the vest or jacket is not lined but can be.


Here are a few tips when making this VEST based on the facing pieces!
The pattern did not state to understitch the facing but I always do it with any garment that has a facing. This helps so much with ensuring that it lays flat. 

To secure the neck and shoulder facing, stitching them down (stitch in the ditch) in the shoulder seams will help.

For the most part, the armhole and neck facing laid flat after stitching my facing in the seams at both shoulders, sides, and center back.
 |
| Working to ensure that the inside of my finish garment looks just as beautiful as the outside. |

I plan to wear this over a bodycon dress, with jeans and heels during the spring and summer months.

I know for sure this will be on heavy rotation as the color is perfect this time of year. I am happy with the final fit and plan to rock it all year long.


One Love,
Marica - Overdriveafter30
Nice addition to your wardrobe. Color is spectacular!
ReplyDeleteThanks FRAN!
DeleteHow beautiful. I always love your style.
ReplyDeleteThanks Lynne
DeleteLove this! Can't believe I have a version of this cut out on my cutting table right now. You're encouraging me to move it up the sewing queue!
ReplyDeleteGo for it Carolyn!
DeleteYou made a great choice in what to make with the beautiful hot pink fabric. It looks wonderful on you.
ReplyDeleteGorgeous vest, and I must say you have a wonderful sense of style! Love how you've put these outfits together.
ReplyDeleteThanks Joy!
DeleteI really love this color on you. It looks so sharp with the black and white. Fantastic choice!
ReplyDeleteThanks Ann
DeleteLove, love, LOVE!!!
ReplyDelete:-)
Deletefabulous make and the color is wonderful. you are rocking it all around. I always look to see your shoes as much as your makes. I love love shoes and apparently so do you cause you always have such gorgeous ones.
ReplyDeleteAWWW Yes I do love shoes. I create my look based on my shoes.
DeleteThis is a gorgeous vest! Color is perfect. Enjoy wearing this!
ReplyDeleteThanks Linda
Deletebeautiful color
ReplyDelete