

“As I write, December ends amid the usual neurosis of lists - from bestsellers to best dressed of the year. The last twelve months get summarized in these podium/listings published by all the newspapers and posted on the networks.” (Irene Vallejo, Infinity in a Reed , 2019) – Free translation
Let me participate in this end-of-the-year-list neurosis! From thinking about the project to sharing it with you, this is my list of ten steps to post on this blog:
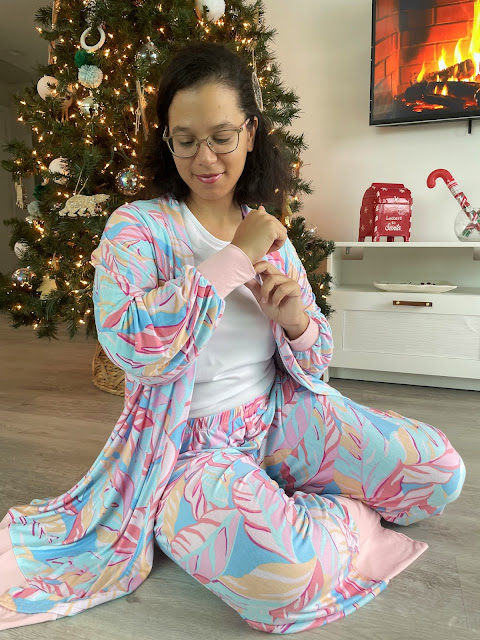
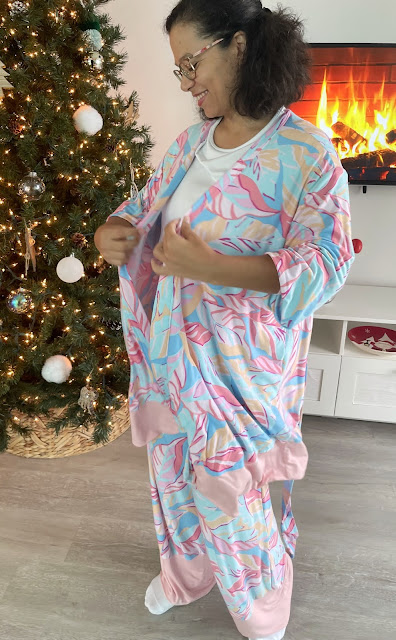
- Decide on a project - I appreciate simple, straightforward, practical projects. I was looking to sew a pajama set this time and chose the McCall M7297 pattern that included the whole set of pants, shirt, and robe. I ended up skipping the shirt, though. It wasn’t my style! The good news: I will use this pattern if I ever want to sew a nurse scrub.
- Select the fabric – Patterns usually include recommendations about the suitable materials to use. In this case, I chose a very stretchy and flowy jersey fabric, combined with a plain pink knit for accent pieces. I checked that both fabrics had the same stretchiness and composition (rayon/modal/lycra) to ensure they were going to couple flawlessly at the seams.
- Cut the pieces – This was my first time using a commercial pattern made in such a thin paper – it feels like rice paper - so I cut my size right into the pattern. I don’t particularly like tracing, but I felt bad cutting into the pattern and knowing I wouldn’t be able to use it again. Once cut, I wrapped every piece into the “rice paper” and laid them all out.
- Make pattern modifications – I made the pants first because they were faster and easier, and they would give me a chance to get familiar with the fabric. Unfortunately, these pants were around six inches too long for me! Also, the bottom band with an accent fabric is an original detail, but it makes them heavier than I like. Once I got the pants, I realized I needed to modify the robe a little. So, I shortened it too, by 6 inches, and sewed tight cuffs instead of oversized kimono-like sleeves. I don’t want my cuff to slip in my pancake mix! I also chose to sew an elastic inside the belt and stitch it on the back of the robe. Otherwise, I know I would have quickly lost the belt!
- Sew! – It’s “the heart” of the process when everything comes together! No wonder it’s the exact middle step! Sewing this project didn’t need any special precautions, just the usual ones: jersey or ball-point needle, serger to polish the seams, making sure not to stretch the fabric while sewing.
- Polish – Here’s a shameless confession: the first outfits I ever sewed didn’t survive the first rounds on the washing machine. They frayed all over; the armholes got deformed, stitches got loose. I wasn’t paying much attention to the finishes. Understitching, what’s that? Stabilizing the stitches, what for? Using the twin needle, why? I have learned my lesson with practice: garment longevity depends on polishing these details.
- Smile and pose! – You can pose in front of a tripod, and that’s fine! But instead, let me give you a tip: find yourself a talented, generous, and resourceful friend like my friend Jennifer! She not only offered her house to take the pictures, with her beautiful Christmas tree, decorations, and a fireplace on the TV. Jennifer sets up the mood, finds the right angles, and takes the best pictures! I will take this opportunity to thank other friends and family that have had the patience to take my photos this year: Carlos, Liana, and Sarina.
- Edit pictures – There are a million apps to edit pictures, and I am not an expert in this! I make sure the lighting is natural, and that’s it!
- Write – Ideas pop up in my head throughout the process. “Oh, this would be worth sharing!” So usually, by the time I finish a project, I know the angle I’ll give to my article, and it’s just a matter of sitting down and putting it together!
- Share – Yay! If you are reading this, the process is complete! Thank you for reading!


Writing on this blog has taught me so much this year. When I applied to become a Fabricista, I knew I liked sewing, posing, and writing. Since then, I’ve realized I enjoy every step of the way! What about you? Any favorite steps? Would you add any steps?
Unfortunately Fabric Mart Fabrics sell out quickly!
You can find similar fabrics by shopping the following category, JERSEY KNITS.
Enjoyable post, I appreciate your logical approach to the process.
ReplyDeleteGreat Job! Thank you for sharing this!
ReplyDeleteYour loungewear is so pretty and very also practical. You have a winner in this make. Happy Holidays to you.
ReplyDelete