
Hey all! Back again to share some Mama and me goodness. This time with both of my kiddos!

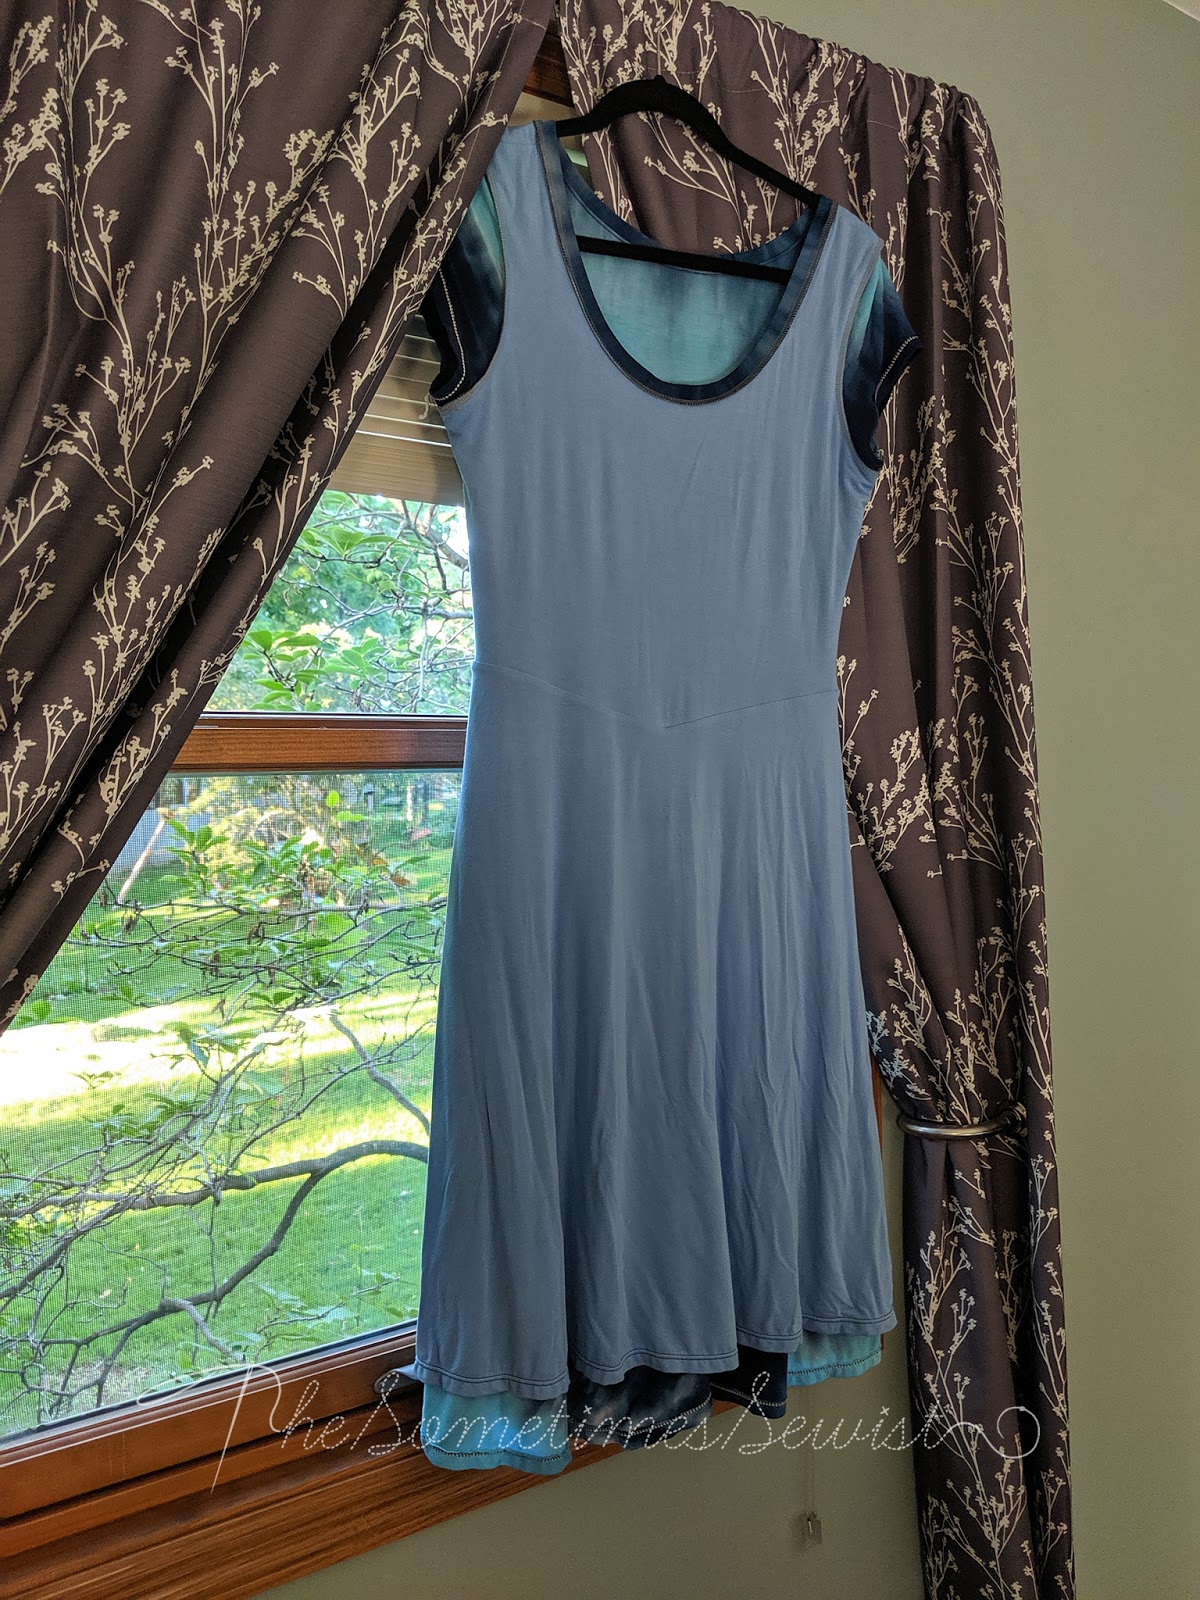
This tie dyed fabric is a soft, lovely Rayon/Lycra Jersey. It's unfortunately sold out, but you can find tons of similar options here! The opacity felt sufficient for the tiny garments, but I was a little concerned it might be a bit too sheer for my own dress, so I lined in another light blue Rayon/Lycra Jersey, like this.

I'm wearing the Sew Liberated Stasia Dress. Upon first glance I kept thinking it was just your average knit dress, nothing special. But I'm easily susceptible to marketing, and I also just kept. on. looking. at this pattern every time I peeped FabricMartFabrics.com. I finally decided to bite after this intriguing verbiage from the pattern description that really spoke to my mama self:
"The Stasia's secret is a v-front bodice, which highlights the smallest part of the waist and provides plenty of room below for beautiful bellies (I call mine the empty baby house!) Wearing your Stasia Dress, your belly and hips will be free to hike, dance, and do all sorts of wonderful activities while still feeling like a million bucks."

Basically, I decided that I needed to try this dress pattern on my empty baby house. Haha. And I was not disappointed. I really LOVE this dress. I already have my next version planned.
I was very lucky to be able to sneak away to see the awesome Ali Wong in Chicago, which is where all of these individual shots were taken (by my friends Stacey and Amanda: thanks y'all!). Shout out to my awesome hubby for watching the kiddos. <3

What makes this knit dress different? There's negative ease at the bust, but zero ease at the waist and the hips are free. So there's no cling in the places where you may not want it. I wasn't expecting to, but I also really love the slightly pointed waistline.

Also...IT HAS POCKETS. They recommended to use a beefier knit than I did (this rayon is a bit thicker than tissue weight) if using the pockets, but I think they turned out great in this garment!

I used a size 12, which is what the pattern recommended for my body measurements, and am quite happy with the fit. I did find that the lovely voluminous skirt pulls at the bodice a bit more than I'd like and it seems to grow a bit as I wear it (see Chicago pics vs. wooded pics, the latter being after more wear), so I'd definitely recommend a two way instead of a four way (like this) stretch knit for this garment. At the least I'd recommend a knit with very minimal vertical stretch.

I did make some changes in my version. I adore a scoop neck, but I'm not a huge fan of scooped backs. So, I raised the back neckline 3" and reduced the neckband to compensate. It's still a bit more dipped than I'd like, so I'll raise it 4" in my next iteration. I also thought the skirt would be a tad too short for my liking, so I lengthened it 3". I'm 5'4" and am happy with the adjusted skirt length, but probably only needed to lengthen it 2" (if I had though about the knit "growth" issue previously mentioned). Also, I cut the lining of the skirt only 1" shorter, but you can see the main skirt looks far longer here due to fabric stretch.

While we're on the topic of the skirt, I discovered something I found to be super befuddling. There are three garment length options in the line drawings and yardage charts (top, short dress, maxi dress) but the printed pattern only came with three pattern sheets (which were numbered 1 of 3, 2 of 3 and 3 of 3, so all appeared to be accounted for), none of which contained maxi skirt pattern pieces. I pored through the directions and the maxi cut layout simply said "in case you choose to lengthen the skirt...".

So I went online and read through a few tester blog posts for the pattern and found that a maxi skirt was indeed included with the PDF pattern, so I emailed the designer to ask what might have happened with my printed copy. Judith answered my email cheerfully and said she wasn't sure what happened, and she kindly sent me the PDF maxi skirt pieces. (Thanks, Judith!)

As of the posting of this blog, it's been determined that yes the maxi skirt should've been included in my printed copy, and Sew Liberated is still checking into what may have happened in the printing process. They encourage anyone who has issues with their patterns to contact them at support@sewliberated.com.

Cheeks is wearing Jalie 2918, in a size I, which is one size bigger than he measures into. I seamed it along the center front and back and cut it on the bias to match the feel of my skirt.

I really love (love love love) Jalie patterns in general, and this T-shirt and their raglan (Nico) are my go-tos for this our little guy and his daddy.

I really love how this turned out for him, and he kept petting himself, telling me how soft it was. Like tactile mama, like tactile son.

Peaches is wearing the Brindille & Twig T-shirt Dress, also cut along the bias and specially seamed like Cheeks' shirt.

I'll start by saying: I HAVE made this garment for her before, but not since she was a tiny blob of a baby.

She's a bit of a wee gal (our daycare provider calls her Tiny Girl. Aww.), so this is a 9-12 month size and fits her well around, but she's pretty average for height and I didn't think enough about that when cutting it out...

I also didn't try this on her before we set out to take photos; oops. I didn't realize it would be this short on her! Eep. It definitely turned out more like a tunic than a dress, and of course this is one time I didn't make any bummies for her as a diaper cover.

I will definitely make this a couple of inches longer next time, or perhaps one to two sizes longer length-wise, and she'll be wearing this particular iteration with pants or shorts from now on.

We'll see how long these kid garments last; a bit a of gamble since we all know rayon can be a picky mistress. As long as they get air dried I suspect they'll be fine, but it's remembering to pluck them from the mess of wash before hitting the dryer that'll be the real issue. Ha!

Here's to the remainder of Summer, and to my sweet tie dye babies. :)

This tie dyed fabric is a soft, lovely Rayon/Lycra Jersey. It's unfortunately sold out, but you can find tons of similar options here! The opacity felt sufficient for the tiny garments, but I was a little concerned it might be a bit too sheer for my own dress, so I lined in another light blue Rayon/Lycra Jersey, like this.

I'm wearing the Sew Liberated Stasia Dress. Upon first glance I kept thinking it was just your average knit dress, nothing special. But I'm easily susceptible to marketing, and I also just kept. on. looking. at this pattern every time I peeped FabricMartFabrics.com. I finally decided to bite after this intriguing verbiage from the pattern description that really spoke to my mama self:
"The Stasia's secret is a v-front bodice, which highlights the smallest part of the waist and provides plenty of room below for beautiful bellies (I call mine the empty baby house!) Wearing your Stasia Dress, your belly and hips will be free to hike, dance, and do all sorts of wonderful activities while still feeling like a million bucks."

Basically, I decided that I needed to try this dress pattern on my empty baby house. Haha. And I was not disappointed. I really LOVE this dress. I already have my next version planned.
I was very lucky to be able to sneak away to see the awesome Ali Wong in Chicago, which is where all of these individual shots were taken (by my friends Stacey and Amanda: thanks y'all!). Shout out to my awesome hubby for watching the kiddos. <3

What makes this knit dress different? There's negative ease at the bust, but zero ease at the waist and the hips are free. So there's no cling in the places where you may not want it. I wasn't expecting to, but I also really love the slightly pointed waistline.

Also...IT HAS POCKETS. They recommended to use a beefier knit than I did (this rayon is a bit thicker than tissue weight) if using the pockets, but I think they turned out great in this garment!

I used a size 12, which is what the pattern recommended for my body measurements, and am quite happy with the fit. I did find that the lovely voluminous skirt pulls at the bodice a bit more than I'd like and it seems to grow a bit as I wear it (see Chicago pics vs. wooded pics, the latter being after more wear), so I'd definitely recommend a two way instead of a four way (like this) stretch knit for this garment. At the least I'd recommend a knit with very minimal vertical stretch.

I did make some changes in my version. I adore a scoop neck, but I'm not a huge fan of scooped backs. So, I raised the back neckline 3" and reduced the neckband to compensate. It's still a bit more dipped than I'd like, so I'll raise it 4" in my next iteration. I also thought the skirt would be a tad too short for my liking, so I lengthened it 3". I'm 5'4" and am happy with the adjusted skirt length, but probably only needed to lengthen it 2" (if I had though about the knit "growth" issue previously mentioned). Also, I cut the lining of the skirt only 1" shorter, but you can see the main skirt looks far longer here due to fabric stretch.
While we're on the topic of the skirt, I discovered something I found to be super befuddling. There are three garment length options in the line drawings and yardage charts (top, short dress, maxi dress) but the printed pattern only came with three pattern sheets (which were numbered 1 of 3, 2 of 3 and 3 of 3, so all appeared to be accounted for), none of which contained maxi skirt pattern pieces. I pored through the directions and the maxi cut layout simply said "in case you choose to lengthen the skirt...".

So I went online and read through a few tester blog posts for the pattern and found that a maxi skirt was indeed included with the PDF pattern, so I emailed the designer to ask what might have happened with my printed copy. Judith answered my email cheerfully and said she wasn't sure what happened, and she kindly sent me the PDF maxi skirt pieces. (Thanks, Judith!)

As of the posting of this blog, it's been determined that yes the maxi skirt should've been included in my printed copy, and Sew Liberated is still checking into what may have happened in the printing process. They encourage anyone who has issues with their patterns to contact them at support@sewliberated.com.


I really love (love love love) Jalie patterns in general, and this T-shirt and their raglan (Nico) are my go-tos for this our little guy and his daddy.

I really love how this turned out for him, and he kept petting himself, telling me how soft it was. Like tactile mama, like tactile son.

Peaches is wearing the Brindille & Twig T-shirt Dress, also cut along the bias and specially seamed like Cheeks' shirt.

I'll start by saying: I HAVE made this garment for her before, but not since she was a tiny blob of a baby.

She's a bit of a wee gal (our daycare provider calls her Tiny Girl. Aww.), so this is a 9-12 month size and fits her well around, but she's pretty average for height and I didn't think enough about that when cutting it out...

I also didn't try this on her before we set out to take photos; oops. I didn't realize it would be this short on her! Eep. It definitely turned out more like a tunic than a dress, and of course this is one time I didn't make any bummies for her as a diaper cover.

I will definitely make this a couple of inches longer next time, or perhaps one to two sizes longer length-wise, and she'll be wearing this particular iteration with pants or shorts from now on.

We'll see how long these kid garments last; a bit a of gamble since we all know rayon can be a picky mistress. As long as they get air dried I suspect they'll be fine, but it's remembering to pluck them from the mess of wash before hitting the dryer that'll be the real issue. Ha!

Here's to the remainder of Summer, and to my sweet tie dye babies. :)
What a great ensemble! I love the added center seam on your son's shirt--it definitely shows off the print well! I just made a round of Nico's for my sons, and I'm with you on the fit--Jalie is such a great option for kids!
ReplyDeleteSimply adorable outfits!
ReplyDelete