
“To overcome fear, here’s all you have to do: realize the fear is there, and do the action you fear anyway.”
- Peter McWilliams

Happy Monday All,
I am so happy I finally made a fully lined garment. One of my sewing goals for 2019, is to create a lined jacket. I kept procrastinating for the past few months due to fear. I literally made every single excuse in the book not to tackle the project and even rescheduled my November post. I then realized fear was holding me back and all I needed to go was give it a try.

The fabric I chose for the project is a beautiful crimson red jacquard metallic fabric here which has a raised pattern design and would work for the basic jacket pattern I had in mind. 

I honestly did not do my research prior and realized that this particular fabric had to be lined even if I decided not to create a jacket based on the fabric texture. I did not want to feel defeated and went straight to work after I found the perfect polyester lining fabric in my stash.

I used McCalls M7730 View B, a jacket pattern with no lapel as I wanted to master lining first. After reading the instructions, I realized that you are basically creating two of the same garment except for a few changes to the sleeves.
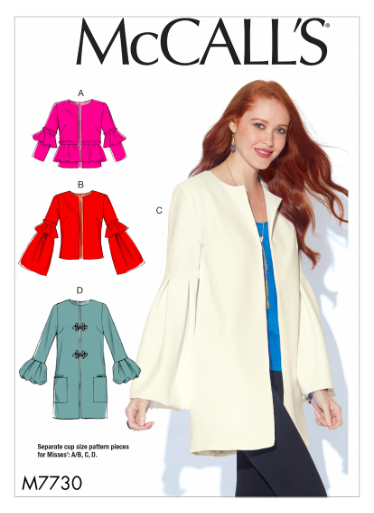
I opted not to construct any of the sleeve variations for this pattern and changed the sleeve length to a basic long sleeve jacket.

My original plan was to taper slightly the short sleeve pattern which was an epic fail. I then looked at a pattern that was similar and used the sleeves of New Look 6514, a duster I made before here.

I checked to see if the sleeves cap length were both the same. Luckily, the patterns were identical and the notches even lined up.

Can you believe I attached 2 wrong sleeves, one short one long :-(!!! I was so excited after attaching the lining to the main and didn't even realize that one of the short sleeve was attached to the lining. For some reason, I just kept on sewing late that night even though I was exhausted and picked up the wrong sleeve length without noticing. I even hung it on my dress form under the main in the dark. It was after I attached the lining, tried it on I realized the mistake I made when I turned it inside out. Has this ever happened to you? (Feel free to share below.)
Lesson Learned: Do not sew when you are TIRED. You may end up using the seam ripper a few times. The next morning, I got up extra early and attached the correct sleeve and finished the jacket. I was so happy and couldn't wait to style and shoot.
 |
| Added a light to medium weight interface for stability. |
Here are some tips that I have learned from other experienced sewists:
1. Trim the seams when add lining to a garment to reduce bulk. Clip corners if need be.
2. When in doubt, add stabilizer or interface to areas that need support. I opted to add interface (not mentioned in the pattern instruction) around the neck area and the front opening of the jacket for stability and it worked out just perfect.
3. Use a lining that matches the MAIN fabric or compliments the color if the jacket does not have facing.
4. Size up for a fitted jacket especially when in doubt. This fabric has NO stretch and I wish I had cut a size 14 instead of a 12 for this particular style.
5. Stitch in the ditch at the shoulder seams to hold the lining in place.

I am absolutely proud of this make and plan to rock this jacket to a business event with a pencil skirt or loose bodycon dress. Have you accomplished your sewing goals for 2019? I still have to make a coat that may be delayed until 2020 as I have a few winter cardigans and sweaters to make before the end of the year.


As we celebrate Thanksgiving this week, I would like to take a moment to thank you all for following and supporting my journey over the past 2 years. My monthly Fabric Mart post has allowed me to step out of my comfort zone and become more confident in my sewing abilities. I am super excited about 2020 now that I have overcome some of my greatest fears in 2019. Moreover, I am grateful for the sewing community who inspires me daily to just cut the fabric. Your kind words and comments you all share do not go unnoticed.

I am target focus for 2020 and will be sharing my sewing plans next month. Also, don't forget to stop by my Instagram page to check out my latest makes.

Wishing you a wonderful Thanksgiving with your loved ones!
One Love - Marica - Overdriveafter30!
I want to make one now! You look so beautiful and the fit is amazing!
ReplyDeleteThank you SO MUCH!
DeleteYou are a beautiful young woman and your jacket is awesome! Congratulations on your finish and accomplishing your goal. Wishing you all the best for 2020 and your sewing goals. Take care, sweet girl, and have fun!!
ReplyDeleteBobbie from Bemidji, MN
P.S. Just so you know, I am a grandmother (76 YO) and love seeing young people going about their lives.
Awww thanks a lot Bobbie! Appreciate those kind words!
DeleteI fully agree about the not sewing when you are tired. A couple of years ago I had a pants for work that I was working on, and sewed the wrong pants together at the side seam. So I took it apart, and thought I grabbed the correct piece, and ended up with the same issue: wrong pieces together.... Needless to say, I quit for the evening with that.
ReplyDeleteIn sewing a purse over the past couple of weeks, I put a zipper pocket in, and put the wrong side of the fabric to the inside of the pocket, but I figured since it was zippered anyways and I had already cut the opening, I was not going to change it. But I did stop for the evening once I realized.
For me, tiredness, frustration, or the mind not being in the sewing are all times that I tell myself it is better to just let the sewing be and go into another room.
AMEN!!! I totally agree!
DeleteCongrats!! I saw your IG post about the sleeves. I've so been there. Glad you persevered!
ReplyDeleteAwww thanks!
DeleteAwesome job!
ReplyDelete