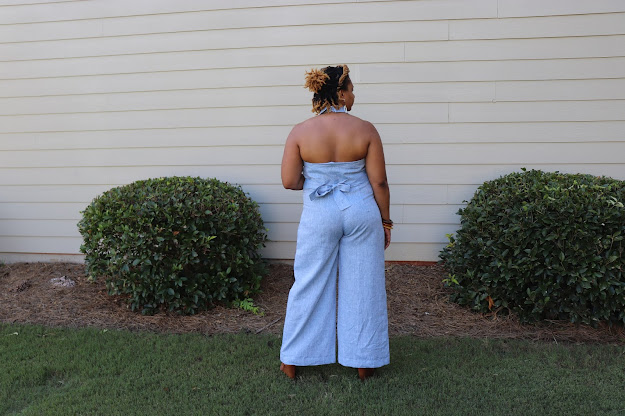
Made by a Fabricista: All Dressed up..


I've been wanting to make something with the exclusive chambray linen since Fabric Mart introduced it. Having used and loved the designer quality linen (here, here and here) I knew this new line would also be amazing. I mean chambray and linen are two of my favorite fabrics, combine the look of one with the feel of the other and you can't go wrong. This fabric is available in 23 colors so you'll find one just right for you. It was extremely difficult to pick just one, but I selected this carolina blue because it gives the look of a classic denim chambray. There isn't much of this color in stock right now, however it will be restocked soon.


Fabric Mart describes it as a lightweight,100% linen fabric with a chambray look with most colors being yarn-dyed with a color and white. They suggest that it is best for a shirt, skirt or dress and warn that a lining may be required for some garments. It worked pretty well for this jumpsuit, but I can understand why it isn't recommended for pants as it is light and I'm a tad worried about the stress on the crotch seam. I was glad that I didn't need a lining. 


Although I loved the fabric before it even arrived I wasn't sure what to make with it. I had pulled several jumpsuit and dress patterns from my stash, but managed to narrow it down to the jumpsuits. That still left three options; Closet Case Amy, McCalls 7936 or Simplicity 9097 so I asked my Instagram fam and they overwhelmingly voted for S9097. So that's what I did though it was the least practical of the three.


It might not be practical as there is certainly no where to wear it currently due to the state of the nation, but I am feeling this make! The halter jumpsuit is a Mimi G for Simplicity pattern and her patterns typically work well for me.  I hardly ever have to adjust the crotch of her pants patterns and I appreciate that. This jumpsuit is a straight 18, though I should have graded out to a 20 at the waist. I had to go back and let out each seam a little for a smidge more room. There are sewn in sash to create a little more definition at the waist. I had a plan to add some elastic between the the back and back facing pieces, but the sash saved that from being necessary. I love the large pockets. 


The only downside of the fabric is it will fray (like any loosely woven linen would) so make sure to serge your raw edges before construction if you're at all concerned. Also serge your raw edges before prewashing! Like most linens it is a prone to wrinkle, but that is simply one of the properties of 100% linen fabrics. Lastly be sure to stay stitch any curved seam or seam that may be stretched while you're working with it. 


See you next month!!!

Tiffany

Comments

  1. You have to stop making such beautiful outfits!!! LOL. This is the second time I saw something you made and raced over to FM to buy the fabric ( the first was the layered crinkle gauze dress and I just bought some of this chambray linen after eyeing this post for weeks). Love what you did was this fabric, and many thanks for the heads up on how to handle this linen when sewing.

    ReplyDelete

Post a Comment

Thanks for leaving a comment! All comments are reviewed before posting to help us eliminate spam. Your comment will be posted within 24 hours.

Popular Posts You Might Like

Made By A Fabricista: Playing with Classic Silhouettes and Timeless Color Palettes

When it comes to sewing, few things excite me more than reimagining classic designs and breathing new life into timeless patterns. As someone who has been sewing for over 25 years, I thrive on exploring unique details and construction techniques that make each piece feel special. Recently, I found inspiration in a previous look I’d created and decided to take it a step further, crafting a full outfit that plays with volume, texture, and classic styling. See below my dress from 2011 that I drew inspiration from. The Fabric For this project, I chose a Glen Plaid Suiting fabric from Fabric Mart, a timeless yet versatile pattern that instantly elevates any garment. The fabric’s classic black-and-white palette gave me the perfect base to experiment with silhouettes and pairings while keeping the overall look chic and cohesive. I love how this fabric’s pattern gives off an air of sophistication yet lends itself beautifully to bold, modern designs. The Dress For the dress, I used the VikiSew...

Made By A Fabricista: Liberty Snow Day

Hi everyone! While we’ve been blanketed with snow out here in Southeastern PA, I decided to conquer my fear of button holes and make NewLook pattern N6749. I was able to snag a few yards of the Jess + Jean print Liberty of London Tana Lawn for it. It’s always exciting when Fabric Mart is able to get Liberty fabrics in! I always make sure to grab some.  Cutting into a beautiful piece of tana lawn is scary every time. The fabric is such good quality, I’m afraid to mess it up! I had to be extra careful as this is also the first directional pattern I’ve worked with. But one of my assistants made sure all of my pieces were laid correctly. Something I wanted to try out with this dress was finishing the inside seams using the overlock stitch on my domestic machine. Normally I would french seam, but it was nice to not have to worry about cutting seam allowance in half, sewing, trimming, flipping, and sewing again. Next time I would cut the seam allowance back before overlocking, but I thin...

Made By A Fabricista: Ghostly School Uniform

When Fabric Mart asked me what fabric I wanted for my first project I knew EXACTLY what I wanted to make, Nene Yashiro from Toilet Bound Hanako kun (a weird but cute anime) but as cute as the design was, I knew I'd need to adjust the colors to a slightly warmer tones to better suit my complexion and undertones. For the main dress I was so happy to find an off white cotton/Lycra stretch twill that was opaque enough to not need a lining and stretched enough that I could continue avoiding my nemesis; zippers. I wanted to try out having a seamless center front panel, so I modified one of my existing go-to bodice patterns, and after figuring out what length I wanted for the skirt, was able to have the center front panel incorporated into the center front panel of the skirt. I then had the rest of the bodice as their normal waist length so that I could add an additional panel to the skirt to be able to have enough width to have volume and gather it down evenly around my waist. The hem h...