
I have been making so many items for myself lately, I really felt pulled to finally make something for my husband for Father's Day. I have only ever made him one item, a Star Wars bag that he brings with him to baseball games so he can have something to hold waters and any giveaways they might have. I have wanted to make him a Hawaiian/camp shirt for years, but I always find something else to occupy me instead. So when I was presented with my June post AND Fabric Mart had both this adorable Japanese quilting cotton in a black volcano print and Colette's Negroni pattern for sale, I told them I had my June project! I knew my husband would love his shirt since he currently has ten of these kind of shirts in his closet and is the closest he gets to dressing up. (Well barring the two or three times a year he wears a suit.)
 Colette Negroni. Size M (at shoulders and upper chest) graded to a L (at the waist and hips). I chose this size based on a Boden camp shirt that my husband owns and wears well. Turns out that the fit is exactly the same, but because I made it, he was all, "it's a bit big in the waist and hips." LOL. Men. I then pointed out it fit exactly like one of his favorite camp shirts and he stopped complaining. :-)
He did love it, though, he just had that one minor issue.
 Side View. The length on this shirt was just right for his 5'11" frame. He has a longer torso with shorter legs (my legs are actually longer than his and I am three inches shorter than him) and this shirt gave him more than enough length. I tried it on and it was long. I could wear it as a tunic if I wanted! So if you have a man you are sewing for with a long torso, I highly recommend this one. I did the hem up 1 inch, btw, not the 5/8" suggested by the pattern.
The hem is slightly rounded at the side seams, not a big deal, but it did require me to ease in the excess hem material when hemming it up.
 Back View. The pleats at the back are nicely drafted, but I think I may have made them too big, so there was more yoke left over than there should have been at the armscye seams. I made it work, but I think I was meant to make those pleats a bit more shallow. My husband has a relatively small frame, so it fit him fine, but be careful of that if you are working on a shirt for a man who has less wiggle room overall.
I like the fit a lot. Most patterns for men have ridiculous ease built into them. I have another camp shirt pattern that has something like ten inches built into the pattern at the chest. I mean I know that men like things loose, but we aren't making a winter coat that has to fit over bulky sweaters here! I would have even liked to try making this pattern smaller (and will definitely make his next version smaller through the waist and hips). I know he won't want anything smaller than a medium, but if your husband prefers a more slim fit, go with the true size, and you will have a slim cut for sure.
 Full Item view. Normally Fabric Mart carries apparel fabric, and while quilting cotton can be used for apparel items, it usually gets sniffed at as inappropriate for garments. I personally love quilting cotton for clothing, partially because I love printed fabric and quilting cotton has the best patterns out there (barring Liberty of London), but I also love the fact that these can be washed and worn a gazillion times and still look fresh and tidy. I almost exclusively sew for my boys in quilting cotton, for instance. I also know that if my husband washes these items and then puts them in the hot dryer, they will stand up to all the hard washing and drying. My items made from more proper apparel fabrics usually require me to wash them and line dry them, so for my sanity, I make many from quilting cotton so I can have my husband do some of the washing.
He will likely wash this with his clothing but then line dry it since he doesn't like to dry his clothing that is "nice" in the dryer. That will allow this shirt to stand up to wear even better.
The colors and print on this fabric are very clear, well executed, and vibrant. It is a Japanese cotton, and from what I have read, the Japanese quilting cottons are prized. It is the typical 44" width, so keep that in mind if you plan to use it. This pattern required nearly 2.5 yards of this fabric.
 Placket Detail. The pattern is well drafted and goes together very nicely. I did find the sleeves didn't set in flat as nicely as the directions said they would, but I also chose not to do the flat-felled seam there (I did do another thing suggested by the pattern, that is in the next photos). I ended up with excess ease on the sleeve, so next time, I will lightly ease up the sleeve cap by adding a row of gathering stitches. It won't require much easing, but will make for a better sewing experience.
I found the pattern, while it came together nicely, didn't have enough match points at the seams. When you are crafting a pattern with a very visible repeat like this one (it is almost like I was sewing with stripes), you need those match points. Mine turned out great, but I spent a lot of my sewing time on the cutting stage to ensure the seams would match up at proper printed placement.
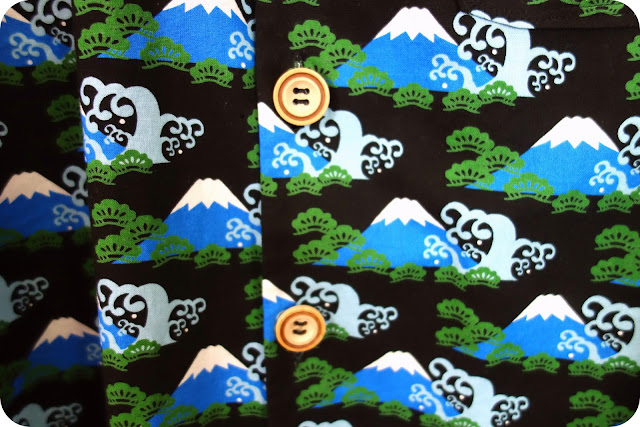
Because this pattern makes up a very 1950s/1960s kind of shirt, I decided to go for buttons that look like "wood," as many Hawaiian shirts of that era featured wooden or coconut buttons (some still do). The effect is kind of cool, the dark background with the lighter colored buttons makes for a striking appearance. I found these buttons in my stash, I believe they were from a Fabric Mart button bundle from a few years ago. :-) If I had made this in the lighter version of the Volcano print, like what I made my dress from (at the bottom), I would have used coconut buttons for contrast (if I could find them, of course).
 Crazy Burrito method for enclosing yoke. This pattern suggested I enclose all the seams of the yoke on the machine. I have only ever made yokes that involved me hand-stitching the bottom bit to the under bit, so I was a bit surprised they suggested this. I was SURE it wouldn't work for me, but some wrangling of fabric and many minutes making sure I wasn't sewing fabric that wasn't supposed to be sewn, and voila, success! A full yoke, completely enclosed by machine sewn seams. I will definitely be trying this in the future on all my shirt yoke projects. Very cool. The directions are adequate, but I feel like you have to read them very carefully to "get it."
 Detail of enclosed yoke from the back looking up on the inside.
 I wanted my pocket to disappear on this shirt, so I was very careful when I was laying out that pattern piece. I showed my step by step process in the above collage for any of you attempting this for the first time. :-) (Reminder, I folded down the pocket facing when figuring out my placement, but you could leave it up if you so desire, so long as the visible part of the pocket has the drawn placement on it.)
 All in all, I am so glad I made this for him. Usually he figures out what I am getting him (grr) or he doesn't really like what I get him (double grr), so to be successful on both counts is a minor Father's Day miracle. He did get it early (Father's Day is June 21!), but early is better, and helped me with the surprise. Yay!
 And because I am me, I couldn't resist making a matching dress for myself from the other color of this fabric, also available from Fabric Mart. I like the black version, but my skin tone looks horrible in black, so this cream works so much better for me.
Even after making both a man's button up shirt and a woman's dress, I had a lot of fabric left over in both colors, so I decided that I would make both boys a pair of shorts in the black color and my daughter a skirt in this cream color. Yes, we are going to be *that family* who has matching clothing, lol. I will limit when we all wear it, but if you know us personally, be prepared for our Christmas card, which will likely have a photo of us all wearing it. Thankfully most of our family and friends enjoy our craziness, so they should smile and not grimace when they receive it in December. ;-)
The children's clothes are cut, but not sewn. I promise to send Fabric Mart a photo of all of us in our gear when I do finish them and can get us all together for a photo.
 Although I plan on writing more on the construction of this dress at my blog next week sometime, I want to at least let you know some details on it just in case you were wondering. Because the cotton is Japanese, I thought using one of my many Japanese Pattern Books would be a perfect fit, so I sat down and figured out which one would allow for the print to be front and center, AND would not have so many seams that I would get a headache from trying to match up all the volcanoes properly. Eventually I settled in on Dress D from the "Stylish Dress Book." This is the cover dress, though mine is altered a lot so it looks different.
This pattern is made up in a size medium at the shoulders and bust, and the large at the waist and hips. My measurements are technically small, medium, and large from bust through hips, but I had read that these pattern books do run small since they are made for the Japanese population, and in general women there are shorter and thinner than I am. Turns out this particular pattern runs large, and thankfully I read that before cutting mine out, so instead of adding seam allowances, I just traced the medium/large and cut it out on those lines, and used a 5/8" seam allowance throughout. So technically I probably have a small/medium here after it was sewn up. It fits great and all the pieces fit beautifully together. Very nicely drafted. I did add four inches to the hem since I am 5'8" and even with the world's narrowest hem (1/2"), it is still above my knee. These patterns are not drafted for the tall.
I didn't want to have a dress with no waist definition, so I decided to add a bit of elastic at the waistline (I used a point *just* above my natural waist--I have a very high waist). I used a bit of bias binding on the inside as a way of encasing the elastic and it turned out well (I will explain more on that in my blog post later this week at my blog).
I also chose not to add the sleeves. I really like the way the shorter cap sleeves look on this dress, great for summer. I do think, though, when I make this up without the elastic at the waist, I will add the sleeves. I will likely try that look with a solid color linen or wool, which I think will be both beautiful and comfortable.
The pockets are brilliant, and are exactly the right size for comfort. I am so glad I added them. Like on my husband's shirt, I wanted them to disappear, so I made sure to do the same technique when laying out the pattern piece.
Okay, that's it for today. I really hope all of you are having a lovely Saturday! Happy sewing and Happy Early Father's Day!
~Dina of My Superfluities.

He did love it, though, he just had that one minor issue.

The hem is slightly rounded at the side seams, not a big deal, but it did require me to ease in the excess hem material when hemming it up.

I like the fit a lot. Most patterns for men have ridiculous ease built into them. I have another camp shirt pattern that has something like ten inches built into the pattern at the chest. I mean I know that men like things loose, but we aren't making a winter coat that has to fit over bulky sweaters here! I would have even liked to try making this pattern smaller (and will definitely make his next version smaller through the waist and hips). I know he won't want anything smaller than a medium, but if your husband prefers a more slim fit, go with the true size, and you will have a slim cut for sure.

He will likely wash this with his clothing but then line dry it since he doesn't like to dry his clothing that is "nice" in the dryer. That will allow this shirt to stand up to wear even better.
The colors and print on this fabric are very clear, well executed, and vibrant. It is a Japanese cotton, and from what I have read, the Japanese quilting cottons are prized. It is the typical 44" width, so keep that in mind if you plan to use it. This pattern required nearly 2.5 yards of this fabric.

I found the pattern, while it came together nicely, didn't have enough match points at the seams. When you are crafting a pattern with a very visible repeat like this one (it is almost like I was sewing with stripes), you need those match points. Mine turned out great, but I spent a lot of my sewing time on the cutting stage to ensure the seams would match up at proper printed placement.
Because this pattern makes up a very 1950s/1960s kind of shirt, I decided to go for buttons that look like "wood," as many Hawaiian shirts of that era featured wooden or coconut buttons (some still do). The effect is kind of cool, the dark background with the lighter colored buttons makes for a striking appearance. I found these buttons in my stash, I believe they were from a Fabric Mart button bundle from a few years ago. :-) If I had made this in the lighter version of the Volcano print, like what I made my dress from (at the bottom), I would have used coconut buttons for contrast (if I could find them, of course).


Even after making both a man's button up shirt and a woman's dress, I had a lot of fabric left over in both colors, so I decided that I would make both boys a pair of shorts in the black color and my daughter a skirt in this cream color. Yes, we are going to be *that family* who has matching clothing, lol. I will limit when we all wear it, but if you know us personally, be prepared for our Christmas card, which will likely have a photo of us all wearing it. Thankfully most of our family and friends enjoy our craziness, so they should smile and not grimace when they receive it in December. ;-)
The children's clothes are cut, but not sewn. I promise to send Fabric Mart a photo of all of us in our gear when I do finish them and can get us all together for a photo.

This pattern is made up in a size medium at the shoulders and bust, and the large at the waist and hips. My measurements are technically small, medium, and large from bust through hips, but I had read that these pattern books do run small since they are made for the Japanese population, and in general women there are shorter and thinner than I am. Turns out this particular pattern runs large, and thankfully I read that before cutting mine out, so instead of adding seam allowances, I just traced the medium/large and cut it out on those lines, and used a 5/8" seam allowance throughout. So technically I probably have a small/medium here after it was sewn up. It fits great and all the pieces fit beautifully together. Very nicely drafted. I did add four inches to the hem since I am 5'8" and even with the world's narrowest hem (1/2"), it is still above my knee. These patterns are not drafted for the tall.
I didn't want to have a dress with no waist definition, so I decided to add a bit of elastic at the waistline (I used a point *just* above my natural waist--I have a very high waist). I used a bit of bias binding on the inside as a way of encasing the elastic and it turned out well (I will explain more on that in my blog post later this week at my blog).
I also chose not to add the sleeves. I really like the way the shorter cap sleeves look on this dress, great for summer. I do think, though, when I make this up without the elastic at the waist, I will add the sleeves. I will likely try that look with a solid color linen or wool, which I think will be both beautiful and comfortable.
The pockets are brilliant, and are exactly the right size for comfort. I am so glad I added them. Like on my husband's shirt, I wanted them to disappear, so I made sure to do the same technique when laying out the pattern piece.
Okay, that's it for today. I really hope all of you are having a lovely Saturday! Happy sewing and Happy Early Father's Day!
~Dina of My Superfluities.
Dina, I do not know how you are sewing your sleeves in "in the flat", but I've been using Peggy Sagers method for a couple of years and love it. http://sewing.patternreview.com/cgi-bin/reviewgallery.pl
ReplyDeleteOoh, thank you for that. I am always looking for a better way to put in my sleeves. I like sewing, but have to admit to not love love loving the sleeve insertion portion. :-) I didn't care for the way this pattern set in the sleeves at all, but the rest of the pattern is great, so worth the little quibble.
DeleteThanks for this long and detailed write-up! I know how long it can take to create a blog post, so I really appreciate it. Both garments look amazing!
ReplyDeleteHey, there! Thank you! I like to write, a lot, so this was a pleasure to do, but it does take some time. :) You know, I am sure, since I saw from your profile at blogger that you are a writer by profession. I also saw that you like Sufjan Stevens, and he is one of my favorites, too. We even share the same birthday, year and all.
DeleteWhat pattern did you use for the Men's shirt; I would love to see the Burrito method for sewing in the yoke
ReplyDelete