

I imagine that most of us who love to sew also love to decorate! If you like experimenting with different fabrics, textures, and colors, then sewing for your home is one more way to enjoy doing that. I used to paint the walls a lot- my husband joked that we were repainting every two weeks. These walls have been varying shades of purple, green, and gold over the years! I decided that my husband had a point, and about 5 years ago, I decided to try painting the walls a neutral gray and then when I wanted to redecorate, I would play around with color using fabric in the room- the pillows, drapes and blankets- things that I could sew.

So, recently I picked out some fabrics from Fabric Mart to give my living room a makeover. I ordered some sheers, fleeces, and decorator fabrics in shades of blue, cream and grey. Let's start with the blankets. With winter around the corner, you've got to have a great blanket to cover up with while you watch TV or read a book!

I ordered 3 yards each of a Polartec Box fleece in Venetian Blue, and an Antique Cream Minky-like Sherpa Fleece. I had originally envisioned making a couple of no-sew tie blankets with the fringe using these, but when I got them the Sherpa Fleece was twice as thick as I had imagined! It was amazingly thick, and I had to come up with a different way to make the blankets. I cut each piece into 1-1/2 yard lengths, and then trimmed the sherpa fleece to be four inches shorter and narrower than the box fleece.

Then I centered the cream fleece on top of the blue fleece, ran a strip of Wonder Tape around the edges, and folded the blue fleece over to make a border. The white strip is the Wonder Tape. I chose to use Wonder Tape instead of pins so that the fabric wouldn't shift while I was sewing it.


I zigzag stitched around the perimeter, and that was it! So simple, and so much more luxurious than any blanket that I could have bought.

For the sheers, I picked out this Silver Spheres Sheer fabric that was 118" wide. I had 8 yards which at 118" wide, seemed like a ton of fabric, but was really just perfect for the window opening. I cut it into four 2 yards pieces, sewed two of these pieces together at the selvages so that I had 236" wide panels, then added both a header and footer out of additional fabric.

I knew that I wanted to try using grommets for the top of the sheers, but I wasn't confident that putting grommets into sheers would be durable. I decided to create a header out of a silver satin. I used Dritz curtain grommets (that look like metal, but are actually just plastic). To use them, you use a template to cut holes in your fabric, and then snap the grommets over the hole. I decided to use a spray adhesive to hold my layers together, as I could easily see the layers shifting and causing problems. Here is my set up before I sprayed the adhesive. I had already attached the header to the sheer fabric, but had not sewn it closed. I covered the areas that I didn't want to spray with newspaper, then lightly sprayed the adhesive on the satin.

I folded it in place, then used their template to mark the holes.

After cutting the holes, you slide one half of the grommet underneath, centering it in the hole. Here is a shot of what it looks like before you put the top part on. Then just snap on the top piece. No other tools are required.

I had ordered 24 grommets, and spaced them 12 inches apart. If I had to do it over again, I would get a couple more packages of grommets, and space them 8 inches apart. I would also recommend interfacing the header- I did not, and even though my satin is pretty stiff, it still could have used a little more body there.
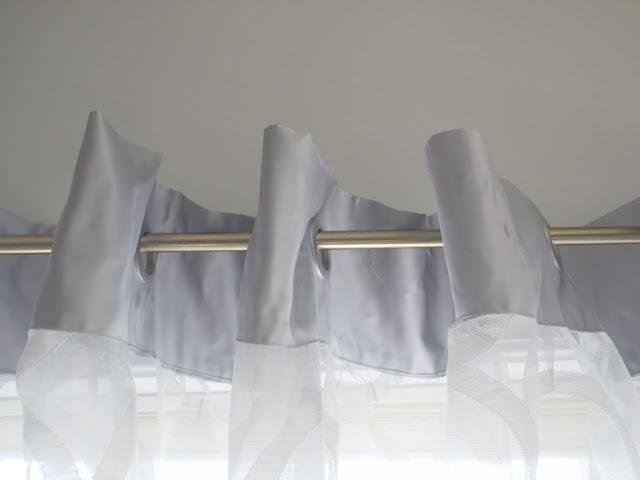
They are really lovely and diffuse the sunlight in this room so nicely. I can't wait to see what the snowfall will look like through them. It's really hard to photograph windows by the way!

You can't see the bottom because our sofa is in the way, but I did also add a silver fabric footer to these. I thought that they needed something weightier to hold them down at the bottom.

For the pillows, I ordered two yards of fabric for recovering some throw pillows- 1 solid and 1 print. The one thing that I have learned over the years in making pillow covers, is that the home dec fabric really is superior to using regular cotton fabric. Pillows actually take quite a bit of stress, and regular cotton fabric will tear and wrinkle, but home dec fabric doesn't. I was able to get 3 covers from each yard.

I use down pillow forms that I got from IKEA in various shapes and sizes. I like down-filled pillows because they seem to last longer than regular polyester filled pillows, and I can just change the covers on them. Again, you really need home dec fabric to use down pillows, as it is dense and won't let the pointy feathers through. Those feathers will manage to get through once in a while, but not often.

For the pillow covers, I don't do anything fancy. I just cut a square or rectangle the size of the form plus 1" for seam allowances. I serge the raw edges, and use the selvages for edges if I can because that will be the best edge finish. I insert a zipper on one side- whatever zippers I have on hand.

Home dec sewing is really rewarding because you get to see and use what you've made everyday! I'm excited to have a fresh look in the living room, particularly as we go into the holidays when we'll be having family and friends over more often.

I think my cat is enjoying the new blanket and sheers too!


I ordered 3 yards each of a Polartec Box fleece in Venetian Blue, and an Antique Cream Minky-like Sherpa Fleece. I had originally envisioned making a couple of no-sew tie blankets with the fringe using these, but when I got them the Sherpa Fleece was twice as thick as I had imagined! It was amazingly thick, and I had to come up with a different way to make the blankets. I cut each piece into 1-1/2 yard lengths, and then trimmed the sherpa fleece to be four inches shorter and narrower than the box fleece.

Then I centered the cream fleece on top of the blue fleece, ran a strip of Wonder Tape around the edges, and folded the blue fleece over to make a border. The white strip is the Wonder Tape. I chose to use Wonder Tape instead of pins so that the fabric wouldn't shift while I was sewing it.


I zigzag stitched around the perimeter, and that was it! So simple, and so much more luxurious than any blanket that I could have bought.
For the sheers, I picked out this Silver Spheres Sheer fabric that was 118" wide. I had 8 yards which at 118" wide, seemed like a ton of fabric, but was really just perfect for the window opening. I cut it into four 2 yards pieces, sewed two of these pieces together at the selvages so that I had 236" wide panels, then added both a header and footer out of additional fabric.

I knew that I wanted to try using grommets for the top of the sheers, but I wasn't confident that putting grommets into sheers would be durable. I decided to create a header out of a silver satin. I used Dritz curtain grommets (that look like metal, but are actually just plastic). To use them, you use a template to cut holes in your fabric, and then snap the grommets over the hole. I decided to use a spray adhesive to hold my layers together, as I could easily see the layers shifting and causing problems. Here is my set up before I sprayed the adhesive. I had already attached the header to the sheer fabric, but had not sewn it closed. I covered the areas that I didn't want to spray with newspaper, then lightly sprayed the adhesive on the satin.

I folded it in place, then used their template to mark the holes.

After cutting the holes, you slide one half of the grommet underneath, centering it in the hole. Here is a shot of what it looks like before you put the top part on. Then just snap on the top piece. No other tools are required.

I had ordered 24 grommets, and spaced them 12 inches apart. If I had to do it over again, I would get a couple more packages of grommets, and space them 8 inches apart. I would also recommend interfacing the header- I did not, and even though my satin is pretty stiff, it still could have used a little more body there.

They are really lovely and diffuse the sunlight in this room so nicely. I can't wait to see what the snowfall will look like through them. It's really hard to photograph windows by the way!

You can't see the bottom because our sofa is in the way, but I did also add a silver fabric footer to these. I thought that they needed something weightier to hold them down at the bottom.

For the pillows, I ordered two yards of fabric for recovering some throw pillows- 1 solid and 1 print. The one thing that I have learned over the years in making pillow covers, is that the home dec fabric really is superior to using regular cotton fabric. Pillows actually take quite a bit of stress, and regular cotton fabric will tear and wrinkle, but home dec fabric doesn't. I was able to get 3 covers from each yard.

I use down pillow forms that I got from IKEA in various shapes and sizes. I like down-filled pillows because they seem to last longer than regular polyester filled pillows, and I can just change the covers on them. Again, you really need home dec fabric to use down pillows, as it is dense and won't let the pointy feathers through. Those feathers will manage to get through once in a while, but not often.

For the pillow covers, I don't do anything fancy. I just cut a square or rectangle the size of the form plus 1" for seam allowances. I serge the raw edges, and use the selvages for edges if I can because that will be the best edge finish. I insert a zipper on one side- whatever zippers I have on hand.
Home dec sewing is really rewarding because you get to see and use what you've made everyday! I'm excited to have a fresh look in the living room, particularly as we go into the holidays when we'll be having family and friends over more often.

I think my cat is enjoying the new blanket and sheers too!
Happy Sewing!
Ann
Wow, your living room looks so glamorous!! Great job on everything.
ReplyDeleteThanks, Ann!
DeleteAmazing. I am inspired to do a little make over myself!
ReplyDeleteThanks, Jenese. I hope you'll post yours as well! I'd love to see your make over!
DeleteAmazing. I am inspired to do a little make over myself!
ReplyDeleteFANTASTIC!!!!!!!!!!!!!!!!!!!
ReplyDeleteThanks, Kathy!
DeleteThat looks fantastic!
ReplyDeleteThanks, Rosemary!
DeleteBeautiful! I especially love the sheers- the light coming through looks great.
ReplyDelete