

Week Two has ended and the contestants all finished their trench coats, using up every minute they had! This week's challenge was to create a trench coat that fit their personality. This was a tall order for just a week's worth of sewing but they all pulled it off great! After looking through what they made, scroll to the bottom of the post to vote for your favorite.
You may find a more detailed blog post about each of their projects on their own blog. We had to modify the length of each blog post to better fit into this space. Click the link to their blog to see more.
Are you sewing up a trench coat for the Reader Participation part of the Fashion Challenge? Post on Facebook or Pinterest using hashtag: #fabricistafabricmart by September 22 and you will be entered into a random drawing for prizes!
For details on Reader Participation prize, week two challenge and more, click HERE.
Let's see what they created...

After reading the email I immediately went on line to read up on the history of the Trench Coat and to look for inspiration. I knew I didn’t want the traditional Trench Coat as I am top heavy and all those buttons on the traditional Trench freaked me out. I also knew I wanted something in darker denim, something I could wear on a cool winter’s night to the movies, or to work on a casual Friday. So I found these three designs that I absolutely loved:


My Trench is fully lined and inset pockets with some beautiful whimsical cotton fabric I found at Walmart. I purchased the whole bolt. The fabric has a really cute French City Part theme. I thought it was a perfect contrast to the darker denim I used for the coat. I also fully serged all seams on the inside of my coat.


I am extremely excited about Week 3’s project and hopefully I make it to the next round. Happy Sewing!


 It would take an entire post to describe my personality, because it is all over the place! I would agree with all personality tests that say I am creative, emotional, empathetic, detail-oriented, etc. For this challenge I would like to describe my personality in a manner that ties into my trench coat choice.
At times I am very reserved, but at other times I am very outgoing. It really depends on the setting, crowd, and my mood (yes, I can be a bit moody).
I love a great trench coat and I love a great moto jacket. I have a few of both kinds of coats in RTW and one of each that are DIYs. I think a trench coat represents the reserved side of me, but a moto jacket represents that outgoing side of me. So as I was thinking about this challenge, I thought, why not merge the features of both styles and make a Moto Trench Coat!

 I adore simple everyday looks and I am sucker for bold, eclectic, and attention-grabbing looks. I love high-end fashion, especially things with a lot of detail, color, and print. My favorite thing to do is mix and match classic pieces with edgy pieces, and I think that is what a moto trench coat embodies. A classic trench with an edgy moto jacket (or in other words reserved vs. outgoing).
So for this look I mixed as many elements of each that I wanted and could get done by the deadline; and although I added many details, my goal was still to achieve a cohesive look.
I made this look by modifying Burda 6800 View B, which is a moto jacket pattern. To turn it into a trench, I added length to all of the front and back pieces. Instead of cutting the back center piece and lining on the fold, I added seam allowance and cut two pieces. My fabric is a heavyweight sportswear fabric, 65% polyester and 35% cotton, reminds me of canvas.

Tee from Maggie Elaine

At times I am very reserved, but at other times I am very outgoing. It really depends on the setting, crowd, and my mood (yes, I can be a bit moody).
I love a great trench coat and I love a great moto jacket. I have a few of both kinds of coats in RTW and one of each that are DIYs. I think a trench coat represents the reserved side of me, but a moto jacket represents that outgoing side of me. So as I was thinking about this challenge, I thought, why not merge the features of both styles and make a Moto Trench Coat!

Julie (from Fabric Mart) presented the challenge this week with a short history on trench coats and I thought it was very informative. One fact mentioned was that Burberry and Aquascutum invented the trench coat back in the 1850s. This led me to start googling Burberry trench coats and that’s where I found inspiration for my look!

So for this look I mixed as many elements of each that I wanted and could get done by the deadline; and although I added many details, my goal was still to achieve a cohesive look.
I made this look by modifying Burda 6800 View B, which is a moto jacket pattern. To turn it into a trench, I added length to all of the front and back pieces. Instead of cutting the back center piece and lining on the fold, I added seam allowance and cut two pieces. My fabric is a heavyweight sportswear fabric, 65% polyester and 35% cotton, reminds me of canvas.

I lengthen the belt, because I think a trench should have long belts so you can tie it. I do like to buckle my belts as well. I intended to add belt holes, but my test runs with the tiny-sized eyelet puncher were disastrous, so I could not commit to making the holes in my fabric until I get that thing figured out.
A classic trench coat has to have pockets and an edgy moto jacket has to have zippered pockets. So I added side pockets and small zippered pockets. In the history Julie provided, I learned that each little piece on the trench coat serves a purpose. These zippered pockets’ purpose is to carry my lip gloss, ID, and key fob, when I don’t want to carry a purse. For a decorative feature, I added flaps and buttons along the zippered pockets.

 For the sleeves, I went back and forth in my head about adding straps, zippers, or both like the inspiration picture. I decided to add zippers to the side of the sleeves, which is a design of the pattern as well. I found these little 5 inch zippers for a $1.00 each and they are the same ones I used for my front pockets.

What would a trench coat be without all the straps and flaps? What would a moto jacket be without a little stitched leather/suede?


What would a trench coat be without all the straps and flaps? What would a moto jacket be without a little stitched leather/suede?

To add a little contrast I made the yoke in black. I used leftover leather from last week as the fabric, BUT I flipped it on the suede side. To treat and protect the suede, I used a suede nubuck, brush, and spray (this technique is great for cleaning and buffing your suede shoes by the way).
I lightly rubbed the nubuk bar across the suede (it’s like an eraser), then brushed it. I always lightly spray-on the protectant outdoors and lay them out to dry, because the spray is a bit strong. The odor mellows out once it dries. Once dry I give it another light brush. This will help protect it from the weather elements. I intend to treat my coat with some sort of fabric/water repellant once I test it out on a few scraps of fabric, so that if I am ever caught in the rain, the water will roll off and not soak through my coat.
I top-stitched the suede with a wine-colored thread. To stitch suede, use a leather needle and a Teflon sewing foot so that it glides through and doesn’t get stuck under the presser foot. I didn’t stitch the lines according to the pattern, I just did my own stitched design.
Now what about that signature? If you noticed in my title I called this a “Burberry-ish” moto trench coat and this fabric is why!

A little over a year ago, I found this fabric at a going out of business/estate sale. The owner of a small sewing factory had passed away and her family sold all of her things from the business. The woman that passed owned really amazing and well-kept fabric, leather, sewing tools, and industrial equipment. I paid less than $10 dollars for this fabric. I had no idea what I was going to do with it, but I purchased it because it reminded me of Burberry’s signature plaid. This fabric is 80% rayon and 20% polyester. When I saw this fabric in my stash, I felt at that moment that my vision for this coat was confirmed!
I used this fabric for the interior of the coat as lining…
I used this fabric for the interior of the coat as lining…

DISCLAIMER: Before you think I didn’t take the care in matching my front panels to my back panels…it is because I had limited fabric and I had to be judicious when using it. So I focused on making sure all of front pieces matched and all of the back pieces matched, because when the coat is hanging and draped, you really can’t tell the sides don’t line up. I used a solid colored fabric for the sleeve lining.

Elizabeth from Elizabeth Made This

When the trench coat challenge this week for the a couple of things ran through my mind. First, I thought about how much I love making jackets, then about how much work a jacket is, but mostly that I wasn't expecting to make another trench coat so soon after my Jeanius Trench. The upside is that I could start work immediately because my pattern had already been fitted and cut before. An applique trench coat was in the works!
Vintage Vera Applique Trench Coat - One of the things that Fabric Mart wanted to see in the trench coats this week was our personal style. My own style is a bit eclectic. As a sewist, I love modern Euro patterns with lots of detail, but I also love embellishment techniques. I grew up going to antique stores with my Mom. We always called it (and still do) treasure hunting. Because of her I have a serious appreciation for lace, other vintage textiles and accessories.
As an adult, I've become a collector of vintage table linens kind of for a really specific reason. I'm a serious baker, and I often make strudel for my very German family. I'm the 5th generation of strudel makers in my family, and one thing you need to make strudel is a proper tablecloth to stretch the dough out on. One thing I noticed is that vintage tablecloths hold the flour better because of their slightly looser weaves. Vintage tablecloth = better strudel--who knew? Once I started collecting tablecloths, napkins soon followed. I love the bright colors and funky prints of old table linens. My Mom jokes that she often wears prints that look like wallpaper. And I'm guilty quite literally of wearing the tablecloth.
One of my favorite linens designers is Vera Neumann. She was a gifted painter who had the smart business sense to put her paintings on household linens and scarves and tablecloths en masse to make a decent living as an artist. I love her sense of color and her bold illustrative mid century style. If I see Vera, I snatch it up! I had always intended to use these particular Vera linen napkins in a garment, but I didn't really know exactly how to do so.

The pattern is the same trench coat pattern I made a couple of weeks ago for my denim trench coat. It is Burda World of Fashion 2-2008-114. It's a classic raglan sleeve trench coat style in most respects but it has 3/4 length sleeves. It might seem odd to sew a jacket out of linen in fall in Colorado, but our weather is incredibly variable. Fall and Spring both are some collection of cooler days interspersed with hot ones or snow. 3/4 length sleeves actually turn out to be wearable for parts of 9 months of the year. They let you layer up or layer down quite easily.
The pattern is an unlined jacket, so I drafted a lining. Sewaholic has a good tutorial for this here at Tilly and the Buttons, The tutorial is for a standard sleeve. Because this is a raglan sleeve, you have to adjust one thing: remember on a raglan sleeve that the facing covers the sleeves as well, so you must cut off the top part of the sleeve where the facing will cover it on the lining.
Fabric
The outer jacket fabric is a linen/cotton from my stash. It has a good weight for it for a jacket, but I wanted to cut down on the wrinkling. I fused the entire jacket with a fusible interfacing.
I had just enough yardage to eek out the body of the jacket, but I didn't have enough for a longer hem, facings, and collar. For the facings, I used this blue/white crosshatch cotton print. I used the same fabric for a hem facing and the belt loops and belt. I like the contrast it provides against the blue of the linen, and the visual texture of it pairs well with the Vera appliques.
The lining is a Japanese polyester lining I picked up the last time I was in San Francisco.

Applique!
The fusible interfacing adds all the stability required for the stitching of all of the applique work. Without the interfacing, the linen might pucker oddly under all the added stitches. Instead of interfacing, you can use a double sided fusible web on appliques to adhere them and give stability. I opted against the Heat n Bond because it feels a little too papery on such large appliques.
The various flowers and leaves I cut from the napkins were scattered around the cut out pieces of the jacket. Using this Valentino jacket as a reference, I played around with the flowers' placement so that they wouldn't be covered up by the welt pockets/buttons etc.


Construction - Construction for this jacket is really straightforward. There's really good instructions in the magazine as it's one of the rare illustrated course patterns in Burda mags.

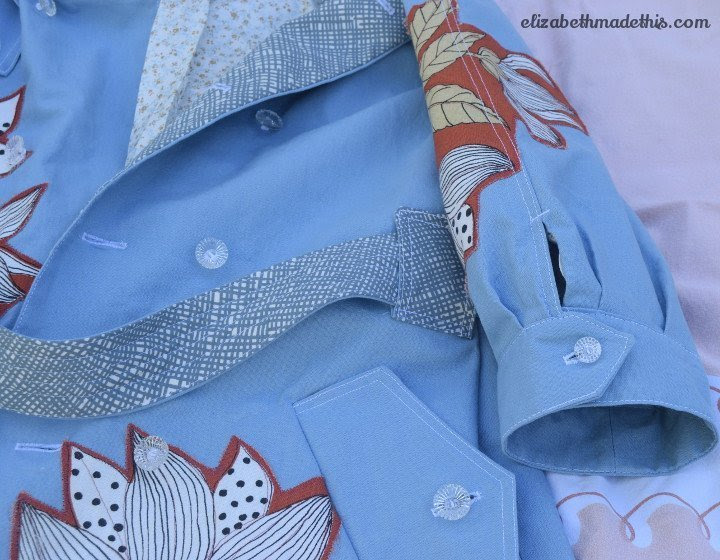
Topstitching - Wow, there's a lot of topstitching in this jacket. One thing I did to streamline the process was to divide my time by task. One session I made all the tabs/collars/belt loops, another I did all the applique, and another session I did all of the topstitching. It really made things go quickly to have all the pieces ready to go so I could just sit and do one task all at the same time. This also minimized my thread changes.
The topstitching thread is white Robison-Anton thread. It is more heavy than all-purpose polyester thread, but lighter than a topstitching thread you might use for denim. This makes it fantastic for embroidery. It's nice here for topstitching on a fabric that is not as heavy as denim.

Belt - The belt for the coat is reversible. I couldn't decide if I liked the blue linen or the crosshatch cotton for the belt, so I chose both. There are 2 layers of fusible interfacing inside the belt plus a strip of the linen to give it the weight a belt should have. I added more topstitching rows to the belt. The reversibility is one of my favorite features of this coat. If I want to change it, I just need to flip it inside out inside the belt loops. Super easy to do, and it gives the coat a different look.
 It was quite the challenge to sew a trench coat in short order, but I'm glad I pushed myself. I'm glad to have found the perfect canvas to display some very favorite linens.
Jennifer from Clothing Hacker


I thought this fabric expressed my personality because it was fun and colorful and a little loud. I work in tech and I am an introvert, but once I get to feel comfortable with people, I tend to talk a lot and have been told I get loud. I also really love experiencing life. I'm not an adrenaline junkie or anything, but I do enjoy trying new things and putting myself out there as much as possible because life is all about making great memories and never having regrets.


I used a red piping between the facings and the lining. I really like that little hidden detail.


LaTonya from Sew So Petite

When I wear a garment, especially one that I have made, I want to feel flawless. I want to feel as though I just stepped out of a magazine. This trench coat does all the above for me. There are many ways that you can wear a trench; loose, fitted, belted and many different color options. I chose to go classic. There is no wrong way to wear a trench and it truly is one garment that looks great on everyone.
I used McCalls 5525 for my trench coat challenge this week. The outer shell is made with medium weight cotton twill and the lining is a poly lining fabric. Because I have made this pattern before, I knew that there were quite a few changes that I wanted to make this time. The overall experience of making a trench coat is both difficult and rewarding at the same time. But that is what motivates me.

Fit – I sewed the smallest size in the envelope. I have made this jacket before and while the previous fit was ok, I wanted a slimmer-looking jacket this time, so I took 7 inches off the length (so my jacket could hit right above my knees), took 2 inches off the sleeve and sleeve bands, redrafted pockets and the pocket flaps, and I increased the seam allowance to 2 full inches each for an even more slimmer look. Because I slimmed out the whole jacket, I also decreased the size of the lapels and redrafted the back flap. The original back flap would have looked too big on this smaller jacket.

Craftsmanship - I wanted my jacket to have a more "high end" appearance, therefore, I double top stitched every seam. I also top stitched the whole pocket flap to give the jacket just a little bit of texture. I also added bias tape the the inside facing piece. I hand stitched the sleeve lining because I did not like the way it looked with top stitching. I originally added black buttons to the jacket to bring out the black that was on the inside lining, but I quickly changed them to the crystal buttons. It just looks better with the bling buttons! After changing the buttons, I decided to add some silver studs to the belt, in lieu of a belt buckle. I am more of a casual girl, so I knew that I would never use the belt buckle anyways.


Overall Execution - I love the changes that I made to the pattern. It is a very classic trench coat with a lot of little details to make it personal to my style and taste. I am a minimalist classic type girl with just a little bit of bling. I do like to be noticed, but I don't want to be the center of attention. Some may call me boring, but I call me "classic"! This trench coat really resembles who I am. My goal is to stay on trend without losing my personal style. I added the crystal buttons for just a hint of bling and the zebra lining for fun. But the overall feel and look of the trench is very, very classic. I studied a few ready to wear trench coats for a little inspiration and I feel as though my trench looks ready to wear.


This trench coat is a nice transitional piece from Fall to Winter and also from Winter into Spring. With the weight of the fabric, it will keep me warm and trendy at the same time!
Voting is Now Closed
Vote for your favorite trench coat now! Voting ends Friday, Sept 23 at 8am ET.
Oh wow! All of you ladies did a fantastic job! So hard to choose but I think it's a toss up for me between Tee and LaTonya! Now I'm inspired to make one of these trench coats for myself!
ReplyDeleteDenim trench is alittle sloppy looking, love #2 and #5.. The big design on #4 is definitely a loser,,She should have used a solid color.#3 ???? no crazy about it but if it fits her personality
ReplyDeleteTee you are awesome. And good job to the other ladies...Good luck to all of us
ReplyDeleteTotally the best year of this challenge yet! Some serious competition among these ladies!! Everyone did an amazing job and I'm astounded by the craftsmanship in such a short period of time. Bravo!
ReplyDeleteI have just reviewed quickly all the entries and am totally blown away. This is the first time I was aware of the contest and took a look at the last challenge winners' projects and was totally wowed. This is going to be hard. I will read every word the entrants wrote about their project and deliberate and write comments. I planned my day around this so I would have time to do the job--a good one I hope. Congrats ladies on a job amazingly done. You all have your own style!! Let's get started Melissa! Julie, this is a great challenge you've created.
ReplyDeleteWow, I am VERY impressed with what these ladies turned out in such a short time!! Honestly... every time I'd read about a contestant and see what she made, I would think "Oh, well she needs to stay in the contest!" and then I ran out of contestants... Beautiful and interesting coats.
ReplyDeleteI really like LaToyna's coat in the red, but I didn't see any pictures on the construction, just the final product - so that would make me choose someone else as the winner.
ReplyDeleteso yay! I so love it..How I wish I can do the sewing you know.
ReplyDeleteAll contestants have to be commended for turning out these garments in just a week, that is no mean feat! For me, it's a toss up between the red and the burgundy.
ReplyDeleteWell done all!
Lee.
Impressive makes for one week! Kudos to everyone.
ReplyDeleteAll of the trench coats are awesome! Each participant shared a little about their personalities and their trench coats seems to match who they are. A lot of work went into the construction of each coat. It is definitely a hard decision to make.
ReplyDelete