
Skirt Inspiration: Beach-Ready Maxi Skirt

Today is the last day of the Skirts Challenge! We hope you enjoyed all the skirt inspiration in May!

We have a guest blogger today! Justine from Sew Country Chick graciously accepted our invitation to guest blog for us during the Skirts Challenge. This is a new-to-me blog that I'm excited I found and look forward to follow her other handmade makes!


Hello! I’m Justine and I blog about sewing at Sew Country Chick!


I live near the beach in southern California and spend lots of time there in the summertime. I wanted a wrap skirt I could put on over my bathing suit that’s also a little dressy, as I’m taking it on a honeymoon trip to Mexico with my husband for our twenty-fourth anniversary this month. Woah! Where did the time go?


I saw a tulip shaped maxi skirt online that would make a cute beach skirt. But I couldn't find a pattern. 


Urban Outfitters Skirt

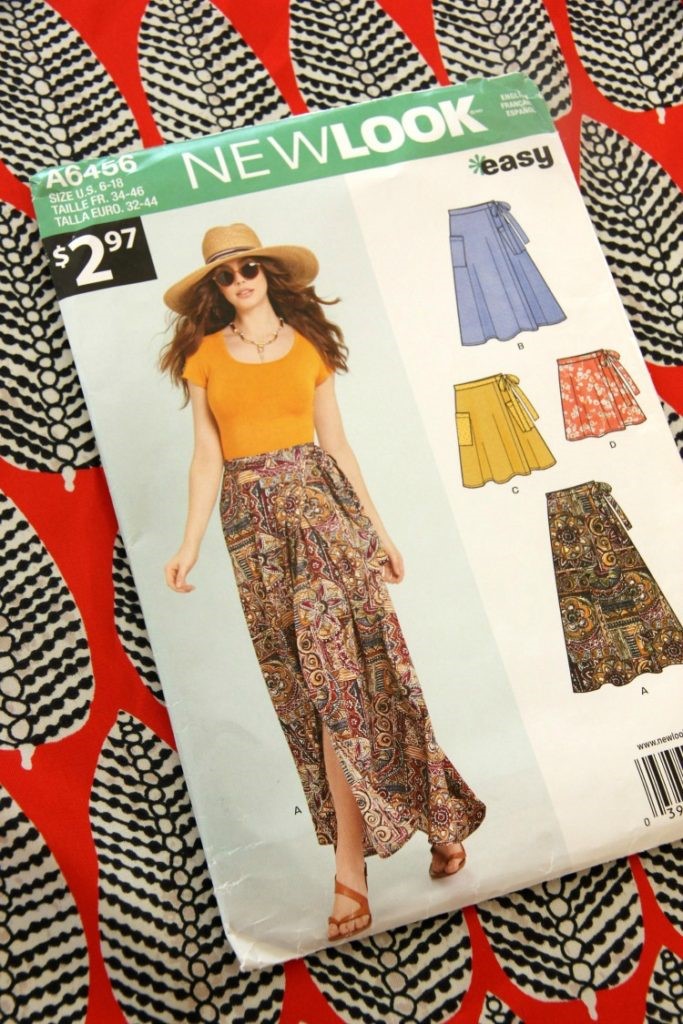
I already had a pattern in my stash that would be perfect to hack, New Look 6456, a basic wrap skirt. I also had several pieces of silk charmeuse bought over the years. I’ve been sewing more solids lately, so my bold prints have been languishing in my sewing room. After sewing lots of dark colored solid pieces this past winter and spring, now was a perfect time to go a little crazy with prints! I chose to use a poly charmeuse I bought on one of my downtown LA fabric district shopping trips. 


I have several pieces of bold printed fabrics. They seemed like a great idea at the time when I bought them, but I never could figure out what to do with them. This maxi skirt is a bit of a fabric hog, and I had five yards of this print, so why not cut into it? I ended up using about three and a half yards of this 54 inch wide fabric for this skirt. 


My pattern had a straight edge and I would have to curve the hem and center front to create the tulip shape. I traced the skirt front onto two pieces of tracing paper taped together and re-drew the center front.


The pattern has a center front line which I traced, then measured up ten inches on that line, then measured up twenty inches on the side wrap extension edge. I drew the front edge curve by hand. I followed the pattern instructions for making the dress, which are very good. I sewed a narrow hem. First I serged the edge, then I flipped it over 1/4 inch and topstitched. I flipped it over one more time to enclose the serged edge and topstitched again.

The fit is good, and true to the measurements stated. I could have made a size up, as I could use a bit more room on the extensions. I cut a size 12.


I cut the back on the fold instead of cutting two pieces. My fabric was wide, the skirt fit on the fold. I wanted to avoid a seamline in the center back with this print because, well, who likes pattern matching at seams?


I really like the waistband and tie on this pattern. It was quick to make too. 


Well, that’s all I have for today! But I do have a few more projects planned for this pattern. I like the knee length version with pockets, and I may add a ruffle to another version. I hope you may feel inspired to get out some of those crazy prints you may have bought on a whim. They may be perfect for a summer maxi skirt!

Thank you Fabric Mart, for inviting me to guest post!


~Justine from Sew Country Chick

Share your me-made skirts thru May 31st and be entered to win a $50 gift certificate to Fabric Mart! Share on Facebook or Instagram using #sewcoolskirts. 

Comments

  1. Love the skirt, love the fabric, love the whole thing!!!

    ReplyDelete
  2. Love your skirt for all it's experimentation and the final look is perfect for the beach. How much fun to find the perfect fabric and pattern already in your stash!

    ReplyDelete
  3. Paula Brown, ANYONE CAN SEW STUDIOMay 31, 2017 at 10:52 AM

    Love the tulip shape. Have had one in mind for a while. Thanks for the inspiration.

    ReplyDelete

Post a Comment

Thanks for leaving a comment! All comments are reviewed before posting to help us eliminate spam. Your comment will be posted within 24 hours.

Popular Posts You Might Like

Made By A Fabricista: Falling for Knits

We are now well into Fall, even though the temps are still relatively warm here in Texas.  I love the fall season and dressing for Fall.   When it comes to the conversation of knits vs. wovens I typically sew mostly wovens. So for this post I decided to sew completely knits!  With the holiday season right around the corner I saw these three dress styles as perfect for Friendsgiving/Thanksgiving gatherings.  The first look is a tried and true pattern Simplicity S9372.  Using this gorgeous burgundy ponte knit , I like how this pattern fits throughout. I chose this color to add to my typically neutral palette in my closet.  I also wanted something I could wear to my sorority meetings and found this color perfect.  It's an easy sew with back fisheye darts  and invisible zipper to add to the tapered style.  The neckline and armholes are finished with bias binding giving it a clean finish on the inside.  I used a universal needle to sew a...

Made By A Fabricista: The Art of the Slow Make: My La Forme Double-Breasted Jacket

I started this project back in July — one of those mid-summer sewing plans meant to get me ahead for fall. My idea was simple: start my wardrobe a season (or two) early so that when cooler weather came, I’d already have a few handmade pieces ready to wear. That was the plan, anyway. But as sewing often reminds us, plans evolve. This jacket, made using La Forme pattern No. 0303, is a double-breasted design with peak lapels and an exaggerated hip detail that gives it such a striking silhouette. I fell in love with the structure of the pattern right away — it has that timeless, tailored feel I can never resist — but it also asked for patience. I picked it up and put it down several times over the months, letting it rest while I worked on other projects, until finally, the timing felt right to bring it to life. And now, here we are — the leaves are turning, there’s a chill in the air, and some parts of the country are even seeing snow. My summer-started jacket is finally finished, and it c...

Made By A Fabricista: Closing 2025 with a Lined Jacket

Hello again, sewing friends! It seems we have arrived yet again in the grandest season for layering, all this oncoming cold weather. I like ending the year with something warm and very useful. Seems based on my past Fabricista posts, I love to sew year-end outerwear, and this round is no different!  I challenged myself with a new lined coat (wait, jacket? Coat? I feel like the presence of wool changes things?). Anyhoo, since the lovely Chalk & Notch Den Jacket has been in my queue, I proceeded ahead. I like the large pockets, the option to line or not, and the extra bodice and sleeve seams for topstitching.  Sewing this coat is not at all difficult, but the many pieces and loads of topstitching will take a bit of time. My version took me a few multiple-hour sessions to complete. I sewed a size 2, which matches my measurements, and I made no alterations. Hint: for a quick size test, just employ the lining pieces.  Gorgeous, muted blue as a soft wool flannel ? This is ...