Hello Fabric Mart Fabricistas! I'm Meg and I'm new here! I'm really delighted to be blogging here for Fabric Mart on occasion. You can also find me at my blog, Cookin' and Craftin', in between my posts here!
For my first project with Fabric Mart, I chose this killer Aegean Blue rayon/tencel chambray... it's a lovely color with a cool, slightly nubby texture. The chambray has a great hand: nice and drapey but also perfectly crisp when pressed... ideal for shirtmaking! It also looked fabulous as a jumpsuit, as Tiffany demonstrated here recently!
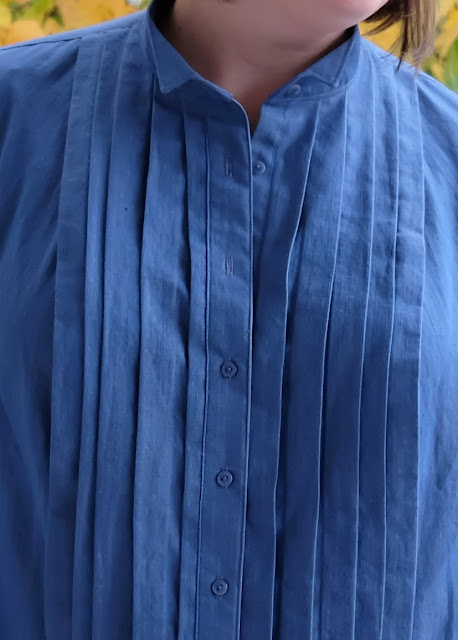
Speaking of shirts, I made the Liesl + Co Recital Shirt, a princess seamed shirt with a pleated, tuxedo-style front. I love the versions of the Liesl + Co Classic shirt I made earlier this year, and Liesl said the Recital Shirt was based on the same block, with many of the same details, so it was a no-brainer to try out this pattern!
Let's be up front about one fact: the pleats on this shirt are not my best work. I don't know what happened, but somewhere along the line, between the pattern tracing (wow, the lines for all those pleats were very close together!), fabric marking and remarking (I used a Clover Chaco Liner, but the chalk lines seemed to disappear before I got to sewing the pleats, so I had to re-do them), and the sewing, things went embarrassingly awry. They are all different sizes and different spacing!
But once they were done, I couldn't bear to unpick them. The thread I used so closely matched the fabric that it would have been impossible to remove it! I decided that, although you eagle-eyed sewists can clearly see my mistakes, your average Joe likely won't notice it. I never claimed to be a perfectionist. (BTW, have you listened to the Love to Sew Podcast on perfectionism? Worth a listen!). I moved on and finished the rest of the shirt.
So, back to the rest of the shirt: I feel like I made up for my mistakes with the pleats with the rest of the details: my collar is crisp, my tower plackets nicely topstitched, cuffs cleanly sewn, and buttonholes blameless. Everything went swimmingly after the pleat disaster! The only fit changes I made were to do a full bicep adjustment of 1", which I also did for my Classic Shirts.
I love some of the details; the little pointy, fold-over collar, in particular. I had perfectly matching buttons in my stash, which was fortuitous!
I'm looking forward to making this shirt again and perfecting both the fit and those pleats!
Thanks again to Fabric Mart for having me and to you for reading this far! I'll be back here in a few months to share my next project, but in the meantime, pop by my blog to read more about my other projects!


Cute shirt, Meg, and don't sweat the imperfect pleats. I do agree, however, that slimmer pants would be more flattering. I so enjoy your blog.
ReplyDeleteI didn't even notice the pleats until you mentioned it. As with quilting, finished is better than perfect. I think it looks great and you should be proud of your work. I love the fabric. And all the fabric at Fabric Mart!
ReplyDeleteIf you hadn't mentioned the pleats before the close up, I might not have notices them. I want to say that the shirt looks very nice. But since you mentioned fit, I see a number or areas. I agree slim pants would help a LOT. Also how big it is depends on what you ere hoping for. The sleeves are a little long and baggy, that is part of the problem. It is clearly too big across the back at the arms. And in the front is doesn't look like the shoulders fit well. I suspect you did not choose the right size pattern. It is important for many of us to choose a pattern to fit our shoulders rather than our bust. Once I learned this, things started to fit and look better. However I must always make a full bust alteration, which is easier that redrawing the sholders and armholes. Here is some thing that mivht help. http://www.nancyzieman.com/blog/sewing-general/sewing-and-quilting-questions-answers%E2%80%94choosing-the-right-sewing-pattern-size/
ReplyDeleteThe pleats look fine from here. In fact, I think that shirt is a show-stopper. The color and fabric looks fabulous. It looks as though you left it long enough to wear it over leggings or slim cut pants of some sort? I love your blog and am happy to see you here....
ReplyDelete