
 |
| Well, I'll wear it next year for Mardi Gras, anyhow...and a whole bunch of dates in between now and then... |
Good day all friends!
Above you'll see the final version of the dress I made from a gorgeous poly crepe fabric from February's Julie's Picks. The timing for this particular fabric in my life couldn't have been more perfect, too. I was set to visit New Orleans with my family from February 11-13, exactly the time of Mardi Gras. My husband's family lives on the border of Louisiana (in Mississippi), and my husband went to Tulane, so we spend a lot of time in NOLA, but have never gone to Mardi Gras (well HE HAS, but we haven't!). We decided this was the year to go since it happened to fall at exactly my husband's and my eldest son's birthdays (2/11 and 2/12). We celebrated two fun things at once, in other words!
Some of you may not know why I would call this fabric perfect for Mardi Gras, but the colors most often worn during the celebrations are purple, green, and gold. Now there is no gold in this dress, but two out of three is actually hard to come by...most fabric designers don't put these three together, and even finding two is hard (though my college's colors were green and gold, so I guess I could have just worn a tee shirt, lol).
Anyhow, so I spied the four yards (pre-cut length) of the crepe in the Julie's Picks and was absolutely set on using it for a Mardi Gras tunic or dress to bring with me on the trip. (Just so you know, Julie's Picks has gone monthly, in addition to annual, so if you just want to try one month, you can order that here. I am annual, and plan to be for a really long time. The curation is wonderful as most months I find something I just can't live without!)
Though the fabric is not available right now, I think this printed poly crepe would look so great made up in a dress like the one I made.
It almost came to life exactly as planned. But then...tragedy...
When I was almost done with the first iteration, made using the Arum Dress by Deer and Doe, I went to go try it on, and though it fit fine, the back princess seams split at the shoulders and the waist. I was so upset! I was all ready to wear it in New Orleans and catch some matching beads to wear with it, but it wasn't to happen. I finished the garment on the 10th in the morning, and with only 24 hours to liftoff, I knew I wouldn't have completed it in time.
Turns out that I chose to use the serger at the wrong time. I suspect that this delicate fabric spun differently than other wovens (it features twisted yarns that results in a pebbled texture) couldn't handle the heavier stitching of the serger and the seams were made weaker through the process of serging. I chose to serge because the fabric frays with fervor, but the way to fix that is not to serge when stitching, but rather to serge the edges of the cut garment, THEN sew with a regular machine.
I was right, as the completed second garment, made using Kwik Sew 3956. This dolman sleeve pullover dress was made with serged edges and sewing machine stitched seams, and there were no split seams, at all, when I wore it on Wednesday this week.

So though the garment didn't travel to New Orleans with me, I am confident it will one day. :-) But at least I could wear the beautiful glass beads that were thrown to me at the Orpheus parade. Most of the time revelers catch plastic ornamental beads during Mardi Gras, then the speciality plastic beads with pendants specific to the Krewe that is hosting the parade (like Orpheus), and then finally these pretty glass beads. I felt pretty lucky to get them, and even luckier now that I see it is a good match for the fabric. I also love that I can tell the history of beads in Mardi Gras when wearing them (it used to be only glass beads were thrown!).
Kwik Sew 3956 Construction and Notes:
Before I talk about how easy it was to sew Kwik Sew 3956, I do want to say I really wanted the Arum Dress by Deer and Doe to work out since it had a ton of hanger (and dressmaker dummy) appeal. The princess lines at the back fit me well. The only thing I noticed was that the sleeves were tight (but still fit), and I am not known for my bigger arms, so I suspect my straight shoulders were causing the tightness (the compensation the fabric had to make at that part of my shoulder ended up affecting the fit at the arms). My plan going forward with the Arum is to make it in a jersey fabric (or a double knit) and enjoy its form in a stretch fabric.

The Kwik Sew 3956 dress was so easy to make. In fact, if I hadn't used the first two yards for the Arum dress, the Kwik Sew would have been even easier to make! I ended up having to use the selvedge to cut the back pieces on, so instead of laying the back on the fold, I had to create a seam line back there.
There were no real challenges, and this flowy fabric is exactly right for a dress that is meant to be loose and flowy (for the most part, the skirt is a bit more fitted).
There are only the front piece, the back piece, and the facings to deal with, so four pieces total! I could have added pockets, but I was stressed that the fabric would be stressed by me handling it too much, so I just left those off. I would like to use those on another version of this dress in the future.
The sizing was accurate to the size chart, so I started with a small at the bust and shoulders (this company's shoulder line looks very straight, so it worked with my shoulder line, but it could have just been because of the style of dress, too). I decided to go from the small at the lower bustline to large at the high hips. This meant that the curve of the waist to hip is a dramatic curve as opposed to a straight line like the original, but I am so much bigger in my bottom half as compared to my top half that I have to do this. If I were to cut a large throughout, the dress would overwhelm my frame up top, and if I cut a small outright, my hips would hurt in protest. And a medium would be wrong everywhere!

So here you see my attempt to fix the seamline at the back. Though I had to sew the back seam instead of having it as one piece, the problem existed because the one side of the selvedge had a white line up it, with bits of the print on it. It looked messy. This fix involves using a ribbon on both sides of the seamline and sewn into place. The ends of the ribbon are sewn into the hemline and the underside of the facing.
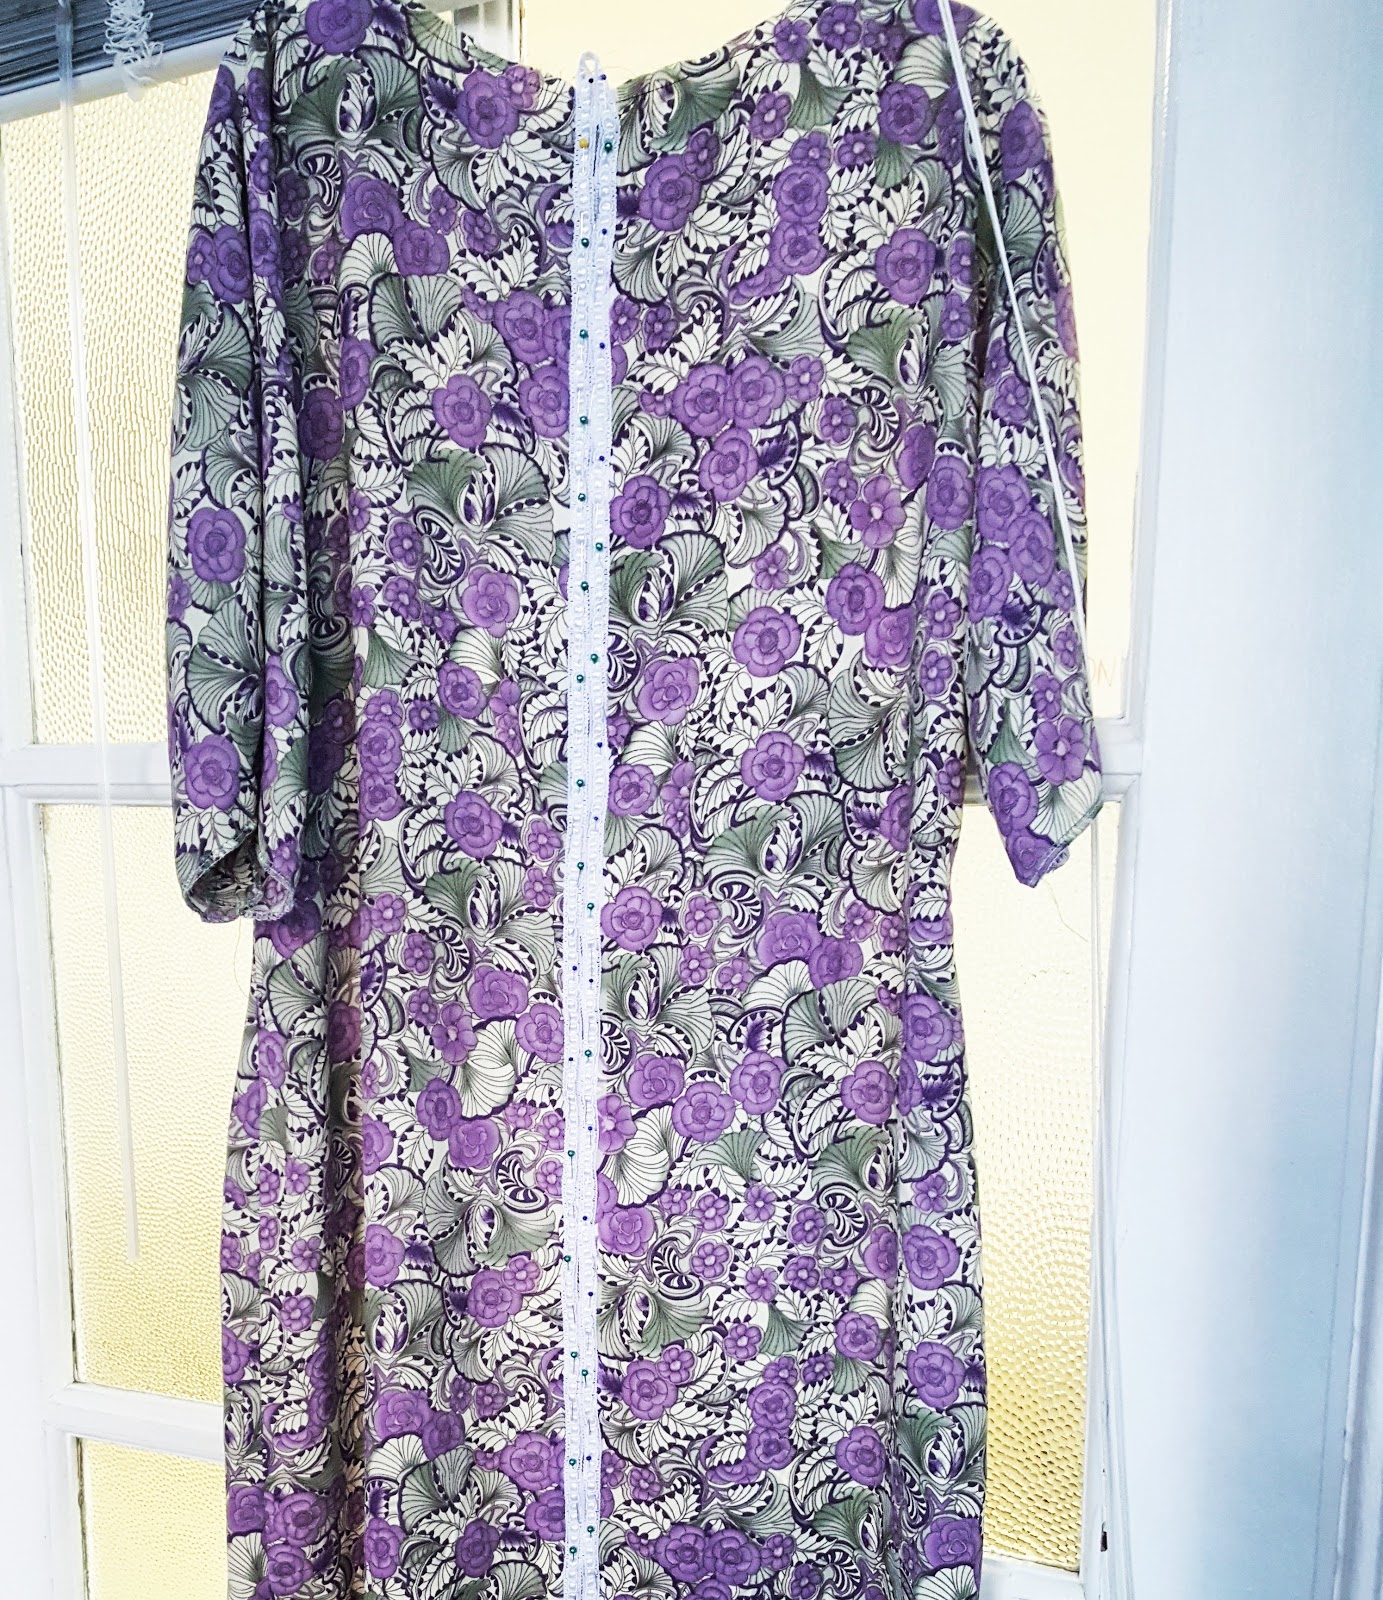
Above you see what I did to precisely place the ribbon on the seam. I used fabric glue on the wrong side of the ribbon, carefully pressed it down the one side of the seam, and up the other side. I then carefully pinned the entire ribbon feature to keep it super secure.

Though it's hard to tell, this ribbon is light lavender and looks really pretty next to the fabric. (The fabric is glorious, too, it is unique and the colors are lovely to look at!)

So I wore the dress all day on Wednesday, and I got my hubby to snap this photo of me holding two glasses of wine (he doesn't drink at all and we bought a groupon that gave us each a glass of house wine, so I had both, lol...and no, I wasn't driving).
This dress was a hit, but the fabric was the real winner. Everyone loves how pretty it is, the colors, and the feel of the crepe. They also liked the ribbon back, so I guess the lack of fabric at the end worked out!
I hope all of you are well. I look forward to coming back in a bit with another project!
Dina, My Superfluities.
Really pretty Dina!
ReplyDeleteThank you so much, Sue!!! I hope you are well! :-)
ReplyDelete