Made by a Fabricista: One Pattern, THREE different VIEWS!

Happy Saturday!

I am so excited to share my July make along with two other amazing sew sisters that I met via social media. After winning last year's Fabric Mart challenge, I have connected with so many awesome ladies in the sewing community!

   Honestly, over the last ten months, I have learned so much from my sewing community of friends who have always shown much love and support.  I am grateful for this platform and opportunity with Fabric Mart, where I am able to share my monthly makes and be committed to a hobby that I truly enjoy. Carla (middle) and Johanna (right) are two amazing ladies that I can always count on for sewing advice.


I fell in love with this McCall's summer pattern M7784 as I wanted to make a flutter top without an elastic band around the shoulder VIEW C using a crisp white cotton/polyester/lycra shirting here.
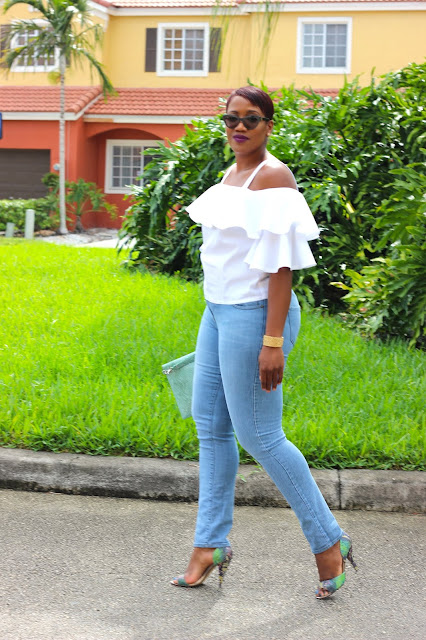
Love the flutter!  USED bias tape hem for the finish.
I love classic and timeless pieces and this crisp shirting fabric was perfect for the shirt I envisioned. The soft feeling against my skin is to die for and I fell in love even more after washing the fabric and knew it was perfect for the top.

VIEW C - SIZE 14 (Cut a size larger but realized it was NOT necessary.)
I shared the pattern via Instagram (insta-story) and quickly my sew friend Johanna messaged me as she had plans to create one of the views this summer.  I then reached out to my other sew friend Carla (Nikki) and she was ready to join in on our first official collaboration. We chose our view, selected our fabric from Fabric Mart and went to work.

I met Johanna on Instagram and she lives only 30 minutes away. I am always happy to practice my photography skills and shoot her makes when time permits.  She offers great sewing tips and tricks from her experience doing pattern test and reviews. 

Johanna fell in love with View A and chose a crinkle seersucker shirting fabric.  Unfortunately, it is sold out but here is another option that is perfect for this view. Her second fabric choice for this view is also here


Johanna lined her fabric using the Muslin that she made.
Side view with ties

MODIFICATION: Remove the keyhole as it was not necessary with this style.

Be sure to stop by Johanna's blog to see more beautiful photos of her top with construction tips for her view!

Johanna's Blog: https://www.soveryjo.com
 Instagram Page: https://www.instagram.com/soveryjo/

Carla (Nikki) chose to create View D with a designer knit (rayon/lycra) fabric that drapes so perfect from Fabricmart here


Carla shared a few construction TIPS with us as she was the first one to sew her view the minute she received her fabric. 

1.  When working with knit or any fabric with stretch, the keyhole may NOT be necessary if the top slides easily over your head.  After trying it, Carla decided to close it up which gave it a cleaner finish in the back. I opted to keep mine open but plan to close it as the hook kept on opening while shooting.

2. Since this pattern has a shoulder facing all around, the instructions did NOT state to understitch and a beginner may not know.  It is important to understitch so that the facing lays flat inside the garment.

3. Interfacing can be tricky with knit and Carla also suggested instead of cutting strips of interface for each section of the shoulder facing (5 individual pieces for this pattern), you should stitch all the facing pieces together and then cut 1 long strip of interface if possible for a more sturdy fit.  Sometimes the facing will stretch slightly while working with each individual pieces if interfaced separately.  

Be sure to check out Carla's, blog for more detail photos of the construction. I am always happy to reach out to her for any sewing tips or advice when starting a project that I may have a challenge with.  She is a passionate part-time sewing instructor and is always willing to help.


Carla's Sewing Blog: https://www.sewingmystyle.com
Instagram Page: https://www.instagram.com/sewingmystyle/


Thank you so much for reading!  I truly had fun collaborating with both Johanna and Carla this month. Also, have you participated in the  Fabric Mart photo a day challenge?  Be sure to post your photo for today!


On a final note, I have been sewing consistently this summer so be sure to stop by my personal BLOG and check out my latest make.


ONE LOVE,


Comments

  1. Wow! You all look great- I love each and every version! I will have to try out this pattern now!

    ReplyDelete
  2. Love! Love! Love them all! Inspiring and gorgeous!!!!!!

    ReplyDelete
  3. All 3 of those tops are so gorgeous!

    ReplyDelete
  4. Love all the versions. What a fun way to see different views made up by each sewist. That way you don’t have to sew each version and the tips from one to another must have been very helpful. Thanks for sharing from you and your new friends. Sounds like you are having a great summer.

    ReplyDelete
    Replies
    1. Awww thanks. Yes we all learn together and share tips as well.

      Delete
  5. I love the collab! All three of your tops are amazing. I didn't even give this pattern a second glance but your crisp white version is really speaking to me!

    ReplyDelete
    Replies
    1. Go give it a try!!! It will be worth it when it's done.

      Delete

Post a Comment

Thanks for leaving a comment! All comments are reviewed before posting to help us eliminate spam. Your comment will be posted within 24 hours.

Popular Posts You Might Like

Made By A Fabricista: Sewing the Eleonora by Silversaga – A Romantic Dress you need in your closet

I recently had the pleasure of sewing up the Eleonora pattern by Silversaga, and I’m excited to share my thoughts because this one really surprised me—in the best possible way. If you’re not already familiar with Silversaga, their aesthetic leans into romantic minimalism—think timeless silhouettes with poetic details. The Eleonora Dress is a vintage-inspired, chemise-style from the Regency Era of the 1800’s design infused with modern elements like adjustable sizing, soft gathers, and flexible fit details.  The Eleonora is a thoughtfully designed dress pattern with multiple views and customizable features. Some of its standout design elements include: • Adjustable fit via ties and elastic channels at the neckline and waist, allowing it to flatter a range of body shapes and sizes. • Sleeve options, including short or long gathered raglan sleeves, often finished with ruffles for added softness. • A full, swishy four-panel skirt—complete with in seam pockets and a deep hem—that b...

Made By A Fabricista: Oversized Jenna Shirt for Summer Fun

 I may or may not have had several meltdowns during the making of this Closet Core Jenna Shirt… But let’s back up first. During the month of May, I promised to wear handmade garments every single day for the popular sewing challenge “Me Made May.” I really enjoyed thoughtfully putting together my outfits each day. While I was doing this, I was taking notes of the gaps in my wardrobe. Particularly, I don’t have many transitional shirts that could work for on-camera work attire and be comfortable for the weekend. When I saw this delicious cotton lawn on the Fabric Mart website, I knew that I wanted to make a button up shirt that would be both work appropriate and a nice overshirt for summer evenings over my tanks and tees.  I have made a few button up shirts before using a vintage Stretch & Sew pattern but I decided to try my hand at the Closet Core Jenna Shirt (up to a 60” chest) which has had rave reviews on social media and pattern sites for being a great pattern with e...

Made By A Fabricista: Sewing the Chalk & Notch Hayes Dress

Hey lovely friends! With summer knocking at the door, I am absolutely ready for breezy dresses at all times. I love linen all year round, but summer is my particular favorite for this fiber. This bright happy color fills me with delight, and it’s so perfect in the sunshine.  For this project, I got all my supplies in one go! I chose this stunning Sea Green linen , lightweight fusible interfacing , ½” elastic , and of course, matching thread. If you haven’t sat down to create your own little sewing kit with all the bits at hand, it’s quite a nice gift to yourself and makes getting started that much easier. I’m all about ease these days.  I sewed the new Chalk & Notch Hayes Dress with the open back cutout, which is View A. The other two options are a closed-back dress and a two piece set. I was a tester for this charming pattern, and I can confirm the two piece set is also gorgeous and really fun to wear. I have looked forward to sewing this version for weeks!  Please...