
Long time no see! Since I last wrote in March 2018 I gave birth to my second baby, a girl, and she's almost 10 months old now!
Boy do I have a lot of makes to share with you today! One for each of my four family members, representing 7 1/4 yards and 29 pearl snaps from KamSnaps.com. I'd planned to only use the snaps for my own shirt, but then decided to work smarter, not harder, and used them on all of our shirts!

I present to you: Violette Field Threads Piper Baby, Ottobre 03/2018 #20, Deer & Doe Bruyere and Kwik Sew 4075.
There's just something quintessentially Winter about plaid flannel: It's cheerful, cozy and warm. There is just nothing quite as delightful as a natural fiber with a brushed surface.
I saw this plaid on Fabric Mart's site and it was love at first sight. It definitely has a bit of a Christmas tilt with the green with the red, but I'm still digging it for January and Winter at large. Not only is it mega soft, it's 60" wide, a bit of a rarity in woven-land, which is awesome for cramming lots of garments in. It was still in stock when I began writing this post a couple of weeks ago, but has since sold out.

Plaid matching can be pretty tricky, so I resolved to cut as many pieces as possible on the bias. Unfortunately, I quickly realized how funky that looks when you're dealing with a rectangular grid plaid instead of a perfect square, since there isn't a symmetry in the bias. I decided to throw caution to the wind and roll with it anyway.
Matching plaids in general is a game in making obvious intersections match up, especially around the body. These are the tips I use to make my plaid matching easier, though I know my plaid placement is still definitely not perfect by any means:
As you can imagine, or already know, plaid matching is a real fabric hog. Making sure things line up mean you will waste way more fabric than you would in a solid or all over print; you'll almost always need more than the pattern calls for.
A good rule of thumb for buying the extra you need: measure the vertical repeat of your plaid to figure out how many pattern pieces you can fit along each width of the fabric. Then multiply the length of the repeat by the number of "widths" you'll need to cut everything out. A hypothetical example: This fabric has a 6" repeat and I could fit all of my Bruyere on 3 widths of the fabric, so to be sure I have enough for matching I'd buy an extra 6"x3 = 18" (half yard).

I'm pretty happy with the plaid matching for the most part on these, but they are by no means perfect and there are many places (like the back of the collars) where there is room for improvement. So I suppose you can take all of these matching tips with a grain of salt. ;)
That got me to thinking about how I've been sewing for SO LONG (almost 25 years now; holy crap!) but still consider myself an intermediate level seamstress. It's because I am so satisfied to keep sewing at a level that makes me happy more than a level that is technically perfect. I just love making more than I love stressing too much about the details. I can't say I'll never try couture techniques but they just aren't a part of my sewing happy place at this point in my life.
But enough with the plaid specific talk and onto the garment specific musings!

I'd planned to take these photos outside, because lighting is always so much better, but the poor baby has her first cold and is a snotty, sad mess and our weather here has been nuts. It was -23F when I woke up this Saturday and -2F on Sunday. Illness or no, definitely can't be having anyone go outside in just a shirt in that kind of weather. And so here's my "fancy" makeshift living room photo studio that I threw together!
Violette Field Threads Piper Baby

I hemmed and hawed about which pattern to use for Peaches. I was between Piper Baby, Isobel Baby (also Violette Field Threads) and an Ottobre dress with some mid bodice flutters and a dirndl skirt.
Then, realizing I was planning to sew 3 other button down shirts I came to my senses and for the sake of my sanity chose to make her this very simple shift dress. It came together pretty easily, but there was one obstacle: her head. Or is the obstacle the pattern's neckline? You choose.

The dress is meant to slip over the head and thus has no closures. The pattern specifies that this 6-12 month size is appropriate for a baby with a maximum head circumference of 15 1/2". Nobody is writin' home about Peaches's 9 month old noggin, but it is slightly above average (70th percentile) and it hasn't been 15 1/2" since she was two months old. Babies have notoriously giant heads for their bodies, so not drafting an opening that fits even a slightly larger than average baby head feels like a pattern drafting misstep to me.

To compensate for the too-small-neckline, I deepened the back neckline by another 1/2". It's a bit of a bummer to expose her back even more during Wisconsin winter, but I didn't want to have to add closures.

The collar feels a bit funny to me since it's sewn into the shoulder seams instead of properly going around the entire neckline. It's a bit of a head scratcher to me why there isn't an option for it to go around he entirety of the neck. I can see that they left it off because of the back bow feature, but it would still have been nice to have it as a possibility since there are no closures to make things complicated in the back.
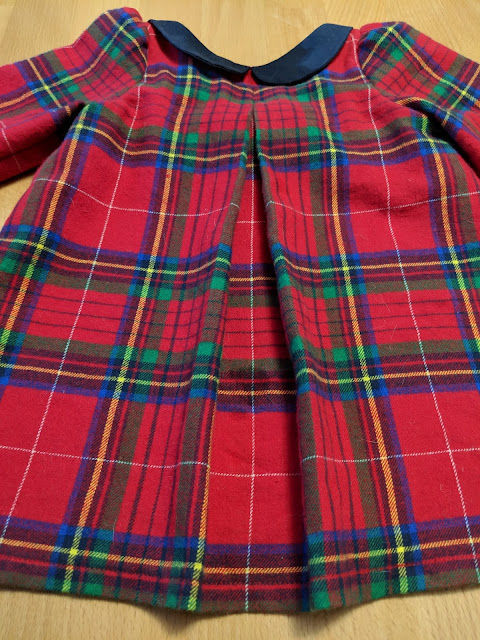

I added a size 16 open ring snap from KamSnaps.com to the bow center section so the bow itself could be easily removed for comfort in the car seat (who wants to lean against a bulky bow?) and for ease of washing.

The sleeve has you sew the elastic channel into the hem and then sew up the underarm. In the interest of time I followed these directions but sewing the underarm then turning up the hem to make a channel would make for a much cleaner finish.

That all said, this was a pretty quick sew and I'm pretty jazzed with how cute it is on her.

Ottobre 03/2018 #20: Savannah

This is only my third time venturing into Ottobre-land, despite the dozen or so magazines of theirs inhabiting in my sewing room.
Working with Ottobre is a bit different of an animal since you have to add all of your seam allowances, but hem allowances are included. The one frustrating thing about this pattern is the magazine specifically states that it will specify the depth of hem for each garment, but with this pattern the directions just called for a "narrow" hem and there was no delineation for the hem on the pattern pieces themselves so I decided my "narrow" hem would be 5/8" turned in on itself, so I could stitch it at 1/4".

I had initially planned to make a size 98, which is precisely what Cheeks measures into now (and coincidentally is the size of the biker hoodie I made him a couple of years ago; no wonder that thing was so dang big!). In the spirit of him hopefully being able to wear this more than two seconds, I opted for a size 104 instead...but man, this pattern is definitely slim fitting as advertised. It JUST fits him despite being one size bigger than he measures. Ugh!! And yes, I definitely remembered to add seam allowances.

It was a pretty easy shirt to put together, once I got past cutting two left sleeves. Oy. The sleeve placket is a very easy iteration (you can see their how-to here), but the magazine's directions had me cut too short of a rectangle for the placket that I then had to recut. Annoying. Never hurts to add a couple of inches, since you can just cut them off when you're done.
The only thing I chose to do differently than directed was to cut two yokes so I could properly enclose the upper back and front shoulder seams using the burrito method.

I was a bit dismayed with how the cut on front placket shifted while I was topstitching it down; the pattern had me interface to the fold line, but I think if I were to do it again I'd interface through that topstitching line.

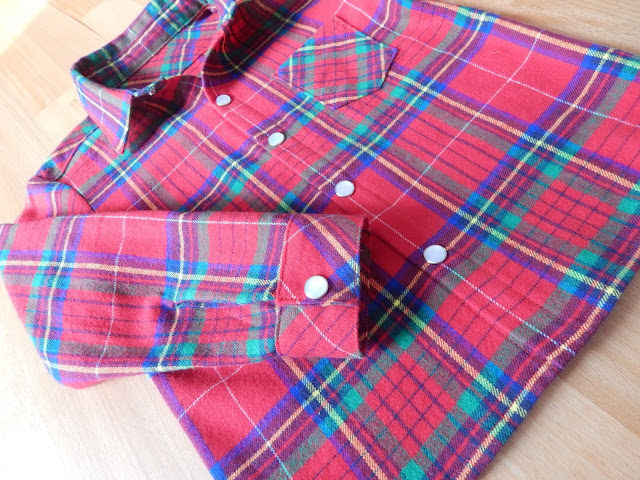
To finish it off, I used these super awesome pearl snaps from KamSnaps.com, which I installed using these dies (1 2 3) and my DK93 table press. I'd been eyeing the pearl snaps for months on their site, trying to figure out what I could use them for. When this project came along I knew it was time to take the plunge!
I think he just looked so smart in this shirt, and putting it together was minimal fuss, button down-wise. I'd definitely make him another...but in at least a size 110!
Deer & Doe Bruyere

I started this one off for me with a rarity: a muslin. I don't like "wasting" the time making mock ups, but with wovens I just have to, or there will be swearing, or crying, or some unfortunate combination of the two. It's a good thing I did, because in my initial mock up I had too little faith in ye olde bust and lowered my darts too much!

I have around a 38 1/2" bust at the moment, and I know Deer & Doe typically drafts for a C or D cup (pretty sure it's D), so I chose a size 42 based on the 37 3/4" bust listed. Their patterns have been very close to fitting my bust in the past so I was happy to just use an itty bitty full bust adjustment
(FBA).

The final fit adjustments to this one include: size 42 with 3/8" FBA (each side, for an added 3/4"), darts lowered 1", and a 1/8" each side (1/2" total) full waist adjustment. I'm pretty happy with these adjustments, but now that it's done I don't think I needed the full waist adjustment. Better a little too big than too small, though, for sure.

I decided to cut the waistband, placket and cuffs on the bias, despite the diagonal vs. square weirdness of this plaid as previously mentioned. It was a bit more exhausting than I imagined because of my attempts to exactly replicate the same part of the repeat for each side. I did pretty well on my own shirt, but kind of gave up on the back of Mr. 5's yoke, as you will see below. Sorry, man, my brain was fatigued.

The pattern didn't call for interfacing the front placket, but I did because I cut it on the bias. I made the rookie mistake of sewing the placket on and not trimming my seams and it was way too stiff and bulky, so I had to rip out my top stitching and trim/restitch.

The pattern also didn't call for interfacing the sleeve plackets, but I may do that next time: they definitely turned out a bit sloppier than I'd like. They're also a bit long, which I'd read in some other reviews of Bruyere; I had intended to shorten them by an inch but forgot to.

Overall, I'm pretty dang happy with how this one turned out! Also happy that it's long enough to cover my butt so I can wear it with leggings.

Kwik Sew 4075

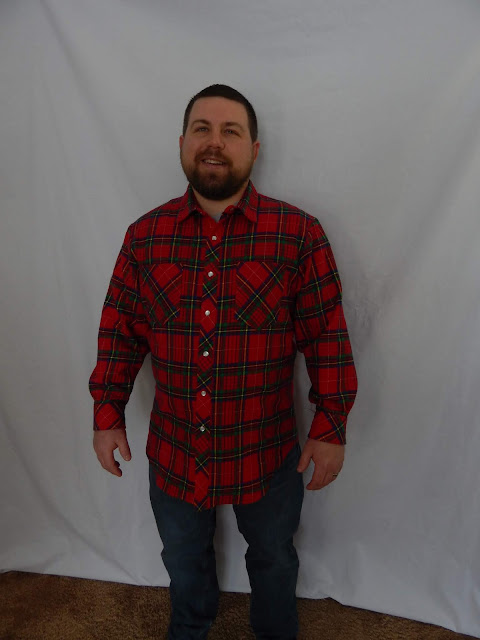
I didn't bother with a muslin for this, but I did make some changes in conjunction with some of my hubby's fit challenges. Mr. 5 has a strong neck and often has trouble with button down shirts being way too small around the neck or way too tent-like everywhere else. For his 43 1/2" chest I cut a Large per the size chart, but used the neckline and collar / collar stand of the XXL to account for his neck girth.

I adjusted the neckline by tracing the size large most everywhere, then sliding the pattern to squarely meet the center front/back and shoulder of the XXL. It worked like a charm!

The only other adjustment I made, based on Mr. 5's other dress shirts, was to shorten the sleeves by 2 1/2".

Now that I see the shirt on him, I would definitely keep the collar and sleeves as adjusted, but I might shorten the body by 1-2" and straighten the side seams instead of having them curve in for a bit extra torso room. The shoulder fit is also really nice, which is great since he's pretty broad across his back.
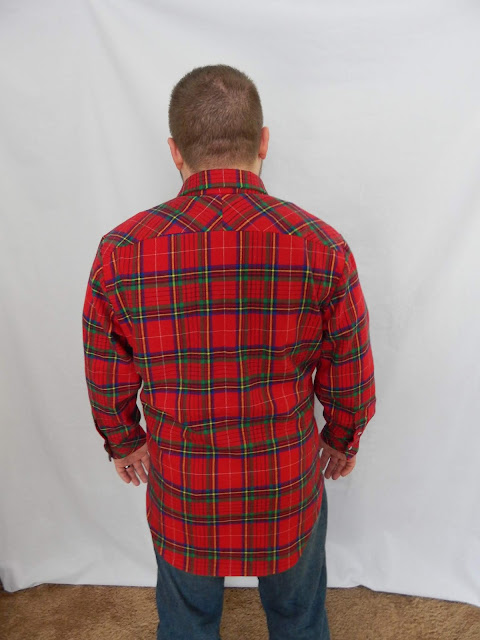
I'm pretty happy with how the plaid matching went on most of his shirt, but the back of the collar and the wonky unmirrored bias in the yoke are a bit lack luster; oops. I cut and sewed this shirt last, so I think I was getting a bit burnt out.

I think this is definitely a shirt pattern that I will be sewing up for him again, if he wants another!
Placket Madness
The most interesting thing about making these three shirts was how differently each of them chose to deal with the front placket:

Anyway, so there they are! Four lovely, toasty garments the the chilliest of Winter days for my sweet little Wisco family.
Until our next sewing adventure...
Boy do I have a lot of makes to share with you today! One for each of my four family members, representing 7 1/4 yards and 29 pearl snaps from KamSnaps.com. I'd planned to only use the snaps for my own shirt, but then decided to work smarter, not harder, and used them on all of our shirts!

There's just something quintessentially Winter about plaid flannel: It's cheerful, cozy and warm. There is just nothing quite as delightful as a natural fiber with a brushed surface.
I saw this plaid on Fabric Mart's site and it was love at first sight. It definitely has a bit of a Christmas tilt with the green with the red, but I'm still digging it for January and Winter at large. Not only is it mega soft, it's 60" wide, a bit of a rarity in woven-land, which is awesome for cramming lots of garments in. It was still in stock when I began writing this post a couple of weeks ago, but has since sold out.

Plaid matching can be pretty tricky, so I resolved to cut as many pieces as possible on the bias. Unfortunately, I quickly realized how funky that looks when you're dealing with a rectangular grid plaid instead of a perfect square, since there isn't a symmetry in the bias. I decided to throw caution to the wind and roll with it anyway.
Matching plaids in general is a game in making obvious intersections match up, especially around the body. These are the tips I use to make my plaid matching easier, though I know my plaid placement is still definitely not perfect by any means:
- I chose one vertical feature to be the center point of all pattern pieces: for this fabric I used the white line. No matter what else is happening, the center front, center back, centers of collars/stands and the center of the sleeve cap are all cut along this line.
- I marked the seam (stitching) lines where the front/back/sleeve meet at the underarm, and then drew a line perpendicular to the front/back centers and between the sleeve points. I used this guideline for vertical placement of my pattern pieces to ensure the plaid matches around the body. Why at the seam line? So when everything is stitched together you have a nice full repeat (instead of partial) right below where the sleeve ends and the body begins.
- When trying to seamlessly match, (which I didn't do with these because I just didn't have the brain power) marking the seam lines on all pieces intended to match is a must, especially for collars, cuffs, etc. I often write a note describing where one pattern piece ends at the seam line, i.e. "bottom of blue stripe" to be able to cut the abutting piece accurately. For collars I try to match along the center back; for cuffs I like to match along the buttonhole end of the sleeve.
- I cut everything as a single layer, because it's a lesson in futility to line everything up and cut accurately on a double layer.
- Since this is a yarn dyed fabric and is essentially the same on both sides, I used a feature of the fabric as a marker for whether I was on the "right" side: I made sure the stripes on the yellow were leaning up and to the right. If they were going down and to the left I knew that was the wrong side of the fabric. Making a note like this especially helps if you're cutting a garment in separate sessions. Once cut, it's a good idea to put some masking tape on the wrong side of your pieces so you can easily identify which are the right and wrong sides.
As you can imagine, or already know, plaid matching is a real fabric hog. Making sure things line up mean you will waste way more fabric than you would in a solid or all over print; you'll almost always need more than the pattern calls for.
A good rule of thumb for buying the extra you need: measure the vertical repeat of your plaid to figure out how many pattern pieces you can fit along each width of the fabric. Then multiply the length of the repeat by the number of "widths" you'll need to cut everything out. A hypothetical example: This fabric has a 6" repeat and I could fit all of my Bruyere on 3 widths of the fabric, so to be sure I have enough for matching I'd buy an extra 6"x3 = 18" (half yard).

I'm pretty happy with the plaid matching for the most part on these, but they are by no means perfect and there are many places (like the back of the collars) where there is room for improvement. So I suppose you can take all of these matching tips with a grain of salt. ;)
That got me to thinking about how I've been sewing for SO LONG (almost 25 years now; holy crap!) but still consider myself an intermediate level seamstress. It's because I am so satisfied to keep sewing at a level that makes me happy more than a level that is technically perfect. I just love making more than I love stressing too much about the details. I can't say I'll never try couture techniques but they just aren't a part of my sewing happy place at this point in my life.
But enough with the plaid specific talk and onto the garment specific musings!

I'd planned to take these photos outside, because lighting is always so much better, but the poor baby has her first cold and is a snotty, sad mess and our weather here has been nuts. It was -23F when I woke up this Saturday and -2F on Sunday. Illness or no, definitely can't be having anyone go outside in just a shirt in that kind of weather. And so here's my "fancy" makeshift living room photo studio that I threw together!
Violette Field Threads Piper Baby

I hemmed and hawed about which pattern to use for Peaches. I was between Piper Baby, Isobel Baby (also Violette Field Threads) and an Ottobre dress with some mid bodice flutters and a dirndl skirt.
Then, realizing I was planning to sew 3 other button down shirts I came to my senses and for the sake of my sanity chose to make her this very simple shift dress. It came together pretty easily, but there was one obstacle: her head. Or is the obstacle the pattern's neckline? You choose.

The dress is meant to slip over the head and thus has no closures. The pattern specifies that this 6-12 month size is appropriate for a baby with a maximum head circumference of 15 1/2". Nobody is writin' home about Peaches's 9 month old noggin, but it is slightly above average (70th percentile) and it hasn't been 15 1/2" since she was two months old. Babies have notoriously giant heads for their bodies, so not drafting an opening that fits even a slightly larger than average baby head feels like a pattern drafting misstep to me.

To compensate for the too-small-neckline, I deepened the back neckline by another 1/2". It's a bit of a bummer to expose her back even more during Wisconsin winter, but I didn't want to have to add closures.

The collar feels a bit funny to me since it's sewn into the shoulder seams instead of properly going around the entire neckline. It's a bit of a head scratcher to me why there isn't an option for it to go around he entirety of the neck. I can see that they left it off because of the back bow feature, but it would still have been nice to have it as a possibility since there are no closures to make things complicated in the back.


The sleeve has you sew the elastic channel into the hem and then sew up the underarm. In the interest of time I followed these directions but sewing the underarm then turning up the hem to make a channel would make for a much cleaner finish.

That all said, this was a pretty quick sew and I'm pretty jazzed with how cute it is on her.

Ottobre 03/2018 #20: Savannah

This is only my third time venturing into Ottobre-land, despite the dozen or so magazines of theirs inhabiting in my sewing room.
Working with Ottobre is a bit different of an animal since you have to add all of your seam allowances, but hem allowances are included. The one frustrating thing about this pattern is the magazine specifically states that it will specify the depth of hem for each garment, but with this pattern the directions just called for a "narrow" hem and there was no delineation for the hem on the pattern pieces themselves so I decided my "narrow" hem would be 5/8" turned in on itself, so I could stitch it at 1/4".

I had initially planned to make a size 98, which is precisely what Cheeks measures into now (and coincidentally is the size of the biker hoodie I made him a couple of years ago; no wonder that thing was so dang big!). In the spirit of him hopefully being able to wear this more than two seconds, I opted for a size 104 instead...but man, this pattern is definitely slim fitting as advertised. It JUST fits him despite being one size bigger than he measures. Ugh!! And yes, I definitely remembered to add seam allowances.

It was a pretty easy shirt to put together, once I got past cutting two left sleeves. Oy. The sleeve placket is a very easy iteration (you can see their how-to here), but the magazine's directions had me cut too short of a rectangle for the placket that I then had to recut. Annoying. Never hurts to add a couple of inches, since you can just cut them off when you're done.
The only thing I chose to do differently than directed was to cut two yokes so I could properly enclose the upper back and front shoulder seams using the burrito method.

I was a bit dismayed with how the cut on front placket shifted while I was topstitching it down; the pattern had me interface to the fold line, but I think if I were to do it again I'd interface through that topstitching line.


I think he just looked so smart in this shirt, and putting it together was minimal fuss, button down-wise. I'd definitely make him another...but in at least a size 110!
Deer & Doe Bruyere

I started this one off for me with a rarity: a muslin. I don't like "wasting" the time making mock ups, but with wovens I just have to, or there will be swearing, or crying, or some unfortunate combination of the two. It's a good thing I did, because in my initial mock up I had too little faith in ye olde bust and lowered my darts too much!

I have around a 38 1/2" bust at the moment, and I know Deer & Doe typically drafts for a C or D cup (pretty sure it's D), so I chose a size 42 based on the 37 3/4" bust listed. Their patterns have been very close to fitting my bust in the past so I was happy to just use an itty bitty full bust adjustment
(FBA).

The final fit adjustments to this one include: size 42 with 3/8" FBA (each side, for an added 3/4"), darts lowered 1", and a 1/8" each side (1/2" total) full waist adjustment. I'm pretty happy with these adjustments, but now that it's done I don't think I needed the full waist adjustment. Better a little too big than too small, though, for sure.

I decided to cut the waistband, placket and cuffs on the bias, despite the diagonal vs. square weirdness of this plaid as previously mentioned. It was a bit more exhausting than I imagined because of my attempts to exactly replicate the same part of the repeat for each side. I did pretty well on my own shirt, but kind of gave up on the back of Mr. 5's yoke, as you will see below. Sorry, man, my brain was fatigued.

The pattern didn't call for interfacing the front placket, but I did because I cut it on the bias. I made the rookie mistake of sewing the placket on and not trimming my seams and it was way too stiff and bulky, so I had to rip out my top stitching and trim/restitch.

The pattern also didn't call for interfacing the sleeve plackets, but I may do that next time: they definitely turned out a bit sloppier than I'd like. They're also a bit long, which I'd read in some other reviews of Bruyere; I had intended to shorten them by an inch but forgot to.

Overall, I'm pretty dang happy with how this one turned out! Also happy that it's long enough to cover my butt so I can wear it with leggings.

Kwik Sew 4075

I didn't bother with a muslin for this, but I did make some changes in conjunction with some of my hubby's fit challenges. Mr. 5 has a strong neck and often has trouble with button down shirts being way too small around the neck or way too tent-like everywhere else. For his 43 1/2" chest I cut a Large per the size chart, but used the neckline and collar / collar stand of the XXL to account for his neck girth.

I adjusted the neckline by tracing the size large most everywhere, then sliding the pattern to squarely meet the center front/back and shoulder of the XXL. It worked like a charm!

The only other adjustment I made, based on Mr. 5's other dress shirts, was to shorten the sleeves by 2 1/2".

Now that I see the shirt on him, I would definitely keep the collar and sleeves as adjusted, but I might shorten the body by 1-2" and straighten the side seams instead of having them curve in for a bit extra torso room. The shoulder fit is also really nice, which is great since he's pretty broad across his back.

I'm pretty happy with how the plaid matching went on most of his shirt, but the back of the collar and the wonky unmirrored bias in the yoke are a bit lack luster; oops. I cut and sewed this shirt last, so I think I was getting a bit burnt out.

I think this is definitely a shirt pattern that I will be sewing up for him again, if he wants another!

Placket Madness
The most interesting thing about making these three shirts was how differently each of them chose to deal with the front placket:
- Cheeks's Ottobre Savannah: Cut-on, so it was part of the fronts. The seam allowance was folded in and then it was folded in along a fold line and topstitched.
- My Deer & Doe Bruyere: A separate rectangle was pressed in half, then again with the raw edges meeting the center of the first press line, akin to double folded bias tape. This sandwiched the center front edges (again, like bias tape) and was topstitched.
- Mr. 5's Kwik Sew 4075: The right side was cut-on, per the Cheeks's shirt, but the left side was cut less wide and a separate two piece placket (the kind I've mostly often seen in the world for button-down shirts) was added. It's like party on the right, business on the left. What the what? I understand the intent, to make the overlapping left edge look more polished, but maybe we could be less lazy and just do both sides? But yeah I could've done that but didn't because of time constraints. HA!

Anyway, so there they are! Four lovely, toasty garments the the chilliest of Winter days for my sweet little Wisco family.
Until our next sewing adventure...
Jess
Awwwwwww! I love them all! And look at him looking like a big 'ole actual KID! Time flies man.
ReplyDeleteMy first thought was "Congrats little plaid family" (c) How to Lose a Guy in 10 Days (one of the best romcoms ever!!!!)
I *love* her dress with that big bow in back. Love. And have been meaning to buy the D&D Bruyere since, forever.
Great job with all the plaid!!!
Thank you!! :D
DeleteGreat job, everyone looks wonderful.
ReplyDeleteThanks so much, Pat. :)
DeleteAw, you guys are so adorable. What great family pictures! I love your daughter's back bow, and it's so smart to make it removable for the car seat! Great job matching the plaid on the bias on the yoke of your Bruyere!
ReplyDeleteThank you much, Elizabeth! And at least one of our yokes looks presentable. Haha. :P
Delete