I recently got a panicked sewing emergency call from my sister. She's relatively new to apparel sewing and working with knit fabric for the first time made her want to pull her hair out. Her fabric kept getting sucked into her needle plate and she was at her wits end. If you've sewn with knits, then chances are this has happened to you.
Maybe it has happened to you enough that you've vowed never to sew with knit fabric again. Before you swear off knits for life, I want to share a few tips for working with knit fabric to encourage you to keep sewing! These are the same tips I gave my sister:
1. Use a brand-new ballpoint machine needle appropriate for the weight of your knit fabric. Fabric Mart sells them!
2. Use a stretch stitch (zig-zag, lightning bolt, twin needle, whatever your particular machine recommends.) When in doubt, read the manual!
3. Go Slow! Turn down your stitch speed, and don’t push your pedal to the floor.
4. Start stitching a 1/4 inch from the raw edge of the fabric to avoid the fabric getting sucked into the machine, then use your backstitch to go back to the edge of the fabric.
5. Most knit fabrics can handle a little steam (be sure to test a small swatch of your fabric before steaming your whole project.) I find that a nice dose of steam from your iron goes a long way in flattening wavy knit seams and making everything look nice and neat.
6. If you have a serger, don't be afraid to use it! Sergers and knit fabric go together like bread and butter!
After helping my sister get to a much less frustrating spot with her project, I was excited to start my next sewing adventure. I ordered two new activewear fabrics from Fabric Mart to make some tricked-out activewear garments.
Fabric Mart had a gorgeous multi-colored abstract floral print swim knit fabric that I used to make a Seamwork Wallis. The Seamwork Wallis is a scoop-neck athletic dress pattern with built-in shorts. I also decided to customize this athletic dress by adding a shelf bra with foam cups. I added a shelf bra by cutting an extra bodice front and bodice back pattern piece and cropping it just under the bust. Next, I took a fun yellow polka dot plush back elastic from my stash and stitched it around the bottom of the cropped bodice pieces. Finally, I inserted foam cups and tacked them into place.
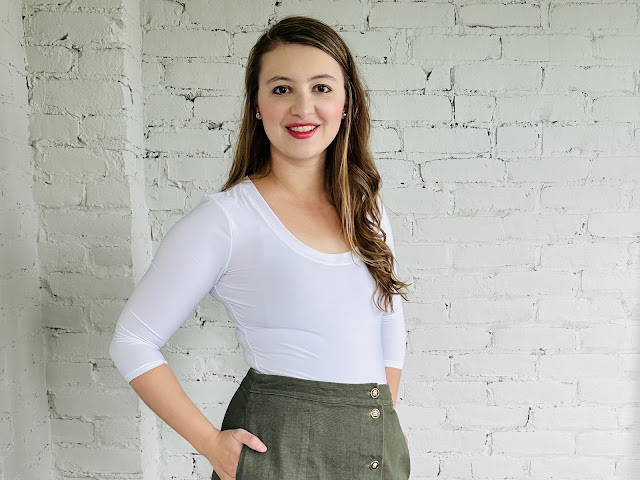
I also made a white 3/4 length sleeve bodysuit with 2 yards of 4-way stretch athletic knit fabric. I used the Seamwork Orlando bonus pattern which takes the normal Orlando scoop neck t-shirt pattern and transforms it into a 3/4 length sleeved bodysuit. To trick out my bodysuit, I ignored the snap closure steps in the pattern instructions and copied a hook and eye closure from my favorite shape wear. I harvested the hook and eye closure from an old bra and inserted it in the crotch seams of the bodysuit. This made for a secure bodysuit closure that didn’t come un-snapped with movement!
It was a lot of fun slowing down and thinking through the customizations of these two garments to make them exactly what I wanted. From the built in shorts and shelf bra with cups in the dress to the hook and eye closure of the bodysuit I was able to trick out my activewear sews! I love that sewing allows you to make your dreams a reality. Whether you are just learning to sew knit fabric, or you're tricking out everything you make, I hope you’re inspired by these tips and tricks! Happy sewing!
SHAINA | @shaina_sews
Unfortunately Fabric Mart Fabrics sell out quickly!
You can find similar fabrics by shopping the following categories: ACTIVEWEAR & SWIMWEAR.


Both are super cute! You did a great job on them. Thanks for the helpful knit sewing tips!
ReplyDeleteI love the dress style and print! The body suit is cute with the scoop neck.
ReplyDeleteThe neck band on your white body suit is enviable. Beautiful garments.
ReplyDeleteI have both patterns on my sew list, after seeing your makes, they are getting moved up on the list! Thank you for the knit sewing tips and reminder for me at least to slow down while sewing. Never thought about using hook & eyes on bodysuit, going to give it a try. Both of your makes are cute. Happy Sewing!
ReplyDeleteHook and eye from an old bra is a great ideal, thanks!
ReplyDelete