
Made By A Fabricista: Linen and Spring......A Match Made in Heaven

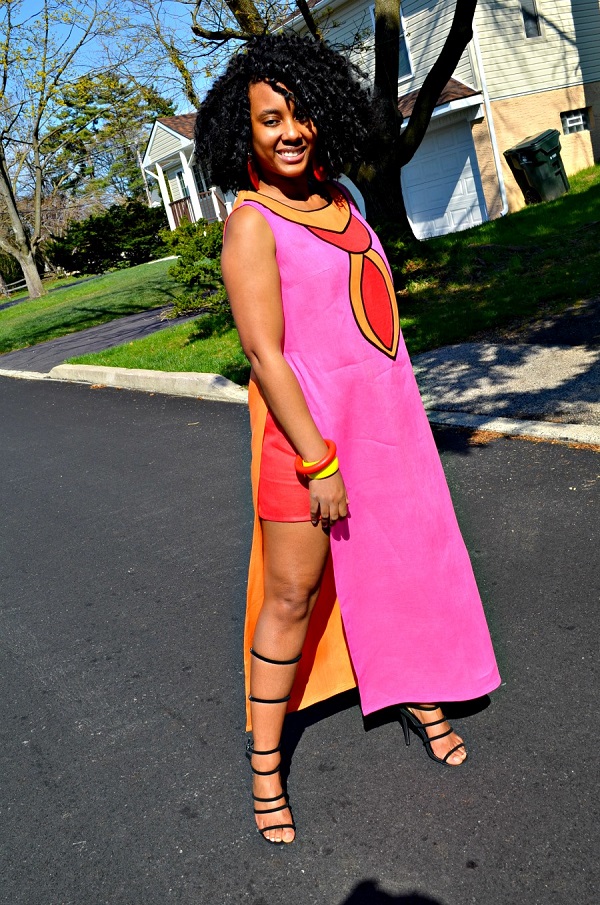
[This outfit was made for and modeled by my daughter Mori]

OK so this Linen was in for some rough treatment just to see what would happen. I washed it in cold salt water and then I threw it in the dryer. I know what you're thinking...Yikes!! But the results were not bad. It didn't have as much shrinkage as I thought I would. [Ha! I had a little extra yardage just in case] As you can see there with the pattern, it's is all pressed to death and gorgeous. I chose these three vibrant colors to see what kind of coloring blocking magic I could do with this simple dress.


I used Simplicity 8094 the maxi sleeveless version of the top/dress and the shorts. I used a size 12 for Mori and I'm thinking that it could have been a little bigger around her arm-circle and neckline. It was fitting just right so I think the next time I will go up in size, she wants a few knit versions of this dress.  I will also like to make the shorts wider in the legs. This is a super quick sewing project and it went together like a charm. The linen worked well with this simple design. Fabric Mart has tons of linen colors to choose from right HERE!


At first I was going to cut the pattern into pieces and then cut the different colors out and piece them together. But I wanted something more interesting to the eye. I was looking at a few new statement necklaces and I thought why not add a statement piece to the front of the dress? I cut out a few shapes and  just played with them a while. I decided on these three pieces but I needed something to make these pieces "POP" I used a small double bias tape in black to trim the pieces and then I sewed them together and then to the front of the dress.


...and this is where we end our post. 
Be sure to stop on over to my blog to see whats happening!
Michelle at That Black Chic
 photo 35845374-bce1-426b-9e7a-633f43c85d42_zps12c60185.jpg

Comments

  1. What beautiful details! Thank you for the tutorial on how you worked with the accent pieces. I also love pink and orange together, so I find this very eye catching. :)

    ReplyDelete
    Replies
    1. Thanks Dina, this was a fun project and I will be making myself one of these.

      Delete
  2. Orange and pink pairings are one of my faves! Awesome work.

    ReplyDelete
  3. Another hot number from you Michelle! Thanks for including how you worked those details.

    ReplyDelete
    Replies
    1. Girl I almost missed the opportunity luckily I remembered to start snapping pics before I finished.

      Delete
  4. I love the accent details. It's a great looking garment.

    ReplyDelete
  5. Insanely awesome! I absolutely love the details and it's so fashion forward!!

    ReplyDelete
    Replies
    1. Thanks, I'm pretty happy with this one myself and I love this pattern!

      Delete
  6. Love statement necklaces but can't stand that tension that heavy pieces give my neck and shoulders. Your tutorial solves that for me! Many thanks!

    ReplyDelete
    Replies
    1. I'm glad I could help you with an alternative, you should try it!

      Delete

Post a Comment

Thanks for leaving a comment! All comments are reviewed before posting to help us eliminate spam. Your comment will be posted within 24 hours.

Popular Posts You Might Like

Made By A Fabricista: Celebrating warm weather with Spring sewing!

Hi sewing friends! I don’t know about you but boy, was winter cold and dreary this year! The weather here in the Philadelphia area has been slowly improving, but Spring sure did take her sweet old time to arrive. So by April, I was definitely in the headspace of needing to sew up things that were either bright and cheery or meant for the warmer weather I am very much craving right now. I recently purchased a few SewBexx Patterns so I took them on a test run to create some Spring makes. First on my list was to make a top using this absolutely gorgeous ITY fabric I picked up last year. I had two yards which was enough for a long sleeve shirt. I chose the Olivia top, which is oversized with a drop shoulder, has multiple lengths and a split hem. I think the pattern is intended for heavier fabrics but I was envisioning how lovely this top would look with the drape of ITY knit fabric, and it did not disappoint. It came together for me quickly and was a straight forward sew…and I love the br...

Made By A Fabricista | Chasing Time: My White Rabbit-Inspired Look for Atlanta Frocktails

For this year’s Atlanta Frocktails, I found myself captivated by a character who’s been quietly tugging at my imagination for years—the White Rabbit from Alice in Wonderland. There’s something so relatable about his frantic energy, always checking the time, always running late. While he’s worried about being on time, I’m usually calculating how late I can be and still technically arrive on time. Spoiler: I’m often wrong. It’s a cycle of procrastination and anxiety that I know all too well. So when I imagined my look for Frocktails, I thought—why not honor the White Rabbit? After all, time has been chasing me too. But this look isn’t just about Wonderland whimsy. It’s also deeply inspired by this year’s Met Gala theme, Tailored for You, which includes a focus on Black Dandyism—a celebration of Black elegance, intellect, and expressive style. I’ve been obsessed with this theme since it was announced. As a Black creative, I find it powerful and moving to see style used as a way to reclaim...

Made By A Fabricista: Getting into the Spirit of Summer

I'm not gonna lie y'all, I had a completely different project I wanted to do, but that's gonna take more time, and I wanted something cute, comfy and fun to wear for my birthday on the 19th. When I saw this goldenrod & off white linen jacquard , I thought it looked a bit like the design on a Koroks body, especially Makar from The Legend of Zelda: Wind Waker! I started with the bodice from the free Elderberry dress pattern from Mood, but deviated for the skirt, it felt a little plain of a design, and I had scraps of a Korok fabric that I knew would be a nice accent with some cut out pockets. I've made these pockets once before, deciding the cut out was based on aligning with the seam on the bodice for how far in, and as for how low depended on where I wanted the pouch of the pocket to start. From there I cut the visible part of the pocket, making sure to match the curve of the waist and following the line of the side seams of the skirt, as well as cutting a facing to...