


When I was composing this blog post in my head, the title was certainly going to include "wadder". I tried it on mid construction, decided it was okay if a little on the bright(!) side, but when I finished it, I put it on and was so disappointed in the results. My son came down at the moment I was trying it on and asked if it was a nightgown!
It wasn't until I removed the 1st temporary drawstring - white satin ribbon, pressed it, added a different temporary drawstring in pink grosgrain (haha!) and accessorized that I felt a huge sigh of relief that I actually like it!
I still think the bright pink linen + this pattern had the potential to turn into an unfortunate result from the start. Too hospital gown-y. I will remake this pattern in a print (went perusing the cotton lawn & voile sections!), but this one was just barely saved.
I wanted to try out the reorderable linen as it isn't a fiber I sew it with very often. In fact, I think I've only made 2 garments with linen blends - I've never used 100% linen. Most of the colors were a bit subdued for summer so I went with pink and boy is it ever! I washed on warm and dried on high heat. I pressed the linen before I started cutting out and made sure to keep everything on grain.
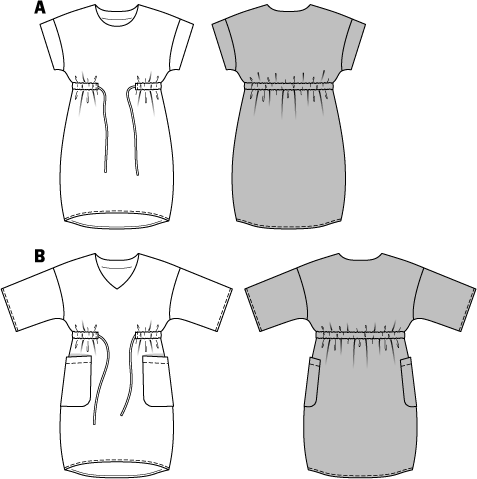
The pattern is relatively simple - front and back both on fold, the sleeve bands, facings and casing.
While I didn't staystitch the neckline of the front and back, I cut them out, sewed the shoulder seams, and immediately put them aside. After cutting the facing, I squared everything back up at the ironing board using the pattern piece. I then interfaced the pieces.
I under stitched the facing, which is sufficient, but I decided to make a nice noticeable topstitching vs doing it at the edge. I love the neckline. It is nice and flat and the topstitching looks great.

When I tried it on I thought, "hmmm, it's okay" and figured I'd like it more with the waist shaping provided by the drawstring. Especially since the fit at the neckline and shoulders was so good!

I removed 1 1/4" off the length (Burda is often a tad too long for me) by marking at many places and then using a rotary cutter to keep it neat. I did a double turned 3/8" hem and topstitched in place.
 |
I know the hi-low hem can be a bit overdone but I like it when it's subtle like this
|
And can we talk about sewing and pressing linen?!?! SWOON! So perfect. And from trying it on, I find it extremely comfy to wear.

There's a wee bit of pregnancy vibe but I think that's because the casing is a bit too high for me with a full bust. On future versions I will lower that about an inch.
 |
I'm not sure why my sleeves are flaring. Likely my handling of the linen during pressing.
|
Recently, another blogger sewed this pattern up and I looked at the fit on her and thought, Hmmm, I chose the wrong size!
I looked at how roomy it was and went with a 14(40). Normally with Burda I do a 14 neckline and grade to a 16. I should have graded this one out. I have JUST enough butt room when it's tied. Another note for future makes.
Now, let's talk about the pattern a bit. Burda 6732 was released last fall and I just loved it. Like the woven equivalent of a t-shirt dress!
-Don't sew the sleeve bands the way they tell you.
They have you sew them flat and then do the seam and side seam in one pass. This is VERY bulky unless you're using something extremely lightweight. And the bulk makes it difficult to get a smooth line from sleeve to dress. I pressed and pressed and in the end I stitched a few lines across the sleeve seam to get it flat.
-The casing isn't cut on the bias.
Cut the casing on the bias. Okay? Trying to press the strip was just a nightmare. I chucked that and cut a strip just under 2" and used my 1" bias tape maker which worked a treat. So I ended up with a slightly narrower casing but that's okay! It's very neat.

Ordinarily I'd wash my finished garment to remove markings but I was so sure this was a wadder! :) So bear with my blue dots!
I marked the casing line at several points as you can see, to ensure I sewed it on straight. I pinned it really well and took my time sewing it.
I went "in" from the bottom of the dress, sewed the far side first, leaving the pins in (shhhh!). I then went back and did the other side, removing the pins as I went.

I realized the white satin ribbon was a HUGE issue and went for some matching pink grosgrain in my ribbon stash. What a difference that made! I will have to hit the store to find a bit of cording that works.
So a pattern silhouette that was a bit new for me...a color that's a bit new for me...a fabric that's a bit new for me...The Trifecta! I am so happy to have a wearable summer dress after taking those "risks"!

Nakisha
Super cute Nakisha! Glad you didn't wad this as it looks darling on you!
ReplyDeleteThanks Sue!
DeleteReally cute dress. Love the color. A suggestion and a comment: when you lower the casing, only lower the front. Just have someone mark where it would hit in front if you held a ruler level with the back. I'd be interested to know what luck others have had with narrow hems; mine always flip up after washing so I've taken to making them a little wider.
ReplyDeleteThanks Mary! That's exactly what I was thinking...I'd only move it down in front.
DeleteMy narrow hems are usually okay!
I think the dress looks great on you! So much so that I might have to pick up the pattern and give it a try. The pink linen is perfect for those hot summer days.
ReplyDeleteThanks Cathy! It's such a cute pattern!
DeleteThat dress looks so cute on you, and I like the high waist. That color of cool pink is a very good color for you, too. Looking at your stitching and workmanship, I can see you are an excellent seamstress.
ReplyDeleteThank you so much!
DeleteI love this! I think the color and fit look beautiful on you.
ReplyDeleteThanks Carolyn!
DeleteWell done Nakisha ... FIESTA ;)
ReplyDelete:-D Thanks!
DeleteI love this! I love color and would have chosen the hot pink! And linen, too! This looks like a super cool dress to wear right now when it is 100 degrees. In fact, I just saw one for sale that looked exactly like this. You have done a great job! Enjoy it!
ReplyDeleteYes, perfect for these extremely hot days! Thanks so much Patricia!
DeleteWhat a great casual summer dress! The bright pink looks amazing on you!
ReplyDeleteThanks Ginny!
DeleteYeah I could initially see the hospital gown look, but you made a great recovery! I like it one you. So pretty
ReplyDeleteIt was a close one! LOL! Thanks Natisha!
DeleteYou look great in pink! Looks like the perfect dress for a hot summer day.
ReplyDeleteThank you Ann!!
DeleteLoved the way you described your making of the dress and your thoughts. Made for very fun reading. You look great in the pink.
ReplyDeleteAw thanks Sophie! I always worry that my blogging style is too "stream of conscience" :)
Delete