

Hope you're having a Golden day, get it? [I crack myself up sometimes!] This DIY pant suit is golden for sure. So tell me this, were you one of the lucky ones who were able to grab some of this fabric when Fabric Mart posted their new arrivals? I jumped on it so fast it was crazy and before you know it "poof" it was gone. So sorry I don't have any links to this fabric but all is not lost, you can use something else for these patterns. Try looking in the suiting selection for the blazer. The other awesome option is denim and as always check the New Arrivals.
I went to my "tnt" blazer pattern for this project because I knew the metallic bias around the edges would look fab and I was on a mission to make another pair of mimi g's jeans and trim the seams in metallic bias as well. I recommend both of these patterns to any level sewist. I did a little pattern hack on the blazer pockets to make them a little more interesting and I made a pictorial of the process for ya.

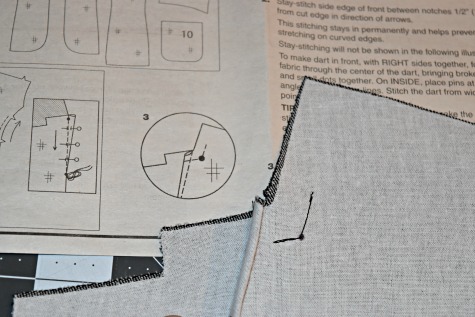
A few things I want to share with you in case you're one of those people who hate to transfer markings. Yes it a necessary evil when sewing almost as evil as cutting out pattern pieces! The dots at the corners where you will be connecting the collar are a must! On the blazer front and front facing pieces. Mark all the dots and sew a reinforcement stitch as shown. [I used white interfacing for this project, I normally would have used black but I could not get my hands on what I needed and I had to get started. I don't need ya'll talking about me.]


I used metallic gold bias on the edges of my front facing pieces. The pattern does not call for this but it looks good inside.

The instructions show you a tried and true method of making crisp corners when sewing your bias to edges so trust it and try it.


OK so here is my packet pattern hack for the Simpilicity 1421 blazer.
1. You start with making a enlarged pocket pattern. I added an inch to each side for my pocket,

2. I cut out three pieces for my pocket, fabric, lining and interfacing. I am using a stretch denim that it the only reason that I used interfacing, I didn't want to stretch. If you're using a heavy duty fabric with no stretch you will not need interfacing.

3. Zipper opening facing. this will be determined by how big you want your zipper opening. [the process I used is like sewing a welt pocket] I cut out a 7 inches long and 2 inches wide.

4. Now mark your sewing guide for your zipper opening. I just put a rectangle in the middle and when I went to sew it I realized it was too small, I needed a wider space to insert my zipper. So look at your zipper and see how much you want showing and make your measurements for your opening.

5. Now pic this piece to your pocket. I put mine on a slant for more interest. [do you see this magic in this pic?? My DIY picture frame pin-cushion matches my project!]

6. Now sew your facing to your pocket. Remember I told you opening that I drew was too small? I just used it as a guide and sewed 1/4 around the line I had drawn on the facing piece. You should be sewing on your lines that were drawn on your facing piece.

7.Time to cut your opening to flip your facing to the inside. Remember not to cut past your stitching at those corners.

8. Flip the facing inside and press really good.


9. Lay your pocket over you zipper, pin and stitch around the zipper. I stitched around twice like you do on denim.

10. Sew your pocket to the facing piece, right sides together. Make sure you open your zipper before you sew these pieces together or you will not be able to turn it to the right side.

11. Now turn it over and press it really good.

12. Final step attach it to the front of your blazer, Remember that since the pocket is bigger you will need to use different placement than the pattern calls for.


Now if you've been following me you know I'm all about the big and bold patterns! You don't have to do it like I do, you can make a bold blazer and mix it with a solid bottom or vise versa. So don't just look at my work and shoot it down right away, give the bold prints a chance.
Well that's all for now Peeps!
Michelle @ www.thatblackchic.com
I knew you were going to do something amazing with that fabric and you didn't disappoint! While I may not wear the two pieces together they look fantastic on Mori and the fabric just shines through! Great job!
ReplyDeleteThanks Carolyn!Yeah it would be a bit much for the average person to wear all together that's why I put the disclaimer at the end. lol!
DeleteLove it! I was one of the lucky ones to grab this fabric but I haven't decided what to make with it. In the meantime, I'll just keeping petting the pretty fabric LOL
ReplyDeleteThank you! I think I have enough left to make me a jacket.
DeleteSo amazingly dope! I was waiting on this post, great job!
ReplyDeleteThanks Jenese!
DeleteYou are beyond the beyond! I love it!
ReplyDeleteI'll take that!
DeleteThis is AMAZING, Michelle! The jeans are fab, but that jacket is such an incredible statement piece! I especially love the metallic bias trim: it's a great touch and looks perfectly sewn! I was *thisclose* to buying some of that denim but thought better of it. (Unlike your lovely daughter, I decided I could not pull this bold denim off! xD ) You certainly used that fabric to its full potential!
ReplyDeleteI knew that trim would make that fabric sing! You could have made a little jacket with the fabric, there are lots of possibilities!
DeleteMichelle, Your work is always stunning and Mori does such a great job modeling. Thanks for the gorgeous inspiration!!
ReplyDeleteThanks Elizabeth and you are so very welcome!
DeleteAnd thanks for the pocket tutorial!
ReplyDeleteI thought I'd share in case anyone was interested, it adds a little something new to the blazer.
DeleteAmazing!!!!!
ReplyDeleteThanks!
DeleteMichelle, Michelle, this is gorgeous this look so professional it looks like it came from a designer line costing designer money. Fabulous work on this.
ReplyDeleteThanks Sharon, it does look like money doesn't it!
DeleteHi Michelle! I grabbed some of this gold when I logged in to Fabric Mart and knew immediately that it would be a show stopper. I'm still contemplating on how a woman over 50 would rock this fabric. I love to sew unique patterns. Any suggestions?
ReplyDeleteThis blazer is perfect! You can wear it with a pair of black wide leg pants looking fly at 50+ Or maybe another jacket without the trim if you don't want to be that flashy.
DeleteJust absolutely superb!
ReplyDeleteThanks Tee!
DeleteBeautiful.
ReplyDeleteWow, wow, wow! That is showstopper. Thanks for always being so inspiring!
ReplyDeleteThanks Ann, I like it loud!
DeleteWow this is stunning! Now I almost regret not buying this denim.
ReplyDeleteShoulda got you some!
DeleteThis outfit is stunning. It seems to be the perfect fabric with the perfect patterns and sewn impeccably. Thank you for the close ups of pocket and the reminders for marking!! Its mandatory when making a blazer!
ReplyDeleteThanks!I just wanted to point out some of my very first mistakes with this pattern.
DeleteLove it! The Pockets make the jacket.
ReplyDeleteOptions are always good.
DeleteWOW! That looks great on her and you did a FANTASTIC job. It's not my style, but I'm loving it! Keep up the GREAT work!
ReplyDeleteI appreciate your words!
DeleteMichelle; you're the one that stole my fabric outta my shopping cart! That suit is amazing! I also love the pockets.
ReplyDeleteHahahahaha Angel!
DeleteYou have a great vision! The fabric was made for the design you chose. Thank you for sharing production steps.
ReplyDeleteYou're welcome Victoria!
DeleteLove the color and fabric. The pictures are amazing. You have a keen eye and capture the feel of the moment. Can't wait to see what's next.
ReplyDeleteThanks for being my Sista Girl!
DeleteYou rock that suit! Fabulous!
ReplyDeletei hope you saved the scraps and made a bag or change purse would make great gifts too
ReplyDeleteThe details in this blazer are amazing! I love it and it looks perfect on you. Thanks for all the up close images during your construction phase. It's great inspiration for when I get the guts to make a blazer!! Beautiful job!
ReplyDeleteYou have a great creative eye for detail and design. This suit is so very well executed and looks beautiful, just like you.
ReplyDeleteJUST GORGEOUS!!
ReplyDelete