

I love when we get designer fabrics. I love it for a few reasons --
1) I love the photo hunt to see what the designer made with it.
2) I love the excitement that the customers get.
3) I love trying to figure out how to use a fabric when it is unusual, such as a panel or border.
4) I love saying that, "This fabric is from XYZ designer and I made my own version of the garment!"

We recently imported a load of fabric from Thakoon. I had heard of Thakoon, but was not too familiar with his designs. Thakoon is Thai-American and grew up in Omaha, Nebraska. His designs are described as "timelessly feminine" and "romantic and sensual as they are modern and innovative. (Thanks to Wikipedia for that info.) His designs have been worn by numerous celebrities and carry a high price tag.
I was intrigued by this cotton sweatshirt knit with a flocked floral design. It is a panel and honestly, at first glance, didn't seem to have a great layout. The flowers are about 24" inches apart, not leaving you with a lot of room to cut something without getting another flower in the pattern piece.
I browsed images found under "Thakoon sweatshirt" on Google, and don't you know, I found it! The original sweatshirt design has a dropped shoulder, back opening with a contrasting insert and piecing that skews the flocked design. I really liked the skewed piece work -- it helped break up this romantic floral and made it edgier.


One thing I didn't like about it was the boxiness. I am not tall and skinny. Boxy tops, especially in heavier fabrics, do not look good on me. I look like a box on sticks. You'll see how I reworked that in a minute.
I decided to go with a TNT pattern for me -- Pamela's Patterns Perfect T-Shirt. (If you remember, in the summer of 2016, we hosted a series of t-shirt pattern hacks.) I normally use the darted front with this pattern, but didn't want to mess up the flocked flower with a dart, so I went with the regular front piece.


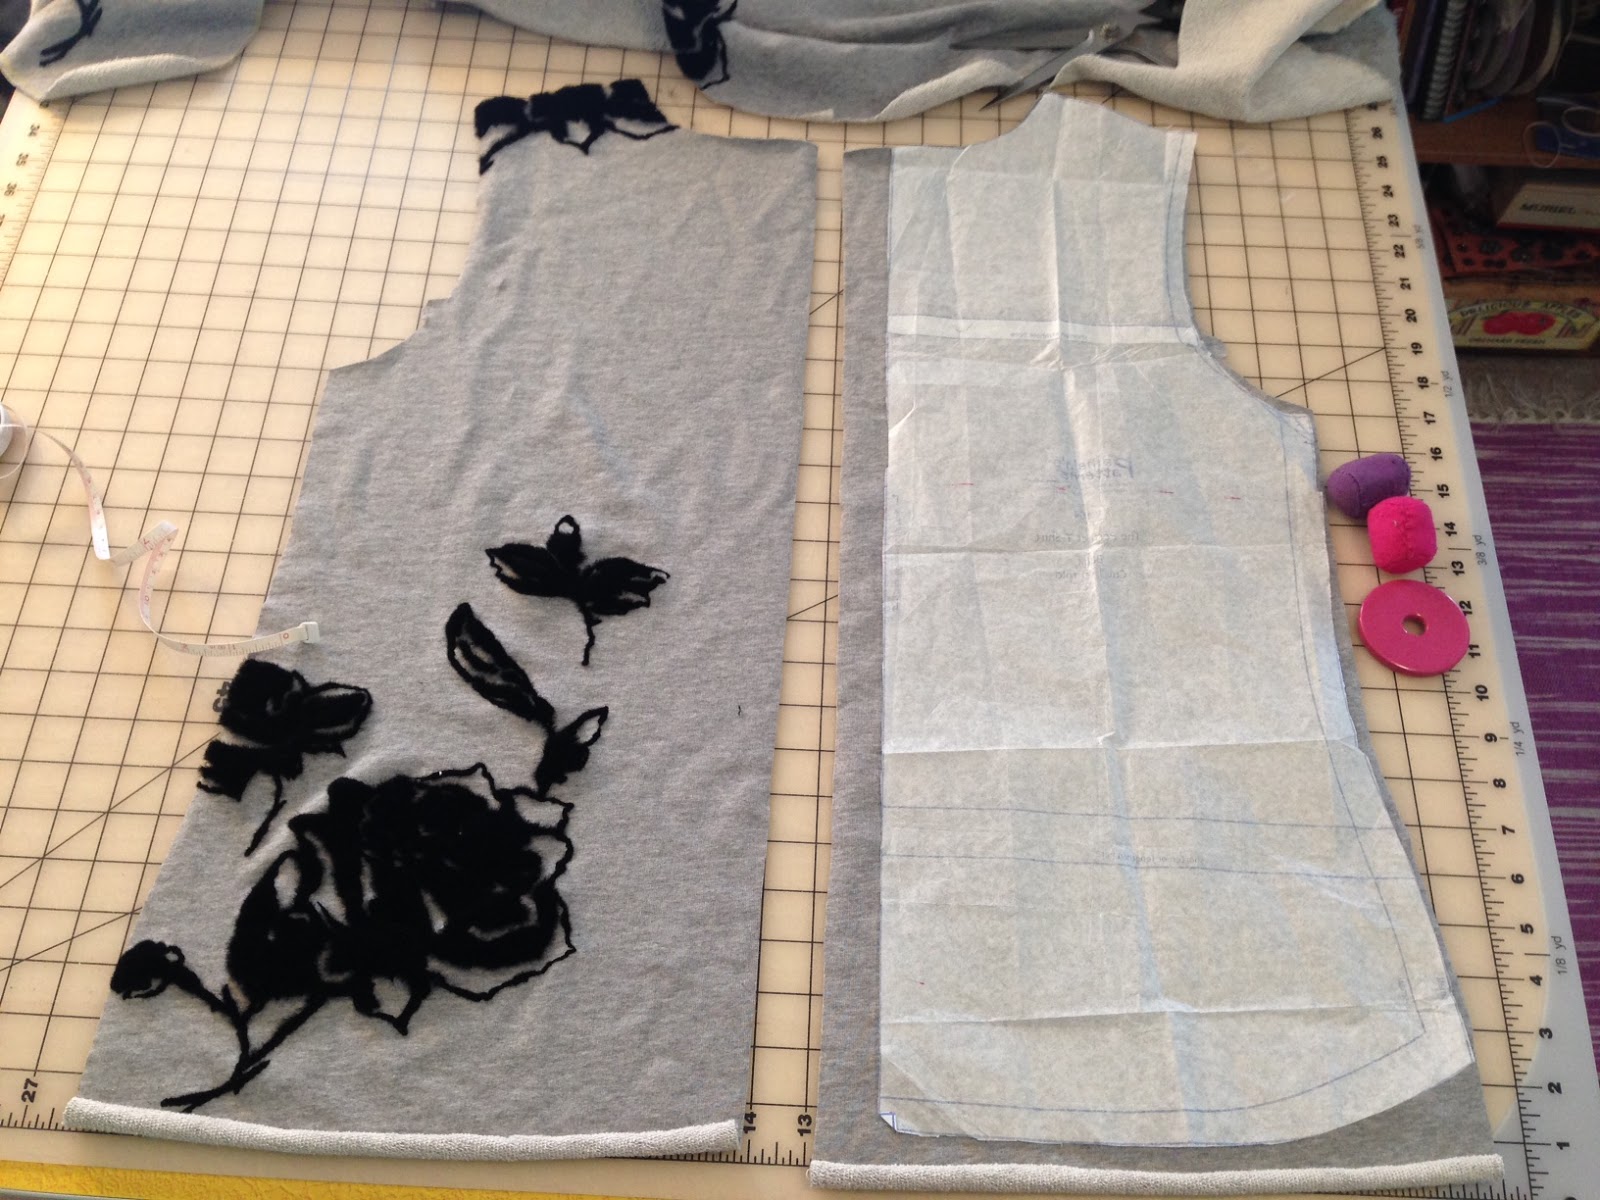
To start off this project, I had to figure out how they cut everything out. It looks like two flocked pieces were used. I had 3 panels to play with and would recommend you buy the same amount if you want to do this project. You won't use all of it, but you need 3 panels for the length of the shirt. Panels are cut in between the two flowers. The fabric is available HERE.
I started with the front piece and laid it so the flocked flower was in the torso area. The shoulder area ended up really close to the flocked flower above it. I traced one side of the shirt, then laid the pattern piece down to create the second half. When I traced the pattern, I made it less curvy and a bit wider at the base. I wanted a looser fit than my normal t-shirts.
If you look close at the original design, there is a seam going down the right front side of the shirt. To create that, I traced the neckline and half the shoulder seam. Then I shifted the entire pattern piece over to create about 1/2" extra width from the shoulder to the hem. That way, I could just fold it, sew it and get back to the original size of the pattern. (I didn't fold and sew though until I skewed the hem piece.)

Here you can see I have everything cut out, except for the one side. I needed to leave enough fabric so that when I cut the bottom half where the skewed piece will be, that there was enough fabric.

Time to start cutting up this shirt! I measured 8 1/2" from the hemline and marked. This is where I then cut across the shirt to skew the bottom.

I moved the bottom piece over about 5 1/2" inches, skewing the flower.


Then I sewed them back together and cut off the excess on each side. Remember the vertical seam? I sewed that in after this step was finished.

To create an open back, I added 1" to the center back pieces for finishing.


I fused SewkeysE 1" Fusible Knit Stay Tape to the wrong side of the center back seams to stabilize it and help it from winging out when I wear it. After the back seam was finished, I basted at the neckline to create one piece.


Sleeves:
I used the long sleeve pattern for this design. I cut out one sleeve without any flocking. I carefully placed the other sleeve so that an entire flower would be shown. I placed it so the flower would show more from the front. (Look at your sleeve cap markings to make sure you have the flower closer to the front vs. the back if you decide this same design detail.) I used the sleeve without flocking as my pattern because I widened it for a looser fit.

The original had a seam skewed at the sleeve. In the photo above, I am testing to see where I would like the seam break to be. I marked 4 1/4" and cut. Be sure you leave extra on one of the sides of the cut piece so that when you skew it you have enough fabric to have a full sleeve. (Similar concept to the front of the shirt.)


I top-stitched the back pieces together till about the waistline. I will need to wear a cami underneath because it stops just above my pant waist line. You could put a panel of some sort in it, but I chose not to.

Something to think about as you make this -- balance your design. I chose to have the flower on the back left and the right sleeve to balance it out. If I chose to have everything on one side, it would have been off balanced-- it would have bothered me! (OCD!)


Another thing to keep in mind is that there is more than one way to do it! You could place it differently. Depending on your size, you may need to. I find that if you size large or smaller, you will be ok. If you are plus size, you may have to do more tweaking or buy an extra panel just in case.
I hope you were inspired by my designer hack. It was a lot of fun to make. I'd love to see your designer hacks. Share them with on Facebook and tag us on Instagram @fabricmart.
1) I love the photo hunt to see what the designer made with it.
2) I love the excitement that the customers get.
3) I love trying to figure out how to use a fabric when it is unusual, such as a panel or border.
4) I love saying that, "This fabric is from XYZ designer and I made my own version of the garment!"

I was intrigued by this cotton sweatshirt knit with a flocked floral design. It is a panel and honestly, at first glance, didn't seem to have a great layout. The flowers are about 24" inches apart, not leaving you with a lot of room to cut something without getting another flower in the pattern piece.
I browsed images found under "Thakoon sweatshirt" on Google, and don't you know, I found it! The original sweatshirt design has a dropped shoulder, back opening with a contrasting insert and piecing that skews the flocked design. I really liked the skewed piece work -- it helped break up this romantic floral and made it edgier.


One thing I didn't like about it was the boxiness. I am not tall and skinny. Boxy tops, especially in heavier fabrics, do not look good on me. I look like a box on sticks. You'll see how I reworked that in a minute.
I decided to go with a TNT pattern for me -- Pamela's Patterns Perfect T-Shirt. (If you remember, in the summer of 2016, we hosted a series of t-shirt pattern hacks.) I normally use the darted front with this pattern, but didn't want to mess up the flocked flower with a dart, so I went with the regular front piece.


I started with the front piece and laid it so the flocked flower was in the torso area. The shoulder area ended up really close to the flocked flower above it. I traced one side of the shirt, then laid the pattern piece down to create the second half. When I traced the pattern, I made it less curvy and a bit wider at the base. I wanted a looser fit than my normal t-shirts.
If you look close at the original design, there is a seam going down the right front side of the shirt. To create that, I traced the neckline and half the shoulder seam. Then I shifted the entire pattern piece over to create about 1/2" extra width from the shoulder to the hem. That way, I could just fold it, sew it and get back to the original size of the pattern. (I didn't fold and sew though until I skewed the hem piece.)

Here you can see I have everything cut out, except for the one side. I needed to leave enough fabric so that when I cut the bottom half where the skewed piece will be, that there was enough fabric.

Time to start cutting up this shirt! I measured 8 1/2" from the hemline and marked. This is where I then cut across the shirt to skew the bottom.

I moved the bottom piece over about 5 1/2" inches, skewing the flower.

End result:

Then I sewed them back together and cut off the excess on each side. Remember the vertical seam? I sewed that in after this step was finished.

Back Piece:
I actually didn't realize that the back on the original was opened when I started. (Can you tell I was figuring it out as I go??) I really liked this idea, so I took the back pieces and found a good spot on the fabric for them. One half I kept solid. The other half I positioned the flocked flower. I had it coming off the edge for interest. The shoulder area also caught a piece of a flower! I added length to the back pieces and graded them to the length of the front to get a high-low hem.To create an open back, I added 1" to the center back pieces for finishing.

I fused SewkeysE 1" Fusible Knit Stay Tape to the wrong side of the center back seams to stabilize it and help it from winging out when I wear it. After the back seam was finished, I basted at the neckline to create one piece.

Sleeves:
I used the long sleeve pattern for this design. I cut out one sleeve without any flocking. I carefully placed the other sleeve so that an entire flower would be shown. I placed it so the flower would show more from the front. (Look at your sleeve cap markings to make sure you have the flower closer to the front vs. the back if you decide this same design detail.) I used the sleeve without flocking as my pattern because I widened it for a looser fit.

I sewed the rest of the shirt just like the pattern states and voila! I have my very own designer sweatshirt! (I have to say, I like my version better. Hehe **The perks of sewing for yourself**)


I hope you were inspired by my designer hack. It was a lot of fun to make. I'd love to see your designer hacks. Share them with on Facebook and tag us on Instagram @fabricmart.
Happy Sewing!
~ Julie
PS-- See our other fabrics from Thakoon HERE.
Clearly, I need to check out more of Thakoon being from Omaha myself! :) What a cool sweatshirt! You did a great job making the original style fit you. This fabric looks cool with the shifted motifs; that's a really innovative way to work with a floral.
ReplyDeleteThank you for the kind comments!
Deletewow. I love it! very creative and you look great in it.
ReplyDeleteThank you, Lori!
DeleteThanks for using the Perfect T-Shirt pattern from my pattern line. I agree, I like your version better than the Thakoon original! It looks fabulous!
ReplyDeleteThank you, Pamela! Your t-shirt does great again!
DeleteGreat detective work and a great knock-off! Nice job, Julie!
ReplyDeleteThank you, Ann!
DeleteI also Google a designer after buying their fabric to see what they used it for. Really cool sweatshirt. I definitely like your version better than the original.
ReplyDeleteThank you, Audrey!
Delete