
Hi Fashionistas!
Is it just me or is time moving faster than ever? I am in denial that it has been one month since I shared my last sewing adventure with you!
Trying to stay comfortable and fashionable during pregnancy has been challenging, but I am determined to make the best of maternity fashions and look chic while dealing with sleep deprivation, heartburn, and fatigue!
Here is what I made: A soft drapey waterfall coat that can be worn three ways:
First way to wear this coat: Draped, with either the right or wrong side of the fabric showing:


Second way to wear this coat: This is my least favorite and I don't plan on wearing it like this, but I thought I would give you some ideas :) This will require you to fold the top of the collar so the correct side of the fabric is showing, and then overlap the right side over the left side and pin with a brooch at the waist!

Third way to wear this coat: I LOVE this one! So chic!

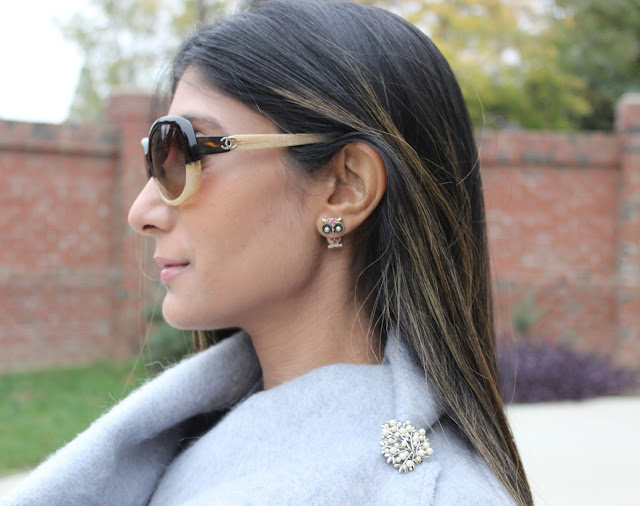
The pattern calls for a button and buttonhole, but I instead used a vintage brooch to pin the coat. This easily switches it up from the waterfall drape to a cowl neck look, and perfect for those cold winter days! And to accessorise, I added these cute owl earrings which are a gift to self
This is an easy unstructured coat. It is unlined, had no pad stitching, no sleeve headings. The fabric is so warm and so soft. When I ordered the fabric, I was expecting it to be a bit more densely woven, but I was pleasantly surprised at how soft it was.
Here are some side pics of how the coat draped if left open in the front


Here is one of the inspiration pics I pinned on pinterest

What I also love about this coat is that is is just one big ole' blanket. So nice and soft and so cuddly. I could live in this now through February :)


For the pattern, I initially considered using Butterick B6244, which I think would be such a good pattern, although more drapey and bulkier than my inspiration picture, I had a serious case of mommy brain. I was convinced I had purchased this pattern, but I had not!

I looked through my stash and found Burda 7184.

I could have used it, but I really wanted a set in sleeve as opposed to the raglan sleeve. So, in the end, I ended up going with Mccalls 7262. I cut view B but eliminated the facing. I'll talk more about how I finished the edges below.I made a muslin using some wool I had in my fabric stash to test out the pattern. In the end I made only one pattern alteration, extended the length.
I wanted something to hit me calf length.

So many pregnant celebrity mums have rocked similar length coats to rock their bumps and I wanted to join in on the fun!
I also wanted to show you some "Behind The Seams" pictures of the coat. I decided not to hem the perimeter of the coat. That would be bulky and since the wrong side shows, I wanted something subtle. So I topstitched all around the coat, 1/4 inch away from the edge. Then I took a pin and frayed the fabric. I treated it very similar to boucle, where the fabric frays, but still looks chic!


This project was so fun to make. I have saved the pattern and at some point, I will trace it on to a tag and hang it. That is my preferred way of preserving patterns I like, and having them on a garment rack makes me more likely to reach for them. I could see making this exact same coat in a camel color and a black color and oh. Maybe a light pink or blush! These are so easy to style. They can pretty much make any outfit look good!
I hope you enjoyed sharing in this sewing adventure with me! Happy sewing, and have a lovely Thanksgiving! See you again, just in time for Christmas!
XOXO
-Vatsla from Fashion Behind The Seams
Is it just me or is time moving faster than ever? I am in denial that it has been one month since I shared my last sewing adventure with you!
Trying to stay comfortable and fashionable during pregnancy has been challenging, but I am determined to make the best of maternity fashions and look chic while dealing with sleep deprivation, heartburn, and fatigue!
Here is what I made: A soft drapey waterfall coat that can be worn three ways:
First way to wear this coat: Draped, with either the right or wrong side of the fabric showing:

I wanted to make something that I can wear for the remainder of my pregnancy, and also be able to wear it after, without having to make any alterations. I decided to go with a drapey, unstructured coat that would be fashionable, yet effortless, but most importantly functional. I am always cold and wanted something warm and cozy.


Third way to wear this coat: I LOVE this one! So chic!

The pattern calls for a button and buttonhole, but I instead used a vintage brooch to pin the coat. This easily switches it up from the waterfall drape to a cowl neck look, and perfect for those cold winter days! And to accessorise, I added these cute owl earrings which are a gift to self

This is an easy unstructured coat. It is unlined, had no pad stitching, no sleeve headings. The fabric is so warm and so soft. When I ordered the fabric, I was expecting it to be a bit more densely woven, but I was pleasantly surprised at how soft it was.
Here are some side pics of how the coat draped if left open in the front


There is really nothing glamorous about the back view, but here it is

Here is one of the inspiration pics I pinned on pinterest

What I also love about this coat is that is is just one big ole' blanket. So nice and soft and so cuddly. I could live in this now through February :)

And if you get REALLY cold, you could just do this. Hahaha

I used this gorgeous wool blend fabric---> HERE
For the pattern, I initially considered using Butterick B6244, which I think would be such a good pattern, although more drapey and bulkier than my inspiration picture, I had a serious case of mommy brain. I was convinced I had purchased this pattern, but I had not!

I looked through my stash and found Burda 7184.

I could have used it, but I really wanted a set in sleeve as opposed to the raglan sleeve. So, in the end, I ended up going with Mccalls 7262. I cut view B but eliminated the facing. I'll talk more about how I finished the edges below.I made a muslin using some wool I had in my fabric stash to test out the pattern. In the end I made only one pattern alteration, extended the length.
I wanted something to hit me calf length.

So many pregnant celebrity mums have rocked similar length coats to rock their bumps and I wanted to join in on the fun!
I also wanted to show you some "Behind The Seams" pictures of the coat. I decided not to hem the perimeter of the coat. That would be bulky and since the wrong side shows, I wanted something subtle. So I topstitched all around the coat, 1/4 inch away from the edge. Then I took a pin and frayed the fabric. I treated it very similar to boucle, where the fabric frays, but still looks chic!

For the side seams, I serged the sides individually before stitching them and pressing them open to avoid bulk. The only place I stitched the seams first and then serged all layers was the shoulder seam and the sleeves. At intersecting seams, my Brother 1034D Serger was able to handle 4 layers of wool beautifully, and I was quite pleased!

For the CB Seam on the collar of the coat, since the wrong side shows, depending on how you wear it, I did not want serger thread showing. So I did a flat felled seam on the center back collar

This project was so fun to make. I have saved the pattern and at some point, I will trace it on to a tag and hang it. That is my preferred way of preserving patterns I like, and having them on a garment rack makes me more likely to reach for them. I could see making this exact same coat in a camel color and a black color and oh. Maybe a light pink or blush! These are so easy to style. They can pretty much make any outfit look good!
I hope you enjoyed sharing in this sewing adventure with me! Happy sewing, and have a lovely Thanksgiving! See you again, just in time for Christmas!
XOXO
-Vatsla from Fashion Behind The Seams
Ummmm, can you provide a link to the fabric used? Please.
ReplyDeleteHI! Here it is and I added it to the blog post too!
Deletehttp://www.fabricmartfabrics.com/Cloud-Gray-Wool-Polyester-Acrylic-Furry-Coating-55W.html
This is stunning! I love the way you treated the edges. What fabric did you use?
ReplyDeleteHI ! Thanks a bunch! Here is the fabric
Deletehttp://www.fabricmartfabrics.com/Cloud-Gray-Wool-Polyester-Acrylic-Furry-Coating-55W.html
I love this. I'm having a reunion in January with my two oldest friends who I met in California. We're all flying into Ohio where one of them lives. Last time we met, I made them both linen kimonos and I had been thinking of making them Grainline Studio Tamaracks. But this makes so much sense and I won't have to worry about the fitting! What kind of wool did you use -- is it boiled? I really do love that third way, too!
ReplyDeleteHI! I love that you are making them gifts! This coat is an easy project considering its a coat! I used the fabric below. Have a lovley trip and happy shopping! Yes, sizing is not an issue with this baby!!
Deletehttp://www.fabricmartfabrics.com/Cloud-Gray-Wool-Polyester-Acrylic-Furry-Coating-55W.html
LOVE IT ... FIESTA ;)
ReplyDeleteThanks Monica!!!
DeleteSuch a beautiful coat! I love all the ways you presented it. It looks great on you. Have a wonderful holiday season.
ReplyDeleteHI! Thanks and have a lovely holiday was well! xx-Vatsla :)
DeleteYou look fantastic in that coat. I love it. I also am interested in the fabric you used. I am hoping to make one soon. I am in the process of losing a lot of weight and am about halfway there. I expect to be at it for six more months. Right now most of my clothes look horribly baggy. This coat would look good as I got thinner. I am a fan of raglan sleeves, but I like the front drape of this pattern better.
ReplyDeleteHI Karen! Thank you so much! Yes, this coat would be a good transition piece as you lose the weight! You could wear it now and later! I plan on wearing mine throughout my preg and for many years to come! Congrats on your weigth loss!!! Here is the fabric I used, and I updated the post to show the fabric too!! Hugs- Vatsla
Deletehttp://www.fabricmartfabrics.com/Cloud-Gray-Wool-Polyester-Acrylic-Furry-Coating-55W.html