Made by a Fabricista: Mad for Olive

Happy Fall Everyone!  
Where I live, we typically have a beautiful fall, except for this year.  It's pretty much been non-existent but that hasn't stopped me from making some fall tops in trendy colors.  


For this months post, I knew I wanted to use Olive green and I knew I wanted a cosy knit.  I found this lovely fabric in the ITY knit section.  Isn't that color so pretty?  

Here's the link to the fabric: Olive ITY knit


Yes, I am back to indoor photos.  It was just above 30 degrees today and the wind was howling.


I make a lot of flat pattern measurements before I start.  With this pattern, I knew it would be snug across the back shoulder area, so I widened that area for a total of an inch.  This is a typical adjustment for me when I use StyleArc patterns.  


I spend a lot of time on my necklines and hemlines.  I used this notion from FM's site: SewkeysE-White-Fusible-Knit-Stay-Tape-Interfacing.  It's sold in various widths and for necklines I use 1/2" tape.  I also used 1/2" on the hemlines.  Simply fuse the tape, stitch the neckband on, turn, and topstitch.  


This knit is so soft and it behaved so well when I was sewing it together. 


The pattern I used is the Oakley Knit Tunic from Style Arc.  I thought it would be perfect for this fabric.  I think it was a very wise choice!  
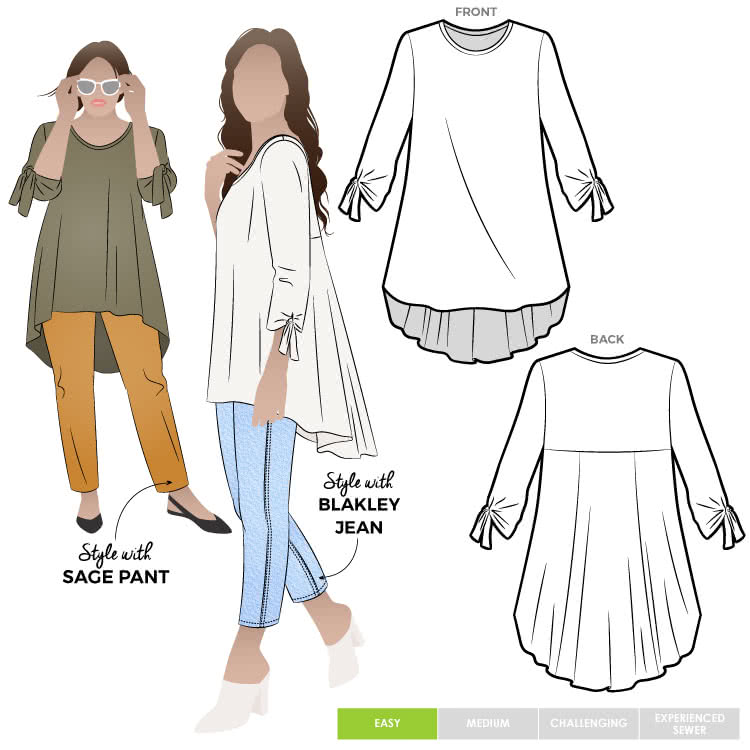
Oakley Knit Tunic By Style Arc - Tunic top featuring a panelled swing back and a 7/8th length sleeve with optional tie.

This went together fast and I love the style of it.  It's perfect for an ITY knit, and those sleeves!  Aren't they clever?  They are simply a button hole with a tie that goes through it and is tied.  So simple yet so fun.


This top deserved a fun and colorful scarf, so I used a fun knit stripe to make one.

Here's a link to the fabric: crochet knit


This project literally took less than ten minutes.  Cut a piece of fabric the width of the fabric and about 1/2 yard wide (at least).


Sew the short sides of the piece together with right sides together.  Next, sew the long edges together leaving about a 2" opening.


Flip the entire thing right side out and stitch the opening closed.  That's it.


I love my new top and scarf!
Thanks for reading!
Sue from Ilove2sew!

Comments

  1. What a beautiful soft olive shade. And your scarf fabric is perfect with it too. A lovely fall outfit!

    ReplyDelete
  2. This was a perfect pattern and fabric pairing. I love that color and have so many of these scarves in fun fabrics because it's such a quick and easy way to add a pop of interest to an outfit.

    ReplyDelete

Post a Comment

Thanks for leaving a comment! All comments are reviewed before posting to help us eliminate spam. Your comment will be posted within 24 hours.

Popular Posts You Might Like

Made By A Fabricista: Why Sew A Muslin

Here it is, my September blog post featuring Newlook N6692 and this pretty rayon challis from Fabric Mart! This pattern style is so in right now. The square neckline, cute puff sleeves and the tiered skirt are all exactly what I was looking for in a summer dress. As always I started with making a muslin first!  Let’s get into why it’s important to start with a muslin.  A muslin is basically a practice garment. It prevents you from cutting into your good fabric prematurely.  I usually use a muslin fabric (natural cotton) but you should also consider using a fabric that is the same weight as your fashion fabric. This will give you a truer gauge of how the garment is going to lay in the final fabric. Anytime I try out a new pattern company I make a muslin. This was my first time using a Newlook pattern so I need to know what the ease would be like for this pattern. Also I need to see how the bust would fit me and where I would need to make adjustments. Plus there were some new techniques

Made By A Fabricista: The Love of Sewing - Basic Pieces for a Beginner

Happy Friday All! It has been a while since I made myself a dress. I am excited to sew after not making anything since my last post (whew) and finally sharing some photos.  This past summer has been a roller coaster journey with plans to release a small collection and then deciding that right before the launch to postpone. Sewing has brought me joy over the past 8 years and the mere fact to sew daily for orders had me in a panic mode. I really don’t want to walk away from my craft due to burn out  and decided that if I do sew for others, it would be only for local clients. Moreover, If next year I decide to launch, it would be seasonal and not year round. I really want to share my talent and love for sewing with others but don’t want it to be a full time job and lose the passion in me.  After a bit of soul searching, teaching and sharing my talent with my community will always be my first love. For the past 2 summers, I was blessed to partner with two nonprofit organizations’ local sum

Made By A Fabricista: End of Summer

Summer is nearing to an end but here where I am in Texas the heat isn’t letting up any time soon!  I still have plenty of time to get a few more summer looks out of the way.  In this blog I will be sharing two separate projects. The first project is this denim set; I had the inspiration saved on my list of makes to make.  For this project I got this gorgeous denim and matching thread to start my project. Yes, Fabric Mart will match the thread to your fabric perfectly and with my favorite thread brand Gutermann.  The denim had a very great weight and wasn’t too stiff.  It was very starchy when it arrived, so I did a prewash before working with it.  I’m so glad I did because it had a lot of dye saturated in which would not have been great for the skin and other clothes. For the first part of the set, I drafted a corset with the scallop edge cups, such a cute detail!   To start I used my bodice sloper to make the corset, I was not worried about the design details and focused more on