
Made by a Fabricista: Mad for Olive

Happy Fall Everyone!  
Where I live, we typically have a beautiful fall, except for this year.  It's pretty much been non-existent but that hasn't stopped me from making some fall tops in trendy colors.  


For this months post, I knew I wanted to use Olive green and I knew I wanted a cosy knit.  I found this lovely fabric in the ITY knit section.  Isn't that color so pretty?  

Here's the link to the fabric: Olive ITY knit


Yes, I am back to indoor photos.  It was just above 30 degrees today and the wind was howling.


I make a lot of flat pattern measurements before I start.  With this pattern, I knew it would be snug across the back shoulder area, so I widened that area for a total of an inch.  This is a typical adjustment for me when I use StyleArc patterns.  


I spend a lot of time on my necklines and hemlines.  I used this notion from FM's site: SewkeysE-White-Fusible-Knit-Stay-Tape-Interfacing.  It's sold in various widths and for necklines I use 1/2" tape.  I also used 1/2" on the hemlines.  Simply fuse the tape, stitch the neckband on, turn, and topstitch.  


This knit is so soft and it behaved so well when I was sewing it together. 


The pattern I used is the Oakley Knit Tunic from Style Arc.  I thought it would be perfect for this fabric.  I think it was a very wise choice!  

Oakley Knit Tunic By Style Arc - Tunic top featuring a panelled swing back and a 7/8th length sleeve with optional tie.

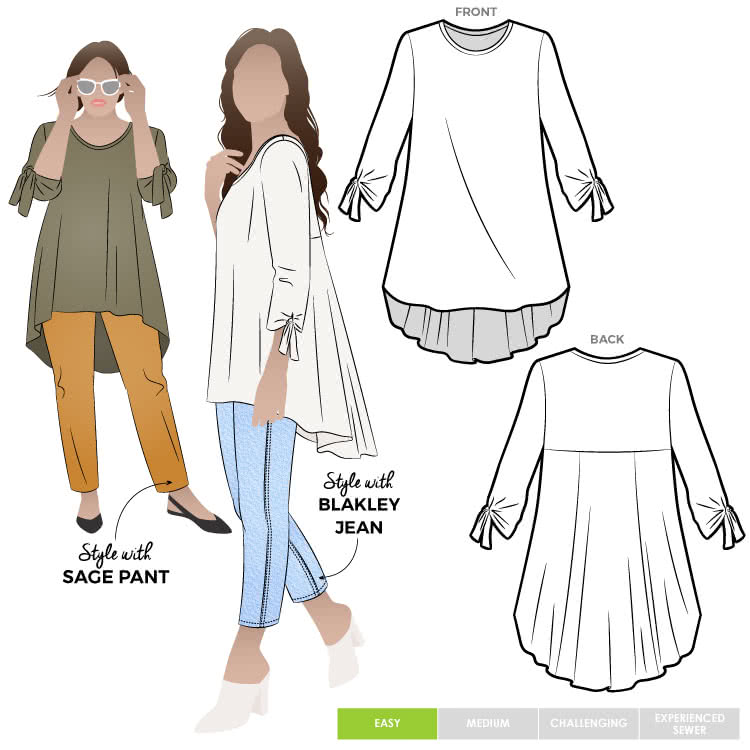
This went together fast and I love the style of it.  It's perfect for an ITY knit, and those sleeves!  Aren't they clever?  They are simply a button hole with a tie that goes through it and is tied.  So simple yet so fun.


This top deserved a fun and colorful scarf, so I used a fun knit stripe to make one.

Here's a link to the fabric: crochet knit


This project literally took less than ten minutes.  Cut a piece of fabric the width of the fabric and about 1/2 yard wide (at least).


Sew the short sides of the piece together with right sides together.  Next, sew the long edges together leaving about a 2" opening.


Flip the entire thing right side out and stitch the opening closed.  That's it.


I love my new top and scarf!
Thanks for reading!
Sue from Ilove2sew!

Comments

  1. What a beautiful soft olive shade. And your scarf fabric is perfect with it too. A lovely fall outfit!

    ReplyDelete
  2. This was a perfect pattern and fabric pairing. I love that color and have so many of these scarves in fun fabrics because it's such a quick and easy way to add a pop of interest to an outfit.

    ReplyDelete

Post a Comment

Thanks for leaving a comment! All comments are reviewed before posting to help us eliminate spam. Your comment will be posted within 24 hours.

Popular Posts You Might Like

Help Our Buyers Shop!

  Comment on this post with what you are looking for right now and our buyers will seek it out!  I am craving wool gabardines and ponte knits in fun autumn colors. What about you?

Made By A Fabricista: Just Wear It Out!

Originally I wasn’t happy with my make this time around. I put it on fresh off the sewing machine and didn’t love how it fit. My elastic was slightly too narrow for what the pattern called for. I did end up putting a stitch to close up the v-neck on the top. I thought my sewing on the waistband looked sloppy and I looked kind of frumpy in the outfit. I was going to put the project down to fix later but decided to wear it out for some feedback from our web manager and one of the describers.  I ended up pleasantly surprised! The fabric is super comfortable and I felt really good wearing it. All the things I didn’t like kind of melted away wearing it out. The flaws were so small that only I noticed them. I think it’s important to remember that while striving for perfect seams and flawless construction is good, a handmade garment doesn’t have to be perfect to be wearable. This isn’t the first time I’ve softened on a garment after wearing, and it certainly won’t be the last! The 100% c...

Made By A Fabricista: The Sheer Volume Of It All!

This garment was inspired by a dress I saw in an ad, and when I went to purchase it (which I rarely do)…I realized that the dress didn’t come in my size. Ticked off and with $300 back in my pocket, I decided to draft it myself. The description listed the fabrication as a silk cotton voile, so I used that as a starting point to recreate the simple yet elegant silhouette.  My drafting experience is limited; I’ve only ever made garments that are pleated rectangles that fit into an elasticated waist. No darts, no complicated calculations, and definitely no sleeves. But I’d have that dress if it’s the last thing I do! I made a drawing, created a Pinterest board to document my inspiration, and narrowed down the features I really wanted to have: billowy bubble-hemmed bishop sleeves (say it three times fast!), a fitted and lined bodice, and a gathered tiered skirt. Finally, it was time to shop for fabric. I knew I wanted a silk blend of some kind, without breaking the bank. For weeks, I ke...