
Made By A Fabricista: College Inspired Cardigan

Happy Monday All! It has been a while since I wrote a blogpost and it feels great to be back!

Today I am excited to share my daughter who hasn’t graced the blog for quite sometime. Now that my children are older, I have to always get their permission to take photos and share. It took a lot of convincing to get my daughter to rock this FAMU (Florida A & M University) inspired cardigan.

I originally planned to make the Blackwood cardigan using the orange and green ponte knit for myself to represent my alma mater FAMU but then realized I cut the wrong size. 

I was a bit disappointed at first that I cut a medium instead of a large but knew my daughter would rock it. Additionally, even if I wanted to squeeze in the cardigan, it just could not even pass my elbow when I tried it on.

It was definitely a learning experience because I now know that you cannot add a non stretch ribbon around a fitted knit garment sleeve. It must be added to a loose sleeve as the ribbon stops the fabric from stretching.

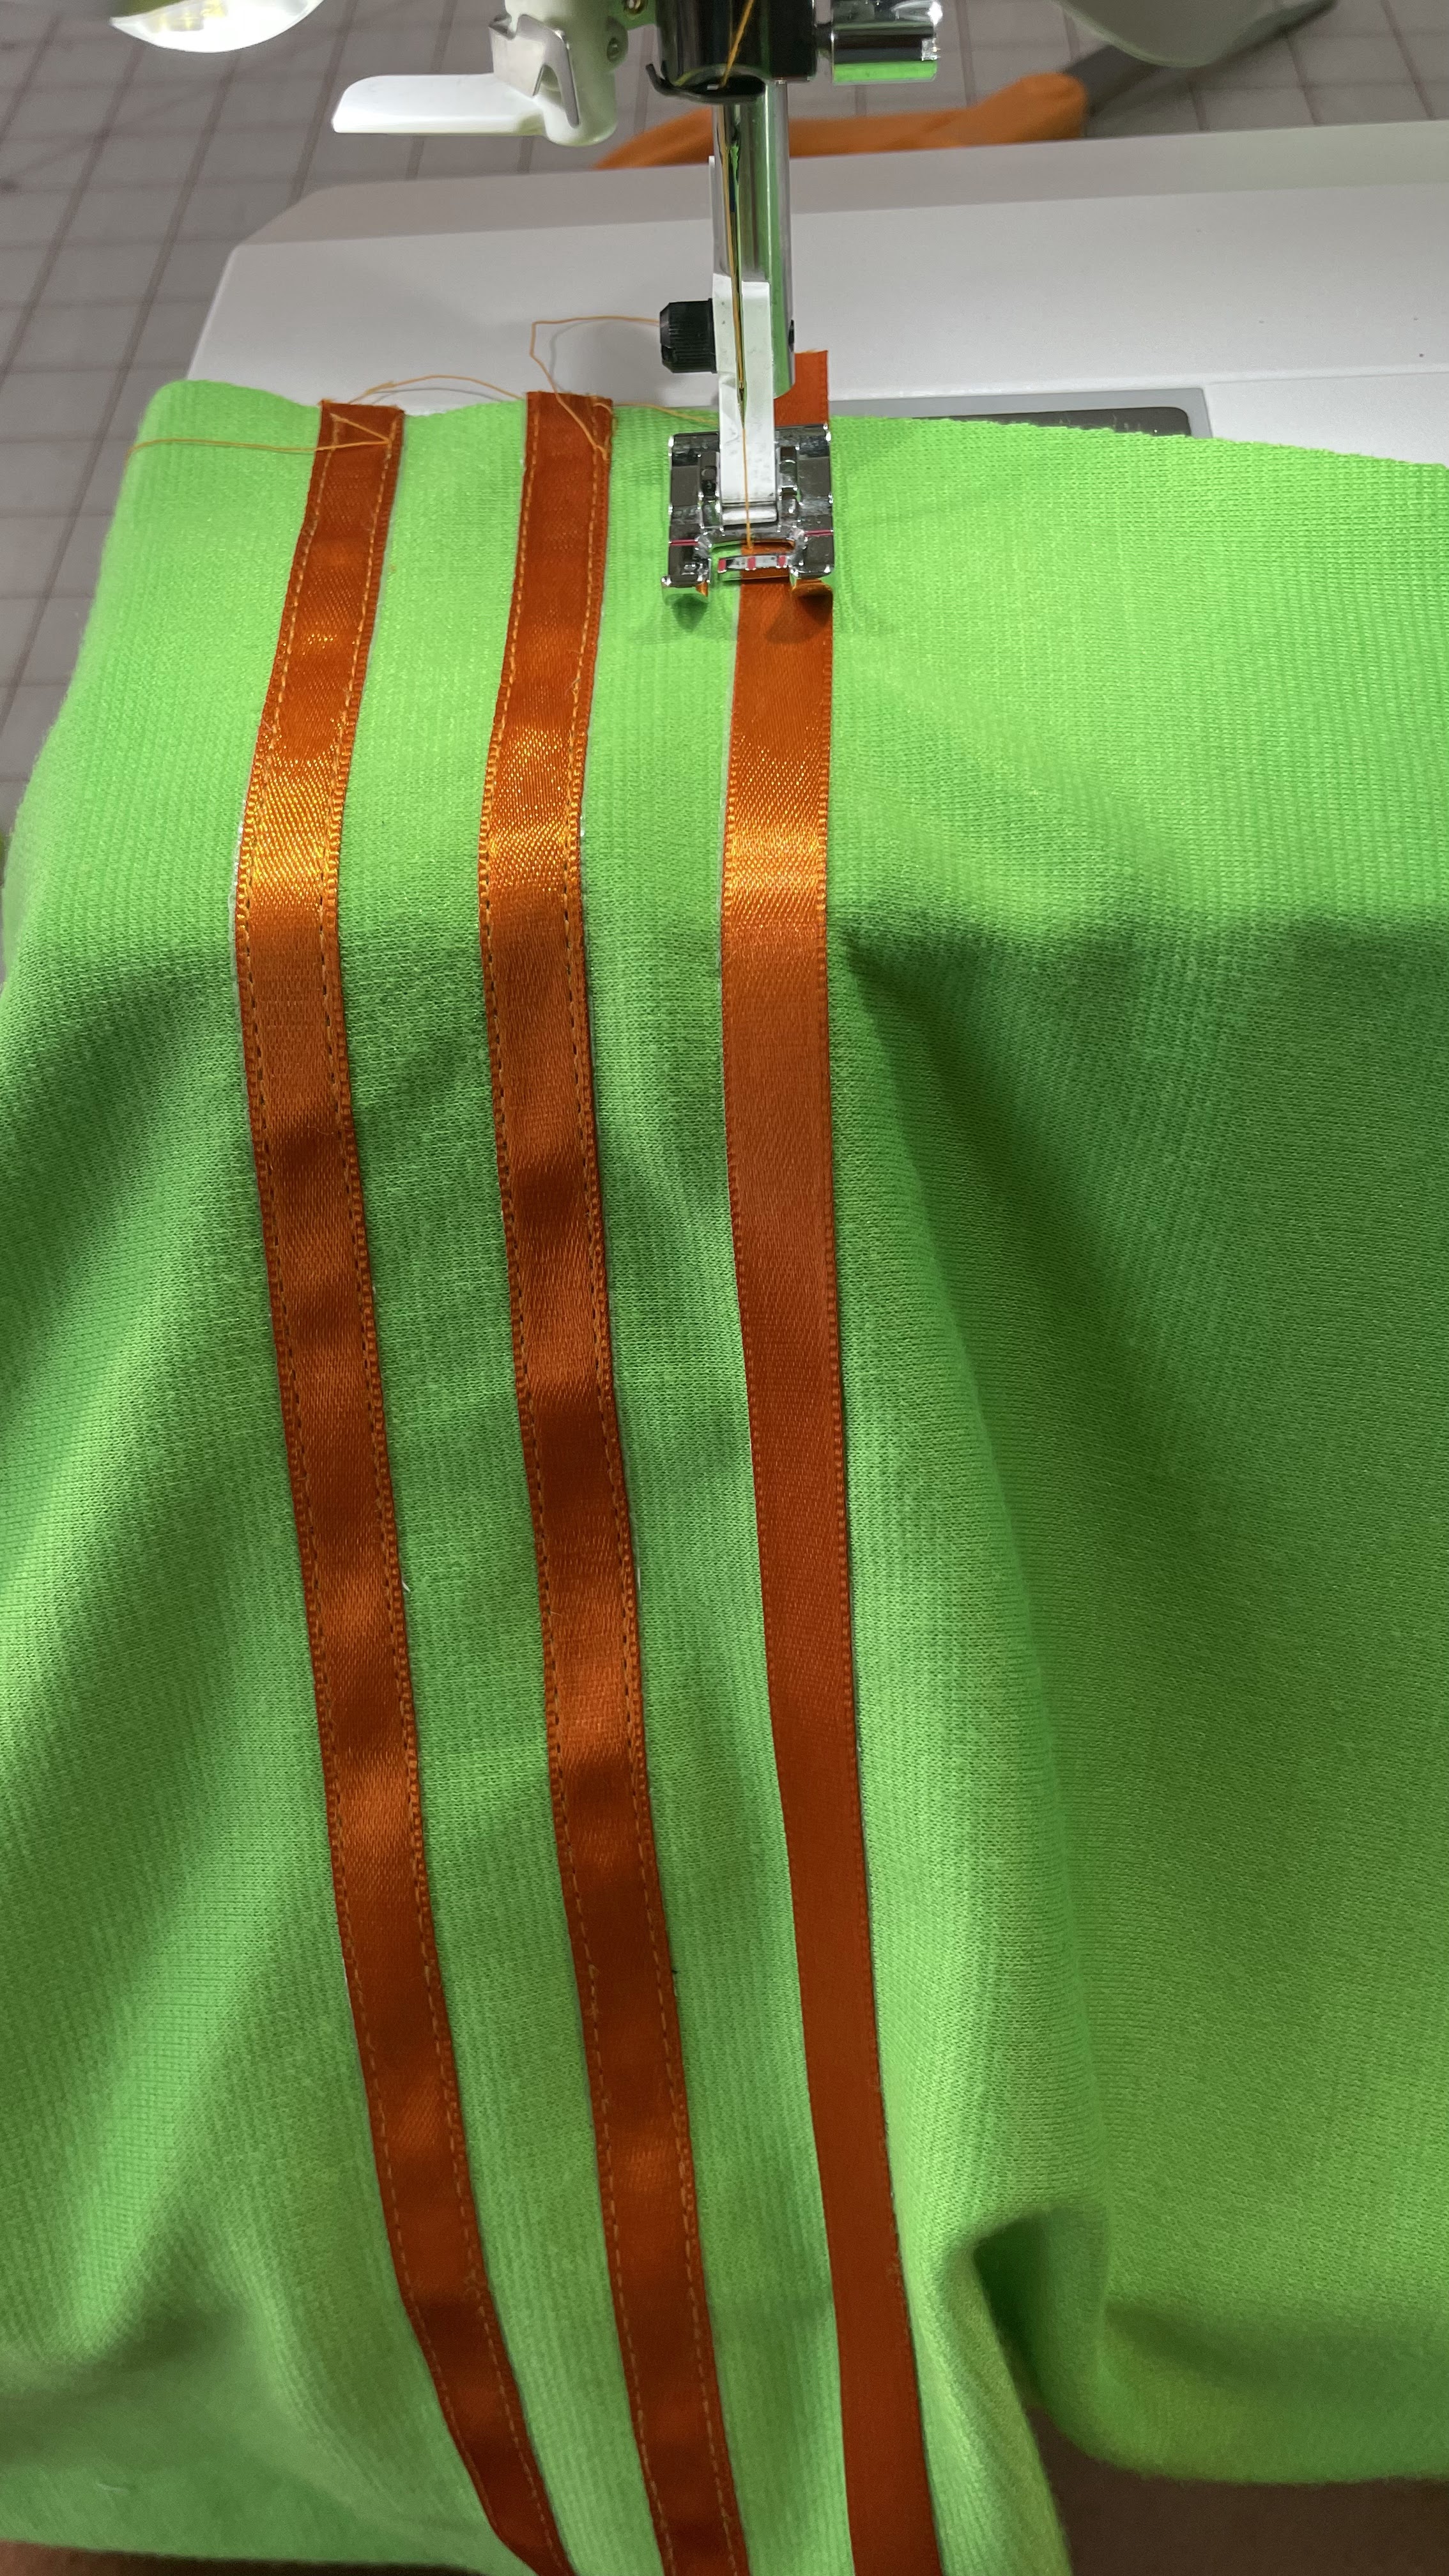
On a positive note, here are a few tips when when adding ribbon around a garment sleeve.

1. Use a quilting rule or draw a straight line.

2. To avoid the ribbon from shifting, use a 2 sided wash away tape to hold it securely in place while using the quilting ruler as the guide to keep it straight. No pins necessary!!

3. Separate each row at 1/2 inch and keep it consistent. Next time around, I may separate it at 3/8 inch and place it at least 3-4 inches above the elbow.

4. Sew   the ribbon at the edge and go slow for a clean finish. An edge foot would be ideal but not necessary.


I definitely plan to try it again possibly on an oversize sweater sleeve. This was my first time trying this technique and making the shorter version of the Blackwood cardigan. This weekend,  I plan to cut a color block version using some of the newer color ponte knit I purchased at Fabric Mart.

For my top, I was somewhat disappointed and wish I had used a different fabric type such as a fleece or thicker knit to make the hoodie portion a bit stable. I am not convinced that I would make this pattern (Simplicity 9636) again with ponte knit even though it is a quick and easy sew.

Overall I truly enjoyed making both looks and was able to take capture a few photos with my daughter, moments that I will cherish.  Thank you so much for reading and following my sewing journey. Don’t forget to stop by my Instagram page (heymaricamitchell) to see what I am currently working on. Have the most amazing Thanksgiving and Holiday break when it comes! See you in 2023!!!!

One Love,

MARICA  @heymaricamitchell

Unfortunately Fabric Mart Fabrics sell out quickly!
You can find similar fabrics by shopping the following categories PONTE KNIT.

Comments

  1. Beautiful models and Beautiful sewing! Thank you!

    ReplyDelete
  2. Love the cardigan and the top you made!

    ReplyDelete
  3. I really like te style of the college cardigan! Maybe there is some sort of decorative/colored elastic that you could use on tighter sleeves. There must be something out there! Really cool idea, and great projects. :)

    ReplyDelete
  4. Pretty. Both, the cárdigan and the model.

    ReplyDelete
  5. I love both of the new tops you made. Nice to see your daughter again too. I wonder if fold over elastic would work for the sleeves? I know it would be bulkier because it would be double thickness but it comes in some great colors now if you can find them. I hope you have a blessed holiday season also and may 2023 be a great year for you and your family.

    ReplyDelete
  6. What a wonderful story. Thank you for telling it. Luckily your lemons made lemonade.

    ReplyDelete
  7. both very attractive

    ReplyDelete

Post a Comment

Thanks for leaving a comment! All comments are reviewed before posting to help us eliminate spam. Your comment will be posted within 24 hours.

Recent Posts You Might Like

Made By A Fabricista: Summery Stripes Set

Warm weather and linen go hand in hand! Our summer has been slow to show up with the heat, but bright, sunny afternoons have me all ready for light, swingy garments to stay cool. Wearing matching sets has been one way to make getting dressed easier when I hit decision fatigue since reaching for two items that already go together removes the need to plan or do any rearranging.  This is a lovely lighter-end-of-mid-weight linen in the most beautiful and subtle seaglass hues of grays and greens. This color combo strikes me as so calm and sophisticated, and a little stripe-play is perfect for details.  My tank pattern is the brand-spankin’ new Matchy Matchy Sewing Club Sunny Side Tank, just released this week. It’s a perfect little cropped A-line shape for wearing with high waisted pants or showing some midriff.  I made no changes to the extra small. The wide neckline is so elegant and this shape still gives full bra coverage to boot.  These really cute pants are the Mat...

Made By A Fabricista: A Fresh Take on a Classic Shirt Dress

Summer has arrived! That means longer days, soaring temps, and the perfect excuse for me to add another linen garment to my wardrobe.  Lightweight linen and summer weather just go together, don’t you agree? That’s why I choose this striped linen for my next Fabricista make. Hello Sewing Friends! It’s Sharon from Sharon Sews ready to share my summer dress with you.  The tiny blue and white stripes combined with navy buttons give it a bit of coastal charm, while the details make it anything but a traditional shirt dress.  The fabric is a Ralph Lauren 100% shirt weight linen. The stripes are so small that from a distance the fabric almost looks like a solid color. One advantage of those small stripes is that I didn’t worry about whether they matched as I would have with a wider stripe :-)  The pattern I choose is McCall’s 8556, a shirtdress that, instead of a typical straight silhouette, has a gathered bodice, a fitted waistband that sits just above the waist, short, c...

Made By A Fabricista: The Ultimate Secret Maternity Dress

When you find the perfect summer dress pattern that also happens to be 100% bump-friendly, you don't just celebrate—you immediately plan to make it in every single color of the rainbow. At least, that’s the executive decision I made after sewing my first Tilly and the Buttons Mabel Dress for the Fabricista Blog. It all started with a classic late-night scroll on the Fabric Mart website, where I fell hard for a gorgeous midnight blue cotton lawn block print. I knew I wanted an easy-to-wear, breezy summer dress that could accommodate a growing bump, but I didn't want to buy a pattern I’d only wear for a few months. So, I turned to the internet.  After researching bump-friendly patterns, the Tilly and the Buttons Mabel kept popping up. Sewists everywhere were praising it for its ability to adapt to a changing body. Could it really live up to the hype?  Now that I’ve made one, I can confidently say: Yes. Absolutely. Here is what makes the Mabel so magical: ● The Silhouette: A...

Made By A Fabricista: Art In Motion

Hello Sewing Friends! It’s Tira from TIRACOOKS and I am so excited to share this project with you. When I first spotted this fabric, I was drawn in by how stunning it looked it reminded me of a living art piece. Then, when I looked closer, I noticed painted hanging plants in the print, which made it even more special. This fabric is one of my all-time favorites: chiffon. It cuts so smoothly, and the best part? Any wrinkles come out effortlessly with a steamer. Before cutting into anything, fabric prep is essential! Chiffon must be prewashed by hand in cold water with a gentle detergent or baby shampoo. Always serge or zigzag stitch the raw edges to prevent fraying. Submerge and gently swirl the fabric to wash never wring or twist it then air dry flat. I used a 70/10 needle in my Juki DDL, which is perfect for lightweight fabrics, alongside my Juki overlock machine. Look One: The Duster & Dress I was lucky enough to create two completely separate outfits from this fabric. The first...