
.png)
Before we get started, it’s important to mention that there are two types of sewing patterns: PDF patterns and pre-printed paper patterns. Some pattern companies offer both options, others offer one or the other. There are pros and cons to each and it really depends on your preference.
Some people like PDF because you can purchase online, print and get started. But on the flip side, one has to print, cut and tape pages together to create the pattern pieces.
Others like pre-printed patterns because you don’t have to print and tape pieces of paper. But if you’re ordering online, you have to wait until it arrives.
Next thing to note is that there are two types of sewing pattern classifications: commercial sewing patterns and indie sewing patterns.
Commercial sewing patterns are commonly known as The Big 4 (Simplicity, McCall’s, Butterick & Vogue) Burda and New Look are also part of this umbrella. They usually release a dozen or so new patterns each season. Their instructions are usually straightforward. Patterns sizing is different than ready-to wear so it’s important to look at the measurements. Don’t expect to go with your ready-to-wear size!
Indie sewing patterns are independent pattern designers that produce small collections with unique and basic garments alike. Each company has their own style and specialty. Some companies cater to a specific body shape so it’s important to read up on each pattern company to see how it will work for you. For example, some pattern companies draft for a B or C cup. Some companies put multiple cup sizes in one pattern. Indie pattern designers also tend to offer very detailed instructions as well as sew alongs that you can refer to as you're sewing the garment.
Now that you’ve learned a little background about sewing patterns, lets take a step by step look at how to read a sewing pattern. We will be using the Kelly Anorak Jacket from Closet Core Patterns as our example. We will be showing a pre-printed paper pattern, but this pattern is also available as PDF on Closet Core's website. The PDF version is available in both size ranges: 0-20 and 14-32.


1) Find your size: Most of the time the sizing information can be found on the back of the pattern envelope (if it’s a pre-printed pattern.) If it’s PDF, you can find this in the instructions.
Take your bust, waist and hip measurements. 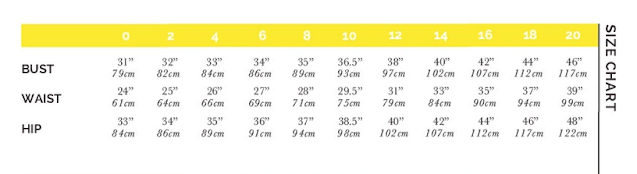 Compare your measurements to the chart. You might be lucky and have all your measurements in the same size line. If not, have no fear! It is very normal to measure in different sizes! You can grade between sizes. Many independent pattern companies do a great job of helping you find your size and give detailed instructions on how to grade between sizes.
When comparing, I like comparing the size chart measurements to the finished garment measurements. This will give you an idea on how much ease (or room) a pattern has. Think about how you like your clothing to fit. The pattern description will also give you some pointers to how the designer intended the pattern to fit. Words such as loose fitting, fitted, semi-fitted, etc. are common terms used to describe the intended fit of the garment.
2) Decide how you want the pattern to look. Many patterns come with multiple views. Line drawings are provided to show you all the details and options a pattern offers. Hood or no hood? Gathered waist or not? You are the designer of your wardrobe, make it how you want it to be!

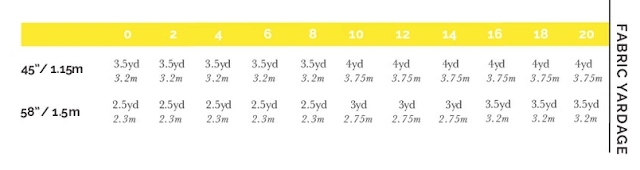
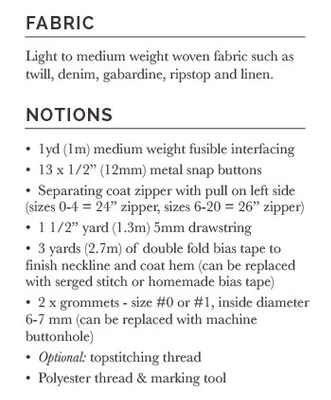
3) Figure out how many yards of fabric you need and pick your fabric! This is probably the most exciting part! You will also want to collect the notions you need for the project.


6) Make alterations as needed. Making alterations and pattern adjustments is its own topic and we can cover that another day! I personally like to use the Palmer/Pletsch tissue fitting method, but there are a number of other methods out there. Often times you will need to do the same alterations for different patterns from the same pattern company, but it’s always good to check first. Since all pattern companies draft differently, it’s best to test first.
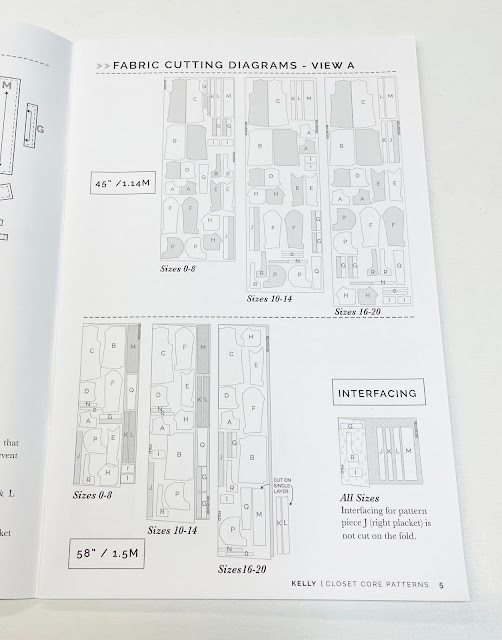
All patterns come with a cutting layout. They are helpful in getting the most out of your fabric. You can go rogue and lay them out how you think (especially if you’re working with a little less yardage than the pattern calls for) Be sure all the patterns are going in the same direction. You wouldn’t want the print on your jacket to be going in opposite directions! Ooops!
Pro Tip: Don’t forget to cut out any interfacing if your pattern calls for it.
8) Transfer markings to the fabric. Markings are things like dots, darts and notches. Tailors chalk is a great tool for marking. It stays on the fabric long enough to use the markings and comes off well when you don’t need it.

There you have it! Are you ready to start tackling your first sewing pattern? Give it a try, it’s not so bad and once you get through the first one, the rest will be a breeze. What will be the first pattern you try?

When comparing, I like comparing the size chart measurements to the finished garment measurements. This will give you an idea on how much ease (or room) a pattern has. Think about how you like your clothing to fit. The pattern description will also give you some pointers to how the designer intended the pattern to fit. Words such as loose fitting, fitted, semi-fitted, etc. are common terms used to describe the intended fit of the garment.
2) Decide how you want the pattern to look. Many patterns come with multiple views. Line drawings are provided to show you all the details and options a pattern offers. Hood or no hood? Gathered waist or not? You are the designer of your wardrobe, make it how you want it to be!


Pro Tip: Wash your fabric before cutting out the pattern pieces! You don’t want your time and effort to go to waste when your garment shrinks after the first washing.
4) Read through the directions. This is probably the most overlooked step. It's easy to get excited about starting your project, but you will save yourself some time (and aggravation) if you read through the directions first! This step could be done at the start of your project too.
5) Cut out or trace the pattern pieces. I like cutting out my pattern, some people like to trace their pattern. There are pros and cons to both. Choose what works best for you!

6) Make alterations as needed. Making alterations and pattern adjustments is its own topic and we can cover that another day! I personally like to use the Palmer/Pletsch tissue fitting method, but there are a number of other methods out there. Often times you will need to do the same alterations for different patterns from the same pattern company, but it’s always good to check first. Since all pattern companies draft differently, it’s best to test first.
7) Cut out your pattern from the fabric. This is the most exciting (and scary) part! Cutting into that precious fabric can be nerve wracking but trust me, it will be ok!

All patterns come with a cutting layout. They are helpful in getting the most out of your fabric. You can go rogue and lay them out how you think (especially if you’re working with a little less yardage than the pattern calls for) Be sure all the patterns are going in the same direction. You wouldn’t want the print on your jacket to be going in opposite directions! Ooops!
Pro Tip: Don’t forget to cut out any interfacing if your pattern calls for it.
8) Transfer markings to the fabric. Markings are things like dots, darts and notches. Tailors chalk is a great tool for marking. It stays on the fabric long enough to use the markings and comes off well when you don’t need it.

There you have it! Are you ready to start tackling your first sewing pattern? Give it a try, it’s not so bad and once you get through the first one, the rest will be a breeze. What will be the first pattern you try?
Shop our selection of Indie Sewing Patterns.
Great post and checklist. Sometimes it's great to go back to the basics. Thanks!
ReplyDelete