Hello Fabric Mart Friends!
I am BEYOND excited to be here with you today with this guest post on the blog! Since this is my first time visiting, here’s a little bit about my background and my love of all things sewing (and fabric)! I’m a full-time working mom of two teens and a self-taught sewist who has been creating and collecting fabric now for eight years. And sometimes – I USE the fabric! 😊 I’ve been a long-time customer and fan of Fabric Mart for their eclectic collections and amazing sales. There is always something to drool over here on the site and the quality is super too. I’m also a huge fan of independent pattern companies and an early adopter of projector technology for sewing; I joined the projector movement in March of 2020 and since then, have been nearly paper-free with my sewing. You can find me sharing my joy of sewing and helpful tips over on Instagram at @Happy.things.here.
So onto sewing with all these gorgeous fabrics! For my first post, I decided to share more about my recent experience with an innovative pattern company called Apostrophe Patterns. If you are not familiar with them, AP offers a unique approach to sewing patterns. Instead of purchasing one pattern (paper or digital), when you purchase one of their patterns, you purchase access to a pattern “calculator” or “generator”. There are many calculators to choose from – including a basic tee, jogger pants, and circle skirt pattern to name a few. The innovation is that you custom build the pattern based on your own measurements – so if you are someone who frequently has to alter or grade a pattern, this is for you. I don’t usually have to adjust patterns (except pants) but I’m in love with the options this approach opens up.
You do need to invest some time up front on two things: first, taking accurate measurements of lots of parts of your body, depending on the pattern. For example, for the tee pattern, I counted 21 measurements you will need to take to generate the pattern. These include obvious things like full bust and waist, but also things like shoulder slope, armscye depth, and bicep that really helps the program build a pattern just for you. Sticking with the tee example, each pattern includes a ton of options, like fitted, semi-fitted, or loose fit, endless possibilities for tee length, hem or band finishings, etc. Each pattern also includes in-depth instructions on to how to take these measurements and for several, a link to a helpful fitting video. And the second time investment is being willing to sew up one or two (and sometimes more) test fits, especially for pants, in order to get the exact fit you seek. But there is a Facebook group with an amazingly supportive community to help you, including moderators with fitting experience who will look at your test photos and provide guidance on what you may need to adjust…for free! I will share that using a projector for sewing is a huge benefit here because I don’t have to reprint anything – I just regenerate and project.
As you can tell, I’m a big fan of this approach. You can create so many different looks from one pattern because you can alter just about anything with the options provided – sleeve length, amount of ease, shape of neckline, fit of pants. So I decided to sew up a few garments using the calculators I purchased and share how I created each look with Fabric Mart finds. Here we go!
First, let’s start on the more basic side. I created an oversized cool weather sweater using the AP My Fit Raglan tee calculator. Now, this doesn’t really look like a t-shirt, right? That’s because I selected the loose fit and banded waist option (with additional customization by me from reducing the width of the band), which gives you more of a sweater/sweatshirt look. I used a jacquard sweater knit fabric and paired this with my favorite thrifted jeans and ankle books for a casual Fall look.
So let’s get a little fancier, shall we? For my next sew, I combined two pattern generator outputs to create a dress. How did I do this? First, I determined how far down I wanted the bodice of my dress to go before the skirt began. I then used the AP My Fit Tee pattern and modified one number – Full Height. My preferred length for a tee is 26 inches so I changed this to 18 to shorten it to hit at my waist. I used the fitted version (whereas I usually use loose fit) and elbow length sleeves (new new fave length!). I sewed up the top but didn’t hem. I then measured the opening at the end of the bodice and used the AP Circle Skirt pattern to generate a skirt with a matching waist circumference. The Circle Skirt generator is a great pattern for getting started, since it has the fewest and simplest measurements. I absolutely love this mashup! I used a few yards of a chevon print ITY (interlock twist yarn).
For my last and for me most exciting outfit, I dove into the My Fit Joggers pattern. I already have a knit jogger pattern I love and have in regular rotation but what had me so interested in this pattern was the flexibility to use the pattern for woven fabrics too. And since you have multiple fit options (slim, regular, lounge) and leg shape (tapered, straight, flare) I realized that if I invested the time to get the fit right, I could make myself some “real” pants. One issue I tend to have with off the shelf pants patterns is the rise – it’s never quite right for me and I hate sewing up and fitting a toile every time I want to try a new pants style…whereas with the My Fit patterns, I can do the work once and then generate multiple kinds of pants. I will share that getting my preferred fit took me a few tries – I probably made five different drafts but I used cheap fabric and I made shorts using basting stitching so they were quick sews. The Facebook group was an invaluable resource to me for getting this right, because after each draft, I took pictures and posted them for feedback. The moderators helped me get my fit right and now I basically have a pants pattern that is custom made for my body.
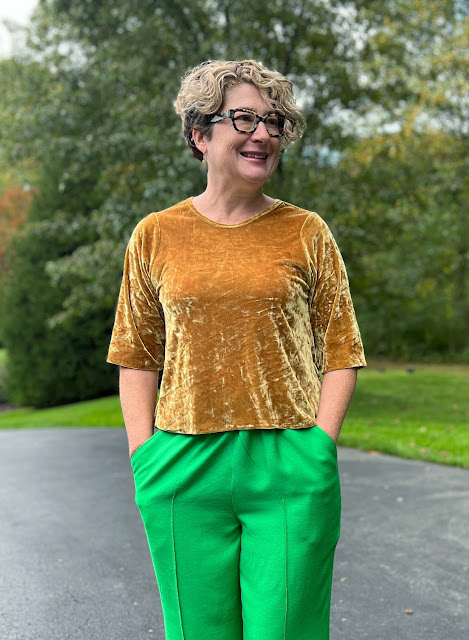
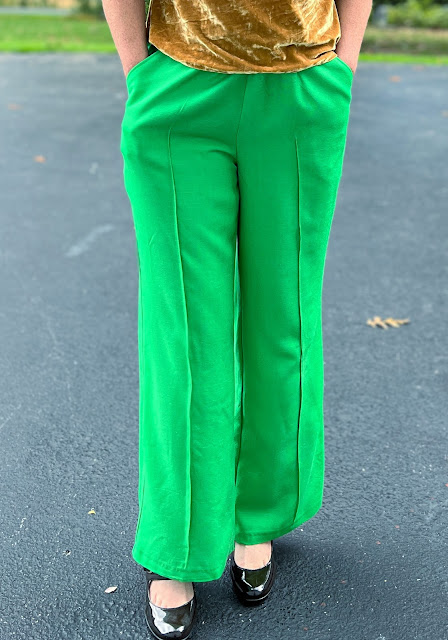
Here is my final outfit where I used the jogger pattern with loose fit, regular leg, separate waistband, and slant pockets. I also added a pin tuck down each front pant leg by tracing the markings from another pattern. I used a GORGEOUS kelly green linen-like rayon that I believe was Sue’s pick of the week a few weeks ago. I also quickly sewed up a crushed velvet loose fit tee in a golden yellow. How do you like my new Fall outfit?
I hope you enjoyed seeing some of the projects I made from the Apostrophe Patterns tools! If you would like to learn more about them, you can visit their website, Facebook group, or I am also happy to answer any questions about my projects.
Thank you for having me as a guest blogger today! I hope to see you again soon. 😊
Andrea | @happy.things.here
Unfortunately Fabric Mart Fabrics sell out quickly!
You can find similar fabrics by shopping the following categories: KNITS, SWEATER KNITS, ITY KNITS, & SUITING.


Love the dress! The ITY fabric makes the fit perfect. Very easy to see with.
ReplyDeleteI LOVE ITY! I would love to write another blog post all about this fabric because it is so versatile, affordable, breathable, and lovely!
Deletethese green pants are great
ReplyDeleteAren't they fun?? And this linen like blend was a Julie's pick of the week so super affordable!
DeleteSuch a great post! I love all of the pieces she sewed - especially the raglan tee and those bright green pants! Thanks for sharing
ReplyDelete