It’s not every day that I get to mix two of my favorite hobbies. Especially when one hobby is sewing and the other is running. You can’t sew and run at the same time, but, you can go running in something that you sewed! With this realization, I embarked on my first hobby-merging adventure.
We’ve had some frigid temperatures in Pennsylvania this winter. Since I’m an outside, stroller-pushing runner, I bundle up my son and myself before I hit the road. The temperature feels 20 degrees warmer for outside runners than the outside air. For the children being pushed in the stroller though, it feels about 20 degrees colder.
With these differences in temperature for each of us, layering is the only thing that ensures that we both stay perfectly warm. My running wardrobe has been lacking a warm top layer. My son’s wardrobe would also benefit from having another warm layer, so I knew pullovers were what I should make.
Inspired by a name-brand ¼ button-down fleece pullover I saw, I started searching for the perfect sewing pattern. The Peek-a-Boo Pattern Shop had the exact pullover pattern style to match the off-the-rack pullover. The Summit Women’s Pullover Pattern and the Kid’s Kodiak Pullover Patterns are classic ¼ button pullovers with snaps. Most pullover patterns have a zipper at the neck, but I find buttons and snaps more comfortable so I loved this aspect of the Summit and Kodiak patterns.
Next, I found my fabric on the Fabric Mart site. Fabric Mart had some great sweatshirt fleece fabrics for the pullovers so it was easy to pick. I stocked up on 2.5 yards of a light grey sweatshirt fleece fabric and 2.5 yards of a dark grey fuzzy sweatshirt fleece fabric. The pullover patterns recommend color blocking, but I wasn’t entirely sure if I wanted to color block or not. I ordered more fabric than I needed just to ensure I had the freedom to color-block as much or as little as desired.
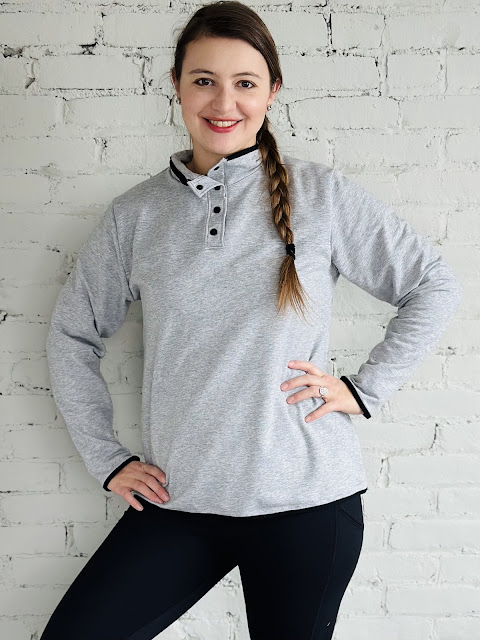
After my fabric arrived, I used the light grey sweatshirt fleece to make a solid pullover in my size. To add interest, I used black 1” fold-over elastic for the binding and black plastic snaps for the closures. For my son’s pullover, I used both fabrics for a color-blocked pullover. The fuzzy dark grey sweatshirt fleece was used on the upper front, upper back, and sleeves to give it a fun contrast to the light grey body, button placket, and bindings.
Both fabrics contained only mechanical stretch, and the sewing patterns recommended fabrics with at least 30% stretch. Since it isn’t always possible to have the perfect stretch content in fabric, I followed a simple principle that has proven helpful:
Less Stretch Content = Size Up Slightly for More Ease
More Stretch Content = Size Down Slightly for Less Ease
With this in mind, I knew that my pullover had the potential to fit snugly since the fabric had less stretch. To combat the lack of stretch, I graded the pattern up a size in the waist and hip measurements to provide more wiggle room. I cut out a size medium bust and a large hip and waist.
For my son’s pullover, I didn’t intentionally grade up for stretch content. Instead, I focused on future-proofing the pullover more than anything. I knew that if I made him a 2T size he would have plenty of room to grow into the pullover since his measurements fall into the 18month size.
The assembly of both pullovers was easy. The pattern instructions were identical because both patterns were made by the same company. I sewed both pullovers simultaneously, step by step. The most complicated part of the pullover assembly process is making the button placket. The pattern is very well illustrated and easy to follow, so even the button placket process is straightforward.
After I finished sewing my pullover, I tried it on over my long-sleeve base layer shirts and it fit perfectly. The pullover is fitted, yet roomy enough to be comfortable while running. The weight of the sweatshirt fleece fabric makes the perfect top layer! I can’t wait to take my new pullover out for a test run.
If you ever have a chance to let two of your favorite hobbies intersect I’d say go for it! Anytime you can incorporate your sewing practice into another hobby or interest you’re bound to end up with something special and unique.
SHAINA | @shaina_sews


It looks perfect! Great job.
ReplyDeleteI’ve tried to find your blog post on your liberty fabric shirt. Very nice make for your running.
ReplyDelete