


My leather skirt is only partially made of leather. The other fabric I used is a rather stable ponte that was a remnant from a previous project. I hadn't really thought about how to put these two fabrics together until very recently. After searching the 'net, I was so surprised that no one addressed any special techniques or tools for sewing leather to a knit. After clenching a rabbit's foot in my teeth, I experimented and I'll show you what worked for me.

The first thing to consider when using leather is the needle. There are specialty needles for sewing leather but I had no idea how they would work on the knit portion of my garment. Also, I typically have a large stash of different types and sizes of needles but I realized I was out of leather ones! As luck would have it, everyone locally was out as well. I experimented and found out that universals, size 14 worked just fine. From reading about the realities of sewing with leather, I learned that if you use the wrong size needle and type, you may end up with your thread ripping out of it just like tearing out a piece of paper from a spiral notebook. No one wants that! I experimented with increasing my stitch length and after sewing several samples, I determined my seams were staying put.

Next I decided I needed to figure out how to finish my seams. For this skirt, I knew that I would use a straight stitch, trim the seams to about 1/4", press open and then topstitch. This worked just great and since neither leather or ponte frays, this was a fast and easy finish that also looks professional.

I purchased a Teflon coated foot a while back that made gliding over the leather so easy. My machine has the ability to adjust the amount of pressure the presser foot places on the fabric as it feeds through the machine. I loosened it up and that helped the fabric glide even easier through the feed dogs.

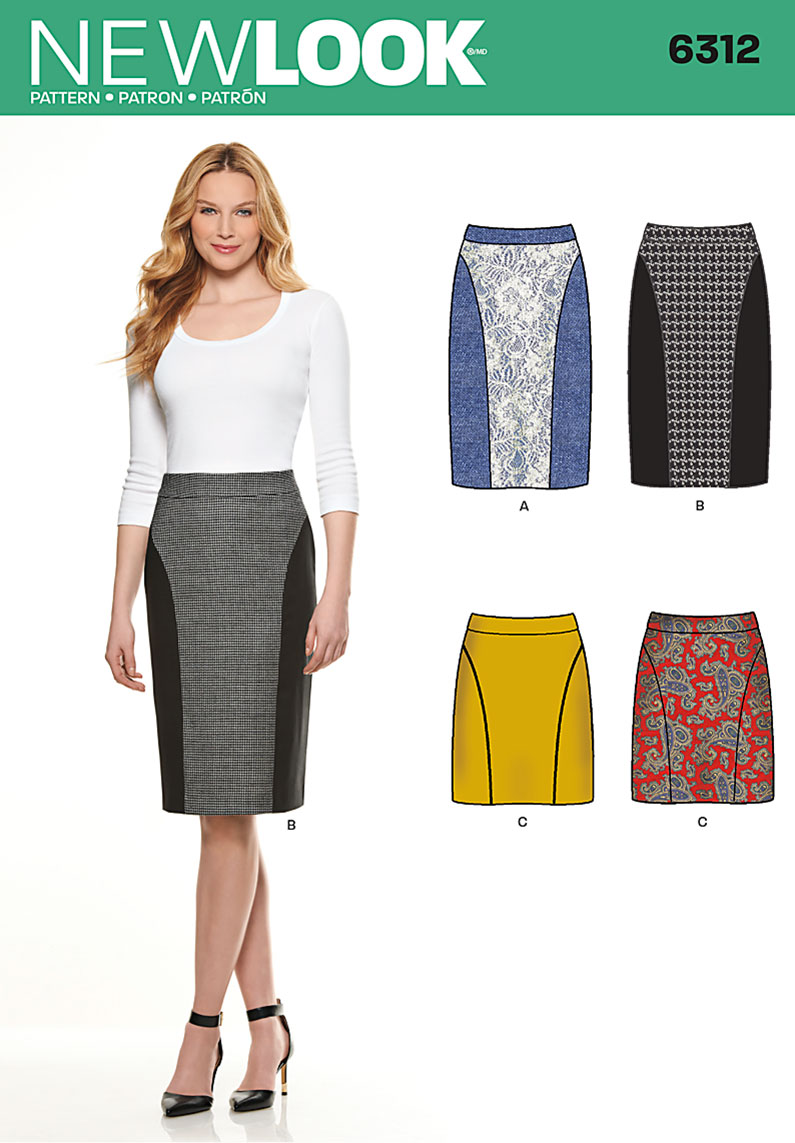
My pattern choice was New Look 6312. This is a simple pencil skirt with some nice details. When sewing with leather, if you aren't seasoned, you'll want a simple pattern with few pieces. I knew this pattern would work great with my leather and ponte fabric.
I made a muslin as one thing you MUST know with leather is that a needle hole in PERMANENT in the fabric. To cut out my pattern pieces, I used pattern weights. When sewing my pieces together, I used wonder clips. Paper clips or binder clips would work equally well.

Here is a photo of my muslin.

Yep, this picture isn't the greatest, but I do hope you'll be able to see how much pinning I had to do to make this fit well.

You'll want to make sure your skins don't have any imperfections that you'll need to work around. Remember, these leather skins came from live animals that may have been hurt by barbed wire, a tussle with another animal, etc. My skins had zero flaws that needed any sort of work around. Yay!
When purchasing leather, it comes as a 'skin' not as yardage. I purchased two skins for this skirt and had enough to make the front, back, and waistbands out of leather. Your leather will look similar to this:

I changed this pattern up a bit by adding an exposed zipper up the back. Many patterns call for a 7 inch zip but I like to use a 9 inch one so it clears my hips more. I am not sure why I didn't get a picture of the back of the skirt with me wearing it, so here it is, up close and personal. You can see how the two fabrics have completely different textures.

To create the exposed zipper, I sewed from the hemline to the bottom of the zipper in a 5/8" seam allowance, just as the pattern suggests. For the zipper, I stitched from the waistband to the bottom part of the zip using a 7/8" seam allowance. At the zipper notch, I turned and stitched to the 5/8" seam allowance. Next, I clipped the corner diagonally and then pressed.

When I put in an exposed zipper, I use steam-a-seam to attach the zipper to the main fabric. That way I am able to re-position as necessary before pressing to 'set' it.

I had a great deal of fun making my skirt. I think it is a piece I will reach for again and again. It looks great with a tee shirt and flat sandals and also with the dressier lace poncho and heels. In the winter months, I will wear this with tights and boots.
Leather is fun to sew! I hope you'll make a full or partial leather garment!
Thanks for reading!
Sue from Ilove2sew!
Sue - I love your new skirt and you'll be glad to have it when the weather starts to turn!
ReplyDeleteThanks Carolyn! Yes, I will be glad to have a start on cool weather garments!
DeleteVery nice! Great job with the leather/ponte combo!
ReplyDeleteThank you Ann! :)
DeleteVery inspiring and beautifully made. Really appreciate the detailed construction suggestions and photos. Great use of fabric and pattern matching.
ReplyDeleteI have wanted a leather jacket for a long time. Haven't sewn with leather before and your instructions will be very helpful. Thanks for sharing. Nice job with the skirt!!! You will enjoy for many years.
ReplyDelete