
This week's post is by Tereza from the blog, Sewing for Me. She will be taking you through the steps of turning a basic t-shirt into a raglan sleeve tee.
Sometimes I get tired of starting the fitting process with new patterns, so I decided to learn pattern drafting. Personally, reading through the books was overwhelming and intimidating. I decided to start with pattern modifications to patterns I've used before rather than with blank paper. This mid-point has proved a great learning step for me and has still taught me some great drafting principles.
For this project, I began with my favorite t-shirt pattern-StyleArc's Adele Tunic. It is a basic tee with an asymmetrical hem, set-in sleeves, and an optional neckband.

To change a basic sleeve to a raglan sleeve, you'll need a straight edge ruler, tracing paper, a pencil, several markers in different colors, and pattern weights.


I start a project like this by tracing off a copy of my original pattern, so I don't lose a TNT pattern. Personally, I like using large pieces of tracing paper that I can easily purchase at the chain craft stores. I started with the pencil, then marked my changes with a colored pen so I could keep track of my changes. I also added to the .25" seam allowance to give me adjustment room just in case.
Step 1: measure off 1" below the armhole on the shirt front, back, and sleeve. This will lower the armhole seam. Because of the change to the armholes and sleeves, this adjustment allows for movement.


Step 2: Measure off 1.25" from the CF and CB on the front and back pieces. This will be the upper edge of the raglan seam.

Step 3: I used the sleeve notches as a measurement point to keep it easy. Mark a dot .5" above the notches on the front, back, and sleeve pieces. These are the lower edge of the raglan seam.

Step 4: Connect the dots on the front and back piece with your straight edge. Then cut along the line you just made.


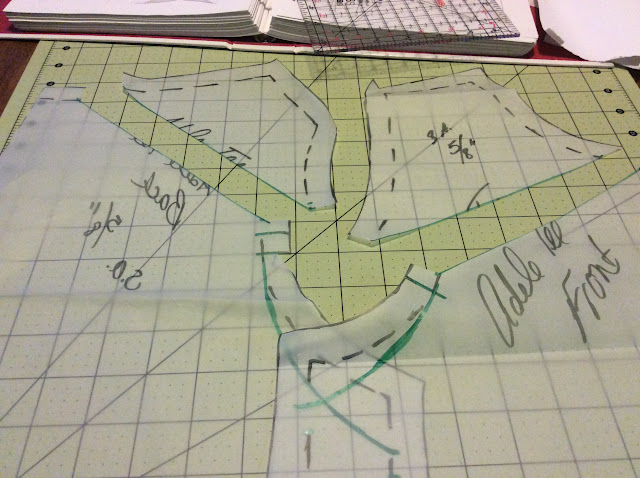
Step 5: Now you will match the dots to attach these new pieces to the sleeve head. It might be helpful to remove the seam allowances if you want. You will notice that during this step you do lose some of the sleeve head. Be careful to line up seams at the dots!

Step 6: Finally, you need to add the seam allowances to the front and back pieces. I also like to mark the new seam lines with the sleeve head dart that takes the job of the shoulder seam.

I also like to visually double check the seams to make sure that I didn't add anything that shouldn't be there. Then I made a sample! I'm glad I did, because I made an odd angle on the back piece. It was easy to fix, first by stitching a new line on the sample and smoothing out the seam lines on the pattern pieces.

Once I refined the fit and decided I liked the placement of the seams with the sample, I cut into my fashion fabrics. Here's how I stitched it up.
1) Stitch darts in sleeve heads.
2) Stitch sleeve backs to back, right sides together.

3) Stitch sleeve fronts to front, right sides together.

4) Stitch sleeve seam and side seam in one step.

5) Stitch/stretch neckband to finish neckline.
6) Hem sleeves and bottom hem the amount included in the pattern. Press and enjoy!


Every Monday throughout the summer, we will share with you a pattern hack on a t-shirt pattern.
Sometimes I get tired of starting the fitting process with new patterns, so I decided to learn pattern drafting. Personally, reading through the books was overwhelming and intimidating. I decided to start with pattern modifications to patterns I've used before rather than with blank paper. This mid-point has proved a great learning step for me and has still taught me some great drafting principles.
For this project, I began with my favorite t-shirt pattern-StyleArc's Adele Tunic. It is a basic tee with an asymmetrical hem, set-in sleeves, and an optional neckband.

To change a basic sleeve to a raglan sleeve, you'll need a straight edge ruler, tracing paper, a pencil, several markers in different colors, and pattern weights.


I start a project like this by tracing off a copy of my original pattern, so I don't lose a TNT pattern. Personally, I like using large pieces of tracing paper that I can easily purchase at the chain craft stores. I started with the pencil, then marked my changes with a colored pen so I could keep track of my changes. I also added to the .25" seam allowance to give me adjustment room just in case.
Step 1: measure off 1" below the armhole on the shirt front, back, and sleeve. This will lower the armhole seam. Because of the change to the armholes and sleeves, this adjustment allows for movement.


Step 2: Measure off 1.25" from the CF and CB on the front and back pieces. This will be the upper edge of the raglan seam.

Step 3: I used the sleeve notches as a measurement point to keep it easy. Mark a dot .5" above the notches on the front, back, and sleeve pieces. These are the lower edge of the raglan seam.

Step 4: Connect the dots on the front and back piece with your straight edge. Then cut along the line you just made.


Step 6: Finally, you need to add the seam allowances to the front and back pieces. I also like to mark the new seam lines with the sleeve head dart that takes the job of the shoulder seam.

I also like to visually double check the seams to make sure that I didn't add anything that shouldn't be there. Then I made a sample! I'm glad I did, because I made an odd angle on the back piece. It was easy to fix, first by stitching a new line on the sample and smoothing out the seam lines on the pattern pieces.


Once I refined the fit and decided I liked the placement of the seams with the sample, I cut into my fashion fabrics. Here's how I stitched it up.
1) Stitch darts in sleeve heads.
2) Stitch sleeve backs to back, right sides together.

3) Stitch sleeve fronts to front, right sides together.

4) Stitch sleeve seam and side seam in one step.

5) Stitch/stretch neckband to finish neckline.
6) Hem sleeves and bottom hem the amount included in the pattern. Press and enjoy!


Every Monday throughout the summer, we will share with you a pattern hack on a t-shirt pattern.
Don't forget you can sew along with us at home. Share you t-shirt pattern hacks (new ideas you have and ideas that we have shared with you) on Facebook and Instagram using #FMSummerofTshirts. At the end of the summer, we will compile all the people that used the hashtag and you will be entered into a random drawing for $75 gift certificate to Fabric Mart!
We've also put together a t-shirt inspiration board on Pinterest. Check it out HERE.
Wow, that was very interesting. You gave good instructions with your steps. I doubt I will ever be making that adjustment but you gave me something to think about. I've been sewing since I was 13 but moved on to quilts for the past 20 years. Want to pick up sewing for myself again so I will stick to fitting patterns. But I really enjoyed reading this. Thanks. Your tee turned out real nice.
ReplyDeleteVery nice! I love the colors and the fit. You look great!
ReplyDelete