Like many sewing addicts, I am often on the hunt for new patterns to try. I had seen lots of reference to Ottobre magazine but felt a bit intimidated by a new foreign mag. But then I reasoned that I got the hang of Burda and therefore, I can get through anything!
The moment I saw the preview for the Autumn/Winter issue (05/2016), I went right to the site and signed up for a subscription -- seriously, I want to sew about 75% of this one! They put out two issues a year; a Spring/Summer issue sometime in February and the Autumn/Winter issue in August.
Having read several reviews for the patterns I chose my size using their size chart. It is in metric but I am quite comfortable with that - I know my 3 key measurements in both Metric and Imperial off the top of my head. But also, as a scientist, I have so many conversions memorized. I'll spare you the rant about the US still being Imperial! :)
I used a size 44 for the neckline and shoulders, grading out to a 46 for the rest. This is standard fare for me. With Burda I use 40/42 and with Big4 I use 14/16. Sometimes I still have to make additional adjustments for bust/waist/hip but I've found that Burda (and now it seems Ottobre too!) assumes a curvier/fuller figure than Big4.
The pattern is meant for jersey but I think a double knit works out okay! I like it!!
Another important note; hem allowances are added, seam allowances are not. Whenever I make knit tops or dresses from Burda I always use 3/8" seam allowances. I did the same here. It just makes serging so much easier.
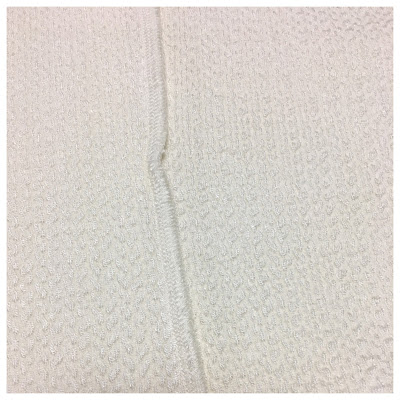
Speaking of...This view is designed to have a visible seam at center front and back. This is to be done using the rolled hem setting on the serger. I found some info on how to do rolled hems for my Brother 1034D and tried some samples and it worked really well. But that was on single layer fabric.
This double knit is very thick and it's textured. Makes for an awesomely cozy sweater, but not something that's willing to submit to a serged rolled-edge seam.
In the draped photo, you can see it falls into wide folds. It's lusciously thick and stretchy and soft...but the rolled edge wasn't going to happen.
I briefly considered sewing normal seams and topstitching on either side of the seam and decided against it. I had to use something much closer to a normal serger seam on front and back and it's quite a bit wider than a rolled edge would be.
Below you can see the texture of the fabric vs the solid (and spongey!) wrong side. You can also see my twin-needled topstitched hem.
This fabric took to topstitching very nicely. Single turn only - double turned seems like it would be far too thick. It takes a press but be sure to press from the wrong side. Pressing on the right side of the fabric left a shine mark and flattened the texture.
I recently discovered that all of my heavier winter sweaters were lost (either accidentally tossed or donated) in my move. So this is certainly a happy addition to my wardrobe!
Love that snuggly collar!
~ Nakisha from KS Sews


I love this sweater. It looks so cozy and stylish at the same time. I'm with you on imperial--I wish we'd just go metric in the US.
ReplyDeleteBeautiful make - very classy. I love your fabric choice. It is so easy to underestimate how much the thickness will add up, but you seem to have tackled that challenge to the ground. I am so glad there are so many yummy knits out there for the fashion sewist!
ReplyDeleteLove that sweater/top Nakisha! The color and fabric are beautiful.
ReplyDeleteI really like your top. I need some slightly warmer tops for winter and completely missed that one in the latest Ottobre. Thanks for showing it to us.
ReplyDeleteI love it!
ReplyDeleteThanks so much everyone!
ReplyDeleteLove it!!! I must make this pattern now before winter sets in.
ReplyDeleteLove it!!! I must make this pattern now before winter sets in.
ReplyDeleteFIESTA and the Ivory is Magnificent ;)
ReplyDelete