
Made by a Fabricista: There's Navy and Then There's NAVY


I went very bright for my last make so I decided to tone it down with a neutral this month. Navy is a neutral that I lack in my wardrobe as I default to black often so I'm trying to remedy that. The first is a very soft jersey knit with uneven stripes and the second is truly a luxurious wool stretch twill. My plan was to sew a coordinating outfit, but as soon as the fabric arrived I realized that all navy blues aren't created equal. Unfortunately, the two blues were just too different to work together. This was totally my fault as the wool twill description literally states "the darkest navy". Still I love both fabrics so I sewed my original plans, it just seems that these two pieces won't be worn together. Thankfully, I recently purchased this RTW light weight sweater that is a better match to the twill.

Not the best lighting, but trust me they are different.
Let me first tell you about the wool twill suiting, as I am in love with it! Some stretch is a MUST for me in pants and this twill offers four-way stretch thanks to the 5% Lycra content (40% across, 30% lengthwise). The soft feel was the first thing I notice while unboxing and though you can tell it's wool, it's not itchy. I often think heavy and thick when I think wool, but this is the perfect suiting weight. My favorite feature is the drape, which is why I opted for wide leg slacks. Trust me and order yourself a few yards (here). It's in the 70% off category and is a STEAL. The description of "darkest navy", as mentioned above, is accurate as you almost have to hold it up to something black to see that it is in fact blue. I truly wish this was available in multiple colors as I would purchase all of them! I may have to order more for a skirt and/or blazer.


I used Simplicity 1017, which is an Amazing Fit pattern, for these wide leg slacks. Amazing Fit patterns have always worked well for me, though this is my first Amazing Fit pants attempt. They typically feature classic silhouettes which is awesome for newbie as well as experienced sewists. The detailed step-by-step instructions provide a method of construction that allows you to fit as you sew. All of the fitting seams, ie side seams in these slacks, have a built in 1" seam allowance to allow for fitting adjustments.


I do have one tip that I learned for a sewist on Instagram (I really wish I remembered who shared it) and want to share with you. When you have facings that required a finished edge sew the iron on interfacing with RSF along the edge that needs finishing, trim the seam allowance and then fuse the interfacing WSF. This results in a clean finished edge that does require moving to you serger, adding bulking bias tape or switching your stitch to a zig-zag. 


Now that I have this fit down, I see myself sewing these over and over. They may be the only slacks I wear to work! Don't you just love when you pair great fabric with the perfect pattern? I know I do. This project was definitely a perfect pairing.


Now let's talk about this simple tee I sewed using Simplicity 8177 (which contains a great tee pattern that is often overlooked). Sewing a tee is pretty simple if you're familiar with working with knits, but matching stripes on a jersey fabric can be tricky. The safest bet to keep the stripes straight is to cut out each piece on a single layer but this would mean tracing the front and back pieces to create a full piece. To avoid that (because I'm lazy) I carefully laid out my fabric and then folded over just enough to cut the front piece before pinning the selvage edge aligning the stripes. This helps to ensure the fabric doesn't slip and it prevents the selvage edge from curling up.


When placing the pattern piece I line up a particular feature of the pattern, such as a notch or a dot, and make sure it lines up with something on the fabric. Here I use the extend/shorten line on the back and line it up with the bottom of a white line. Then when I cut the front piece I set up my fabric the same way and line up the extend/shorten line up again with the bottom of the white line. This ensures my side seams will line up. 


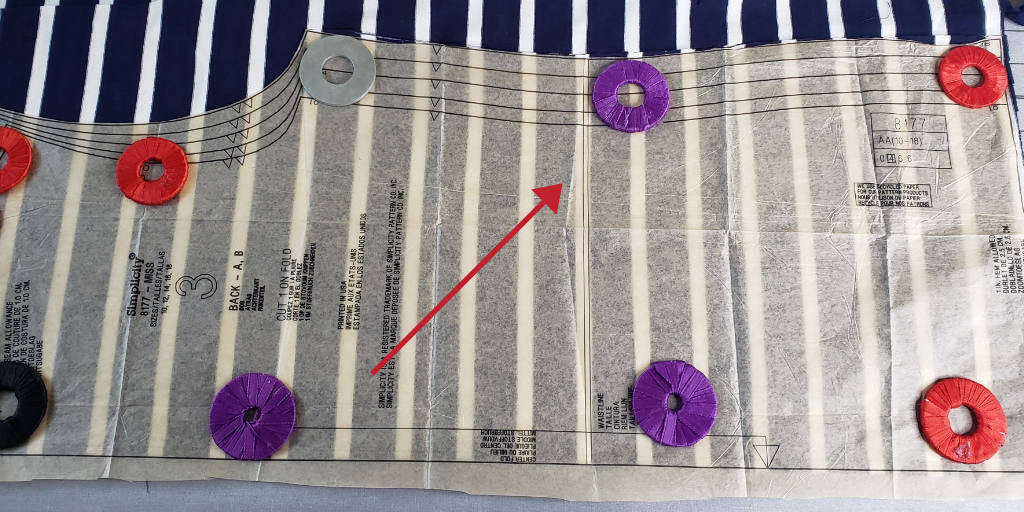
When sewing I take the same approach and pin the seams together lining up the stripes. Though this is a thinner jersey I didn't have any issues sewing it up. To be extra safe you can use a walking foot which helps your machine feed both layers under your presser foot at the same rate, so you lines stay aligned.
I don't worry so much about matching at the sleeve seam because lining up
stripes along a curve is annoying, but look at that side seam!
I love my tee and this jersey is so smooth and soft that it's a dream to wear. Sometimes these types of basic makes don't get much love, but they are usually the items that get the most wear. 


What are your favorite basics? and which fabrics do you keep on hand for those types of projects?


Comments

  1. I love this post. The pants look wonderful and I may need to try again, the fba (full bum adjustment) is a big challenge. Classic look that is a great staple in any wardrobe.

    ReplyDelete
    Replies
    1. Thank you! I too typically need a BBA (big booty adjustment is what I call it), but I didn't add anything to the back rise and surprisingly cut the average back based on my measurements. In hindsightI should've added maybe a 1/2" to the back crotch, but in this fabric which has a vertical stretch it's fine. I definitely say give these a try.

      Delete
  2. Nice job. I feel your pain on the navy that doesn't match. I've also had black that doesn't match. Seems impossible, but it can be too brown looking and not go with anything.

    ReplyDelete

Post a Comment

Thanks for leaving a comment! All comments are reviewed before posting to help us eliminate spam. Your comment will be posted within 24 hours.

Popular Posts You Might Like

Made By A Fabricista: Sewing Summery ITY

Hi sewing friends! I’m dropping in to share a few makes sewn with ITY fabrics and inspire you to try out this slinky, cool-to-the-touch fabric for hot weather if you haven’t yet, or to recommend some patterns that work fabulously if you already love it. This is by far my favorite knit to wear in summer. Since it moves easily there’s lots of airflow, and it just skims the body. More often than not, it has a four-way stretch that doesn’t grow when worn, so it works great for loads of styles.  ITY stands for Interlock Twist Yarn and the knit gives it some wonderful drape and stretch. There are lots of different weights and even some differing textures. Because it’s so fluid, the fabric really resists most wrinkling. I’ve sewn three different weights and prints here to show off just what ITY can do!  This white floral is a lighter weight and features a slightly crepe-textured finish, and I think that combined with the large and spread-out floral makes it quite elegant and eye-cat...

Made By A Fabricista: I Sewed a Chic Matching Set with Fabric Mart Knit Fabric

There’s nothing I love more than sewing a project that is both stylish and comfortable—and this one checks all the boxes! For this make, I paired two Pattern Emporium designs with a gorgeous designer knit fabric from Fabric Mart, and the result is a matching tank and wide-leg pant set that’s as easy to wear as it is to sew.   The Fabric Fabric Mart always has hidden gems, and this designer knit caught my eye right away.  It’s the Urban Taupe/Gold/Black Polyester/Lycra MK Chain Print ITY Knit - NY Designer - 56W.  The weight, stretch, and drape made it perfect for both a fitted top and a flowy pant. It’s soft against the skin, has great recovery, and presses beautifully. When working with knits, having a fabric that behaves well makes all the difference. The Patterns To build my set, I chose two favorites from Pattern Emporium: • The Works Tank Top – Simple, classic, and versatile. It skims the body just right and works beautifully as a layering piece or on its ow...

Made By A Fabricista: From Paris with Love!

Bonjour! I am still in bliss from my recent trip to Paris!!  It was much more than I expected and I absolutely fell in love with the city. I can honestly see myself living there one day. I knew before leaving I wanted to make something to fit into the Parisian landscape because I knew it would be a special opportunity. I was inspired by one of my favorite fashion creators Juliette Foxx. Her checked gingham corset and wide leg pants were on my list to remake. For fabric I used this red and white pin stripe denim twill and deep red sateen for the pants.  The pattern I used for the corset was McCall’s #M8182 with a few modifications.  The fit was a little large so I took it in along the sides and shoulder seam.  I then lowered the neckline since the shoulders were taken in. I used the sateen as my lining which gave a great contrast.  My pants are my unreleased pattern which happens to be exact from the inspiration.  I drafted these last year and have been wo...