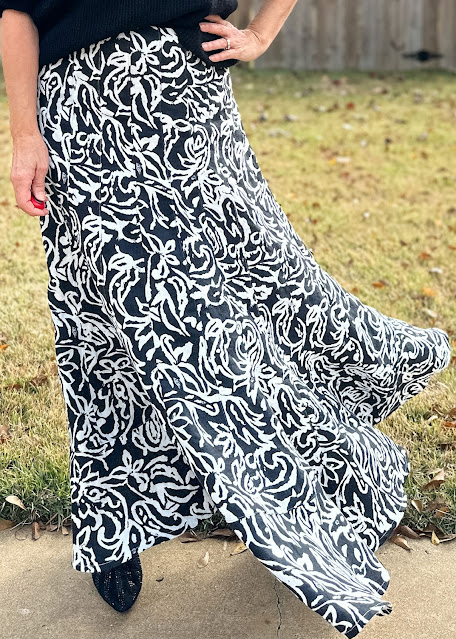
Hello Sewing Friends! It’s Sharon from Sharon Sews with my last post for 2024! This time I used one of my favorite fabrics, linen. Fabric Mart usually has an excellent selection of linens. I should know as I’ve ordered my fair share over the years. This time I choose a medium-weight 100% linen with a black and white abstract print.
When I ordered the fabric, my plan was to use an old Issey Miyake pattern and sew myself an oversized linen coat. But when the fabric arrived it told me it would be happier as a skirt. Your fabric also talks to you, right?
I’ve been drawn to the look of satin bias skirts paired with oversized sweaters but knew that skirt style doesn’t work on my body shape. Plus, once the holidays are over a satin skirt would just sit in my closet. But a linen skirt, in a neutral black and white print, could be worn during the winter months with boots and a sweater and easily transition to warm weather with a tee and sandals.
I decided to sew Vogue 7767, which was released in 2003. I remember this pattern was a big hit in the sewing blog world and of course I wanted to sew one also. I purchased the pattern and here I am, only 21 years later, finally sewing the skirt!
I do wish I had sewn it decades ago, as I really like my new skirt. The movement of this skirt when I walk is divine!
The skirt is simple to sew but does takes some time as there are 20 panels – yes, I wrote 20! Once the panels are sewn together (and edge stitched) the bottom flounce is added. The bottom width of this skirt is 173”, which is why it has such great movement when walking.
On one of my Pinterest boards, I had saved a black designer skirt trimmed with red, yellow, green, and blue buttons. I used that as inspiration for the edge stitching on my skirt panels with each seam alternating between the four colors. It’s very subtle and can’t be seen at a distance, but I know it’s there and it makes me smile.
In my bobbin I used 60-wt white bobbin thread and red, yellow, green, and blue Isacord threads. These are typically used for machine embroidery, but they can be used for non-embroidery projects like I have. I also used an edgestitch foot (on my BERNINA machine it is a number 10 foot). If you don’t have one, it’s one I would suggest adding. I use mine often and it ensured the stitching on all 20 seams was nice and even.
The waistband is finished with an interfaced facing. I used Palmer/Pletsch PerfectFuse Medium Fusible Weft Interfacing, which is available from Fabric Mart. Normally with a faced waistband, especially in a fabric like linen that could stretch with wear, I would also add a stay tape along the upper seam line when stitching the facing to the skirt. However, I forgot to add it to this skirt, and fingers crossed the interfacing and multiple seams will keep any potential stretching under control.
Instead of a lapped zipper, per the instructions, I added an invisible zipper. They are my go-to zipper as I find them so easy to insert.
In addition, I added an interior tab closure for the hook and eye, which not only looks nice on the inside, but it takes some of the pressure off the zipper.
This is how I created mine:
A) Cut a piece of fabric 1-1/2” x 5” for the tab
B) Add a piece of fusible interfacing to the back of one-half of the tab
C) Fold it in half (right sides facing) along the width, stitch using a 1/4” seam allowance, turn right side out and press.
D) Place the unfinished edge of the tab along the unfinished edge of the right side of the facing and baste. When that edge is turned under to wrong side, the tab will extend out.
For a pattern that is 21 years old, the skirt in this linen print is quite current, proving that the saying “everything old is new again” is true.
SHARON | @thesharonsews


Beautiful work. The topstitching is perfection.
ReplyDeleteThis comment has been removed by a blog administrator.
ReplyDeleteWow! Your skirt is fabulous! I'm glad you listened to your fabric and gave it what it wanted. 😚
ReplyDeleteSharon I like your outfit. I have some patterns from the 1990s that I use over and over.
ReplyDeleteBeautiful work Sharon. You are one of my favorite fabicistas!
ReplyDeleteI love it 💗
ReplyDeleteLove love love the whole outfit! The skirt looks well made and fashion forward. Nice work!
ReplyDeleteLove this! Question: did you wash the fabric prior to construction or do you plan on dry cleaning it when needed? This fabric is still in the store and I think it’s time I ordered some. Currently my go to skirt pattern is a wrap around skirt, Simplicity 1069, view D. Since I have slowly been losing weight over the past couple of years using the wrap pattern removes the stress of adjusting the pattern with each size change.
ReplyDelete