

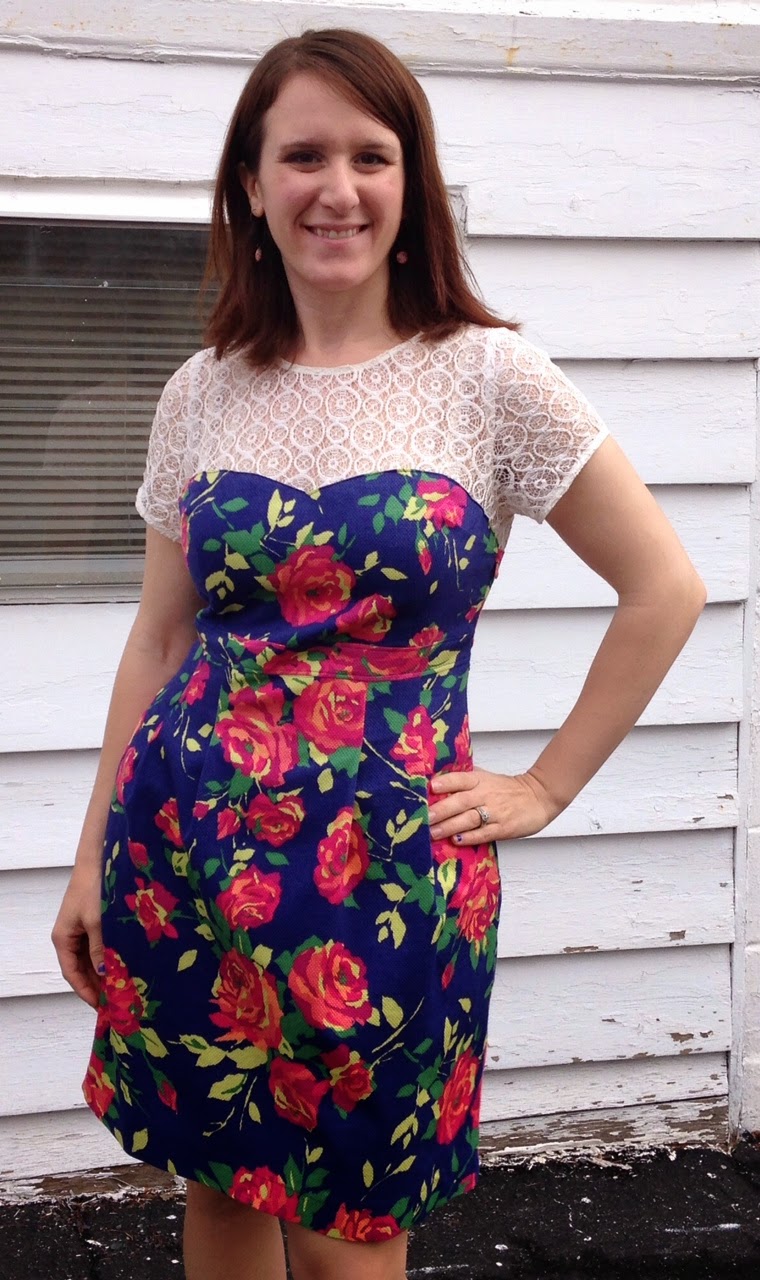
Does this dress scream Spring or what?! I love it! I have to admit I sewed this back in February to keep my spirits up during the frigid weather. But have not had time to blog about it!

I used Colette Pattern's Macaron dress. This was my first attempt at a Colette Pattern. I saw a lot of good reviews, so I felt like I couldn't go wrong. Once I figured out whether I was making the correct size or not, the dress sewed together like a breeze. I had a lot of trouble getting the bust to fit correctly. I made multiple muslins only to get frustrated and take a breather for a week. I did not want this to be left in the pile of unfinished projects because I really had my heart set on it working. With a lot of patience, I made it work!

I chose the Joyful Garden Cotton Pique for the dress fabric. It has some stretch to it, which makes fitting it nice because you can make it fitted and still have the stretch for movement. For the yoke, I found a beautiful cotton lace during one of my business trips. I had been on the hunt for the perfect lace for a long time. I wanted a sturdy, non-stretch lace. I didn't want it to be too delicate because it would literally hold up the rest of the dress. I definitely didn't want it to sag with time. The lace looks delicate, but has more stability than you think it would. Perfect match!

Choosing my size - As I said earlier, I had a hard time choosing my size. I cut out the first muslin in size 12, based off of my bust measurements. But then I realized the bust was too big. So I cut out another muslin in size 10. That worked much better, but should have probably cut size 8, based off of my high bust measurement, then do a full bust adjustment...but I didn't! I had to sew a larger side dart with the size 10 but it was much better than when I cut out the size 12. I also had to take in 1/2" at the top of the side seams and taper to blend with the high waist. It was a little tricky considering there is a side zipper (invisible.) I used a pink invisible zipper. I have a number of invisible zippers in my stash that I've picked up along the way, and of course didn't have any that matched the fabric, so this was the next best thing! It looks great! When sewing the shoulder seams I had to use a 7/8" seam allowance, rather than 5/8". I think I should have done a full bust adjustment to eliminate all of these issues, but really didn't feel like doing it! (I know, that's really bad!)

Ooops! It doesn't match up all that well after a few last minute alterations, but I'm not concerned. That's hidden under my arm!
I had no problem fitting the dress bottom. It fit well and the pleats in the front actually looked good too. I was worried that they would puff out too much, but I pressed them good, so they stayed.
Because I used lace for the yoke, I did not cut out the facing pieces. Also on the sleeves, the pattern called for four sleeve pieces to be cut out, then sewn together for lined sleeves. Instead, I made my own bias tape out of cream silk I had in my stash.
So how did I do this? I cut out 1" strips on the bias. With right sides together I pinned the bias tape to the lace, stretching the silk ever so slightly to go around the curves.

After sewing the bias onto the edge of the sleeve, I folded it in half, encasing the raw edge, then folded it up, so the bias was not sticking out below the lace. Then I sewed the bias in place.

The finished edge of the lace sleeve. I also used this technique along the neckline rather than cutting out the facings, which would show through the lace. The bias also gave the edge of the delicate lace some stability.

The bias also gave the edge of the delicate lace some stability.

Overall, I'm really happy with the way the dress turned out. I would like to try it again, but do a full bust adjustment. I found a great tutorial on the Lazy Stitching Blog. Now I just have to put my mind to it! (If you've read my last two posts, you hear FBA mentioned a lot...)

What are you sewing for spring?
~ Julie
Love the lace top!..You did a super job putting it together. I also like the dress part. I just think it would have worked better if there had not been such a strong contrast between the two fabrics, one delicate, the other bold. JUsT my opinion...
ReplyDeleteGlad you liked it! I wanted there to be a contrast in the yoke and dress. I actually didn't care for the dresses I saw with opaque fabric on both yoke and dress.
DeleteLovely job! I love the pique you chose for this dress, and I bet cotton lace is much more confortable than something synthetic.
ReplyDeleteThank you! The lace is very comfortable. It was worth the search!
DeleteThat is so cute! And thanks for the great review of the Colette pattern. I also love how you finished the lace sleeve. So pretty.
ReplyDeleteI received that very pique in a bundle from you all and I literally squealed. So very springy and preppy. I think I am going to make a cute pair of pants from them. One day!
Would love to see those pants when your finished! :O)
Delete