A little while back,
Fabric Mart had the most adorable elephant printed cotton fabric available,
and even though I wasn't 100% sure of what I wanted to make with it, I
figured it would go fast, so I took a chance and purchased three yards
of it, knowing I could likely make three yards work for something!
After receiving it, and seeing all the ridiculous craziness that came with the
Target/Lilly Pulitzer collaboration,
I decided I *had* to make a Lilly inspired dress from this fabric AND
because it is pink and green, I knew that if I didn't make a dress for
my daughter from the same fabric, I would never hear the end of it. ;-)
Well it turns out, upon doing research with Mr. Google and Miss Pinterest, that I happened to have bought actual Lilly Pulitzer fabric from Fabric Mart, or if it isn't actual fabric from them, it is a darn good duplicate. Above you see some items from Lilly Pulitzer's 2014 summer line! And, yep, those look an awful lot like the dresses I sewed up!
My biggest proof, though?
This pin from Pinterest which shows the fabric close up. It was pinned by none other than the folks at Lilly Pulitzer. The fabric was named "Forgot My Trunks," lol.
So yahoo! I ended up with fabric from my favorite fabric store that made my dream of making mommy and me Lilly Pulitzer dresses a reality, literally!
(And, psst, it looks like something *like* "Roar of the Jungle"
is available at Fabric Mart right now, too, but only a few yards remain.) Sorry, sold out now!
So what to do with the fabric and how could I make it look super "Lilly?" Well, I knew I would have to do a shift dress of some sort, and definitely had to use a crochet lace trim, since so many of her dresses feature that kind of detail.
I had some of this trim in my stash, and it was the exact right shade of white to perfectly work with this fabric.
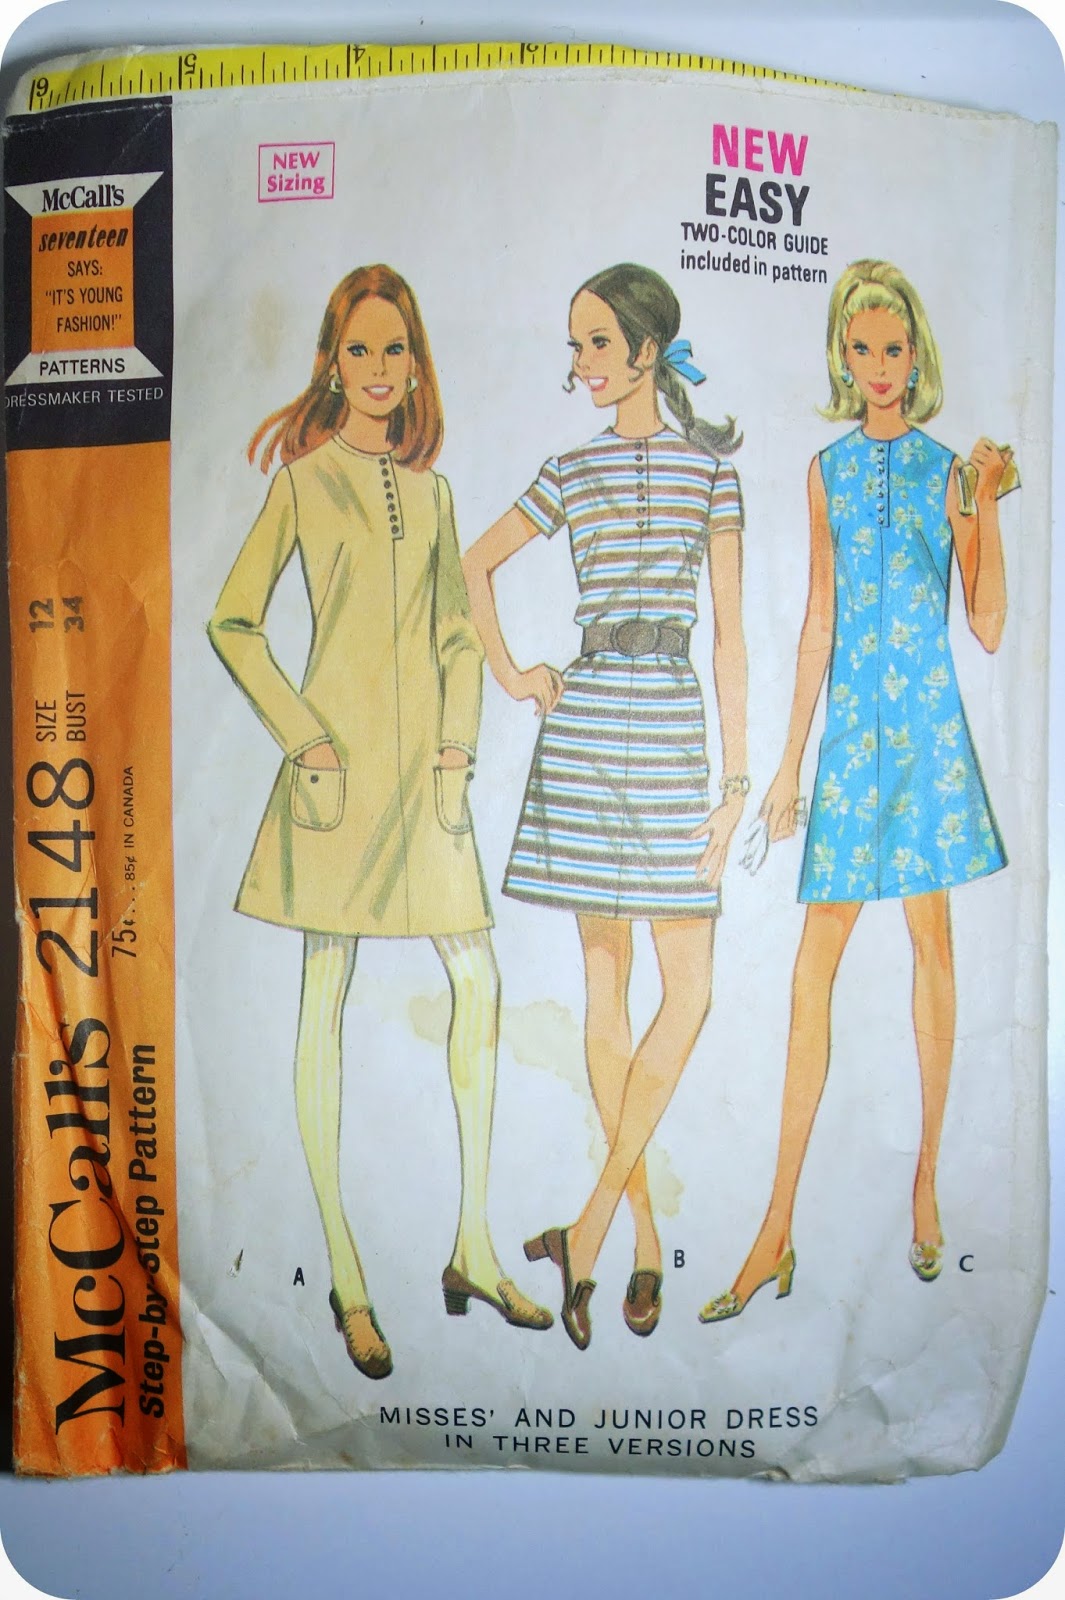
I knew that I wanted the dress's trim to be placed on the center of the dress, in a vertical fashion, and though I could have eyeballed placing the trim down the center had there not been a center front vertical seam, I was glad I decided to go with a vintage pattern that had the seam there as it made placing the lace trim much easier (
which I will show you more of down below). I also liked this pattern (
McCall's 2148--circa 1969) since it featured a front button placket. Though I slightly lowered the neckline and did away with the buttons, having that feature already integrated in the pattern made adjusting for the split neckline design detail much easier, too.
I own only one "Lilly" dress and I have to say, my sewn version looks really close in style to what I have seen out there from her over the years,
especially from her beginnings, when her hemline choices were a bit longer (
they are super short today, especially for the women's line), and she featured more of a classic shift shape as opposed to some of her current pieces, which hug the body's curves more.
In fact, they only way I ended up getting my Lilly dress was from a consignment store, since most of the time Lilly dresses are too loose at the bust and too tight at the hips. The consignment store owner and I speculated that the size 10 dress I purchased had been altered at the shoulders and bust since all of the women who came in the shop and tried the dress on couldn't wear it because it was too tight at the bodice, when the size 10 normally fits them well. More than likely, someone with my pear shape purchased the right size for her hips, but paid someone to fix the bodice to better fit her smaller upper body. :-) Well, turns out I can do that too with sewing my own garments!
I wasn't set fully with the vintage pattern I chose, though. As per usual, I had to do a square shoulder adjustment (
adding a full half-inch to the end of the shoulder line), and I had to grade out from the size 12 at the bust and upper waist to a 14 at the high hip and a size 16 at the low hip. This is a one sized pattern, but I have done enough grading for shapes like this in the past that I pretty much knew where and how I needed to grade out. I am so glad I did both since I am 100% certain this pattern, as it was originally, would have been far too tight from the high hip down if I hadn't altered it. :-)
I love how this dress fits, just enough give to be comfortable, but fitted enough to show off a bit of my shape. I do like the dresses that came in this fabric, but ooh, boy, they seem very fitted and very short, and I am just not comfortable doing that, and I never have been.
The one place I did let loose a bit was at this split neckline. It is a bit lower than I usually wear, and because of that, I need to wear a camisole for modesty, but it is just a peekaboo, so really, no big deal.
I love how the lace looks with the split neckline. I wasn't sure how it was going to turn out, I was really concerned it would look to "becky home-ecky," but in the end, I think it looks close enough to the "real thing" that the trim is more successful. It also helps that the trim is a bit thicker (
1.5 inches width) and made from cotton crochet lace, which is less transparent than other lacy trims out there.
The trim was a bit time consuming though. I placed it, by hand, and with pins, up and down the center seam, with one edge of the trim abutting the center seam. I then sewed the edge closest to the seam as close to the threading of the trim as possible. I then sewed the middle floral decoration bit, and I finished up by sewing the other edge of the trim on the other side. So that makes for three full sewn vertical lines PER lace trim. There are two lace trims here, each on one side of the center seam. This makes for a total width of three inches across, which gives the front of the dress some presence and makes the dress look more interesting.
Though my ultimate goal was to get a photo of my daughter and I wearing the dresses, I couldn't resist my youngest son's desire to be in a photo, so here he is, posing with me for a photo.
So here is my daughter on her own posing in her new dress. For her dress, I chose to use one of the patterns in my stash that she is on the edge of outgrowing,
Butterick 5876, which goes from size 1-6. My daughter can wear a size 6 very easily, but often the length is too short, so I will have to size up to a 7. This time that happened, but because of the shape of the dress and the season, it's okay that it is a touch shorter than her other dresses. We will probably let her wear it with leggings to church, too.
I chose this dress because it had a built in place for the crochet trim embellishment, at the junction between the border hem and the main part of the dress. Though I didn't end up doing the border hem detail, I was able to use that seam line to mark where the trim should be placed, and it ended up being perfect! I may love her dress more than mine!
I hadn't realized that this pattern called for an integrated facing which spans the neckline and the armholes (I have done these before in baby overalls). I thought the back would have a zip, so I bought an extra pink zip only to find out that there is a slash at the neck along with a button closure. I didn't have a perfect button, so I used one from my stash that was okay enough. Turns out that my daughter loves that feature the most, so yay, I guess? :-)
Here is the front and back views of the dress on its own. This dress took far less time to sew up than mine since I chose to sew up the side seams with the serger, and there were no back or front center seams to sew, either. The trim still took time, though, since I had to sew three times per trim (and like mine there were two trim treatments, one for the front, one for the back).
Okay that's it for me for May! I hope you enjoyed this special "Lilly Mommy and Me" post. :-)
And just in case this inspired you to try it for yourself, above are some vintage Lilly Pulitzer dresses that I found while doing my research. I already feel inspired to try another set of dresses soon!
Happy Sewing!
~Dina of
My Superfluities.


 .
.


You did a great job. You and your kids look so cute! Thumbs up Dina!!
ReplyDeletewow - i totally thought the matching dresses were from lilly pulitzer (or lilly for target, since there are some dresses from that line that are almost identical). very pretty!
ReplyDeleteWhat lovely dresses! I love the fabric print. Great for Spring and Summer. What a great Mother's Day project. Your mini you is beautiful just like her Mom.
ReplyDeleteThose are beautiful dresses, Dina! Your son and daughter are just adorable as well. I really like the lace accents.
ReplyDeleteI agree with Ann, these are just beautiful! I love the fit, the fabric, the lace accents, and your little models are just darling!!!
ReplyDeleteWOW! I had the exact same idea....I have Lilly fabric in my stash, and chose a very similar pattern with the split neckline (McCall's 7014/no pockets). I was so aggravated about not getting anything at the Target sale (I stayed up all night!). Did you sew the lace on last on top of the finished neckline? Fabulous job!
ReplyDeleteHi, Eileen, Ooh I want to see what you make! That sounds great. :-)
DeleteSo I sewed the lace on first before I finished either the neckline or hemline. I left a bit of a tail on either end, and when the time came, I sewed up the hem like you see above, and with the neckline, I sewed the facing on top of the lace, so that when it was turned back into the wrong side of the dress, the excess lace was now under the facing. I think it worked out well.
Hope your project goes well!
Thank you Dina. I absolutely love the dresses you made. Will post when I make the dress (on your blog)
Delete